The Cue Library
When building a show with a group of tracks, there will often be a shared set of lighting looks or presets that will be useful in more than one track. Once you have set up a cue that sends the proper messages to achieve that look, you can make it available for reuse in any track by adding it to the Cue Library. To do that, choose Add Cue to Library from the Cue context menu.
|
The names that appear in the Cue Library are the names (comments) of the cues that have been added to it, so it makes sense to make sure your cue is well named before adding it to the library, although you can rename them later using . This image also shows the strip of phrase information which appears along the bottom of a track on which the DJ has performed phrase analysis, which can be very helpful in figuring out good places for cues, and can now even be used to power Phrase Triggers which work across tracks. |
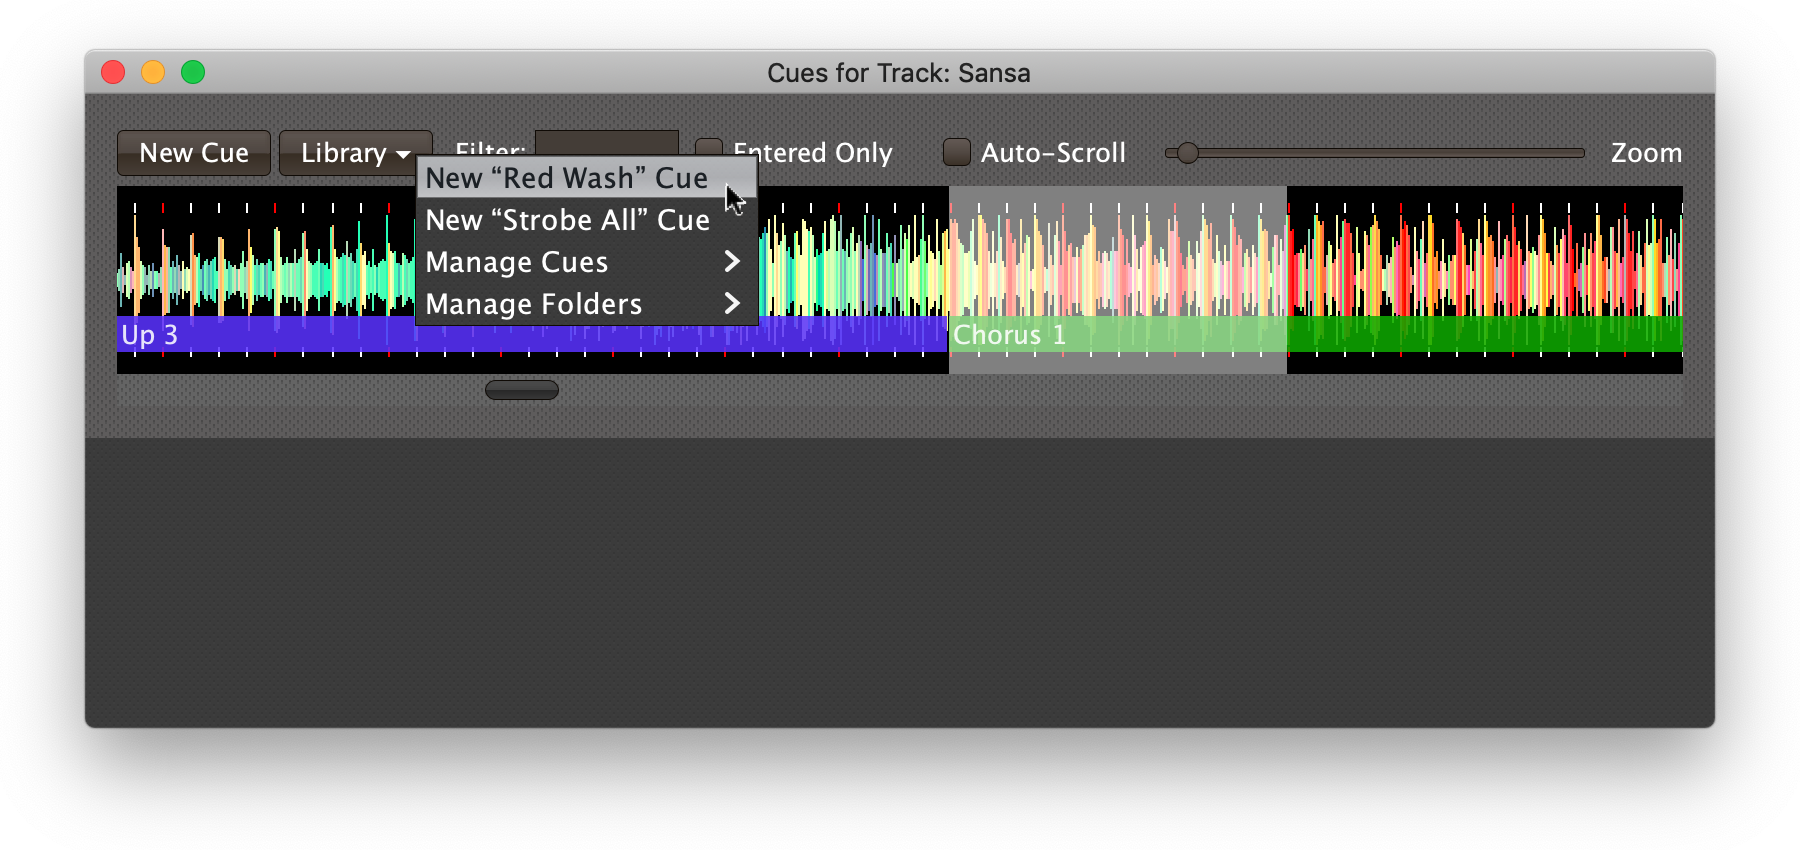
Another way to choose a cue template from the library is to right-click (or control-click) anywhere outside an existing cue in the waveform at the top of the Cue Editor window:
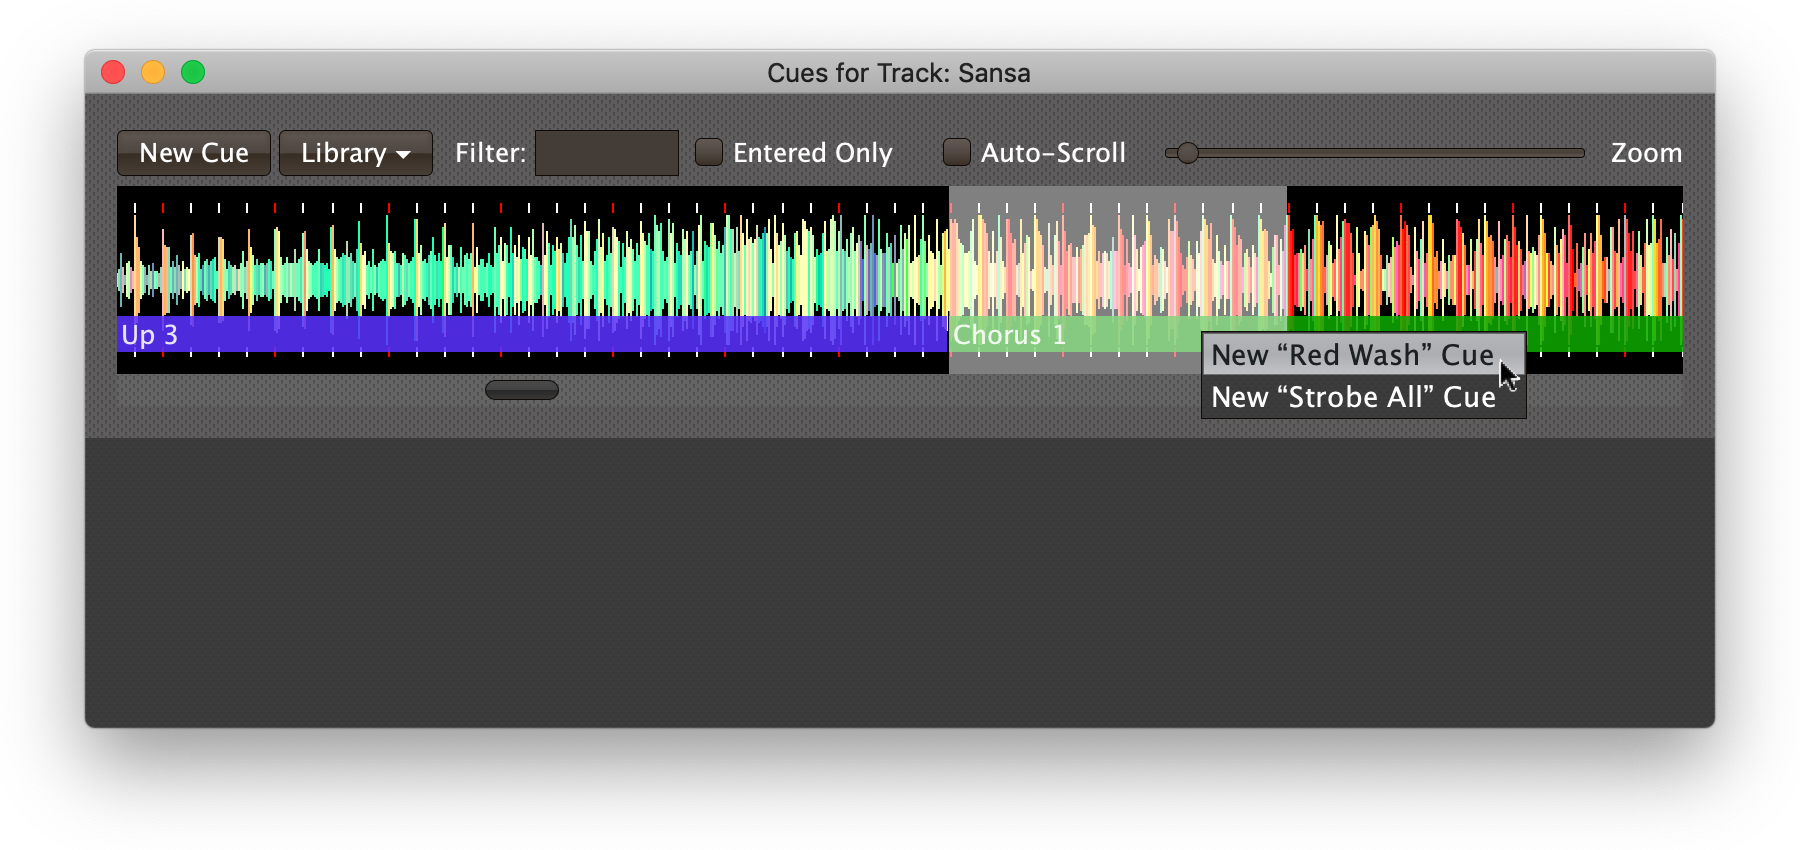
Using either of those approaches to choose New “Red Wash” Cue in the menu would result in the creation of a cue based on that template in the selected region of the track:
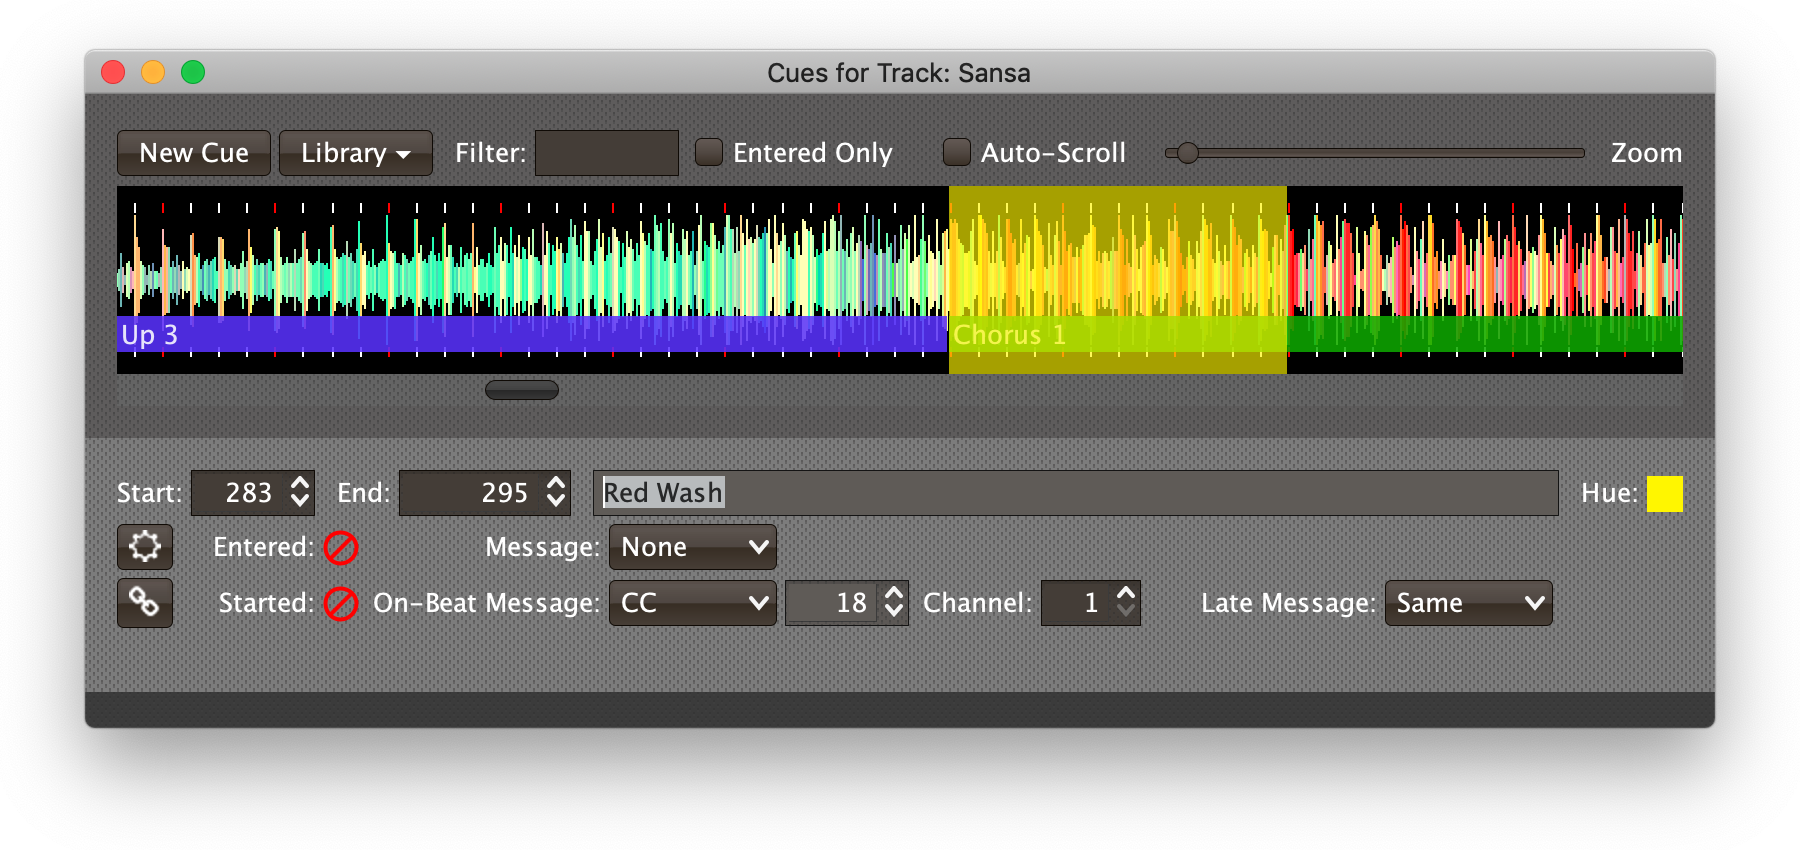
The new cue will share any of the MIDI message configurations and Expressions that were present in the cue that was added to the show library.
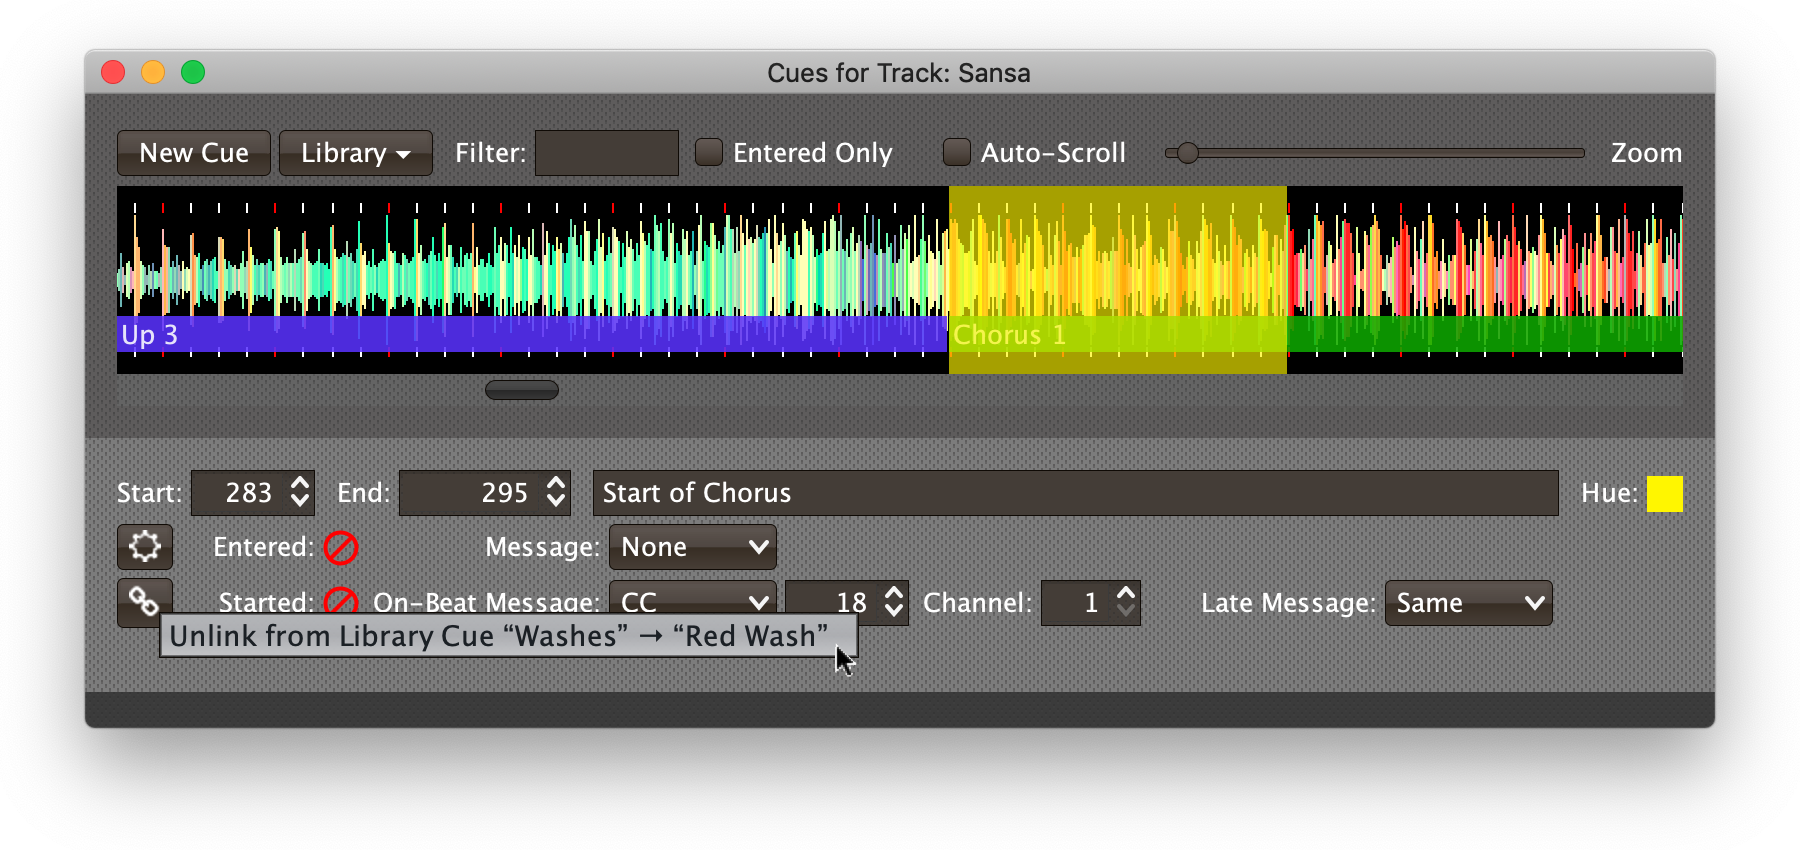
Linked Cues
The linked chain in the Link button towards the bottom left of the cue row indicates that this new cue is linked to the library cue from which it was created. Any changes you make to this cue (apart from the location, name, and display hue of this copy) will instantly be applied to the library cue, and to any other cues that are linked to it, whether in this track or in any other track in the show. This makes it very easy to keep your related cues working the same way.
| If you do want to make notes about the specific role this copy of the cue will play in your show, the comment text (“Red Wash” in this case) starts out selected as soon as you have created it, making it easy to update. |
If you ever have a cue that started out linked to a library cue, but you want to make it work a little differently, you can break the link using the link button:
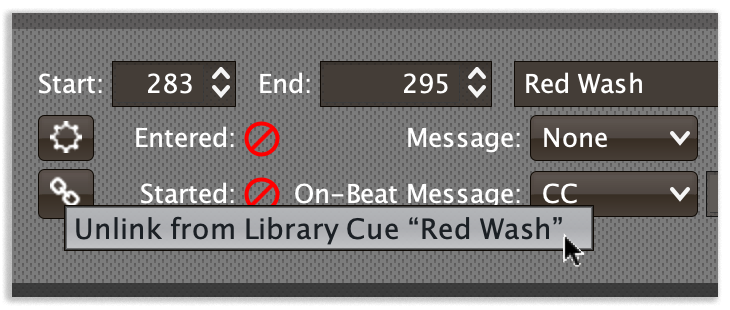
Once you’ve done that, the cue will exist independently, and changes you make to it will not affect the library nor any other cues. The link button changes to show a broken chain.
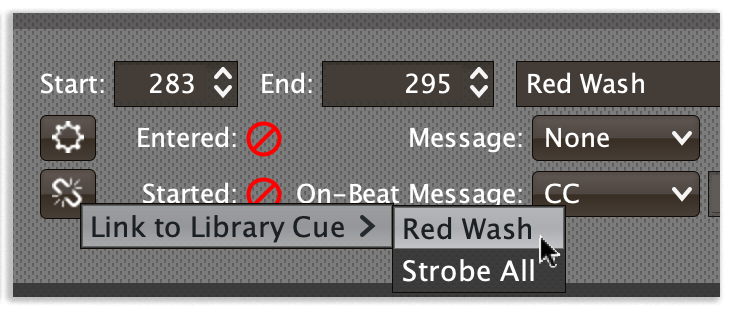
If you change your mind and want to re-link it, you can use the link button again to do that. In the same way, you can link together any cues you created without using the library, if you ever decide they should be linked. Simply click the link button in each cue you want to link, and chose the library cue that you want it linked to:
|
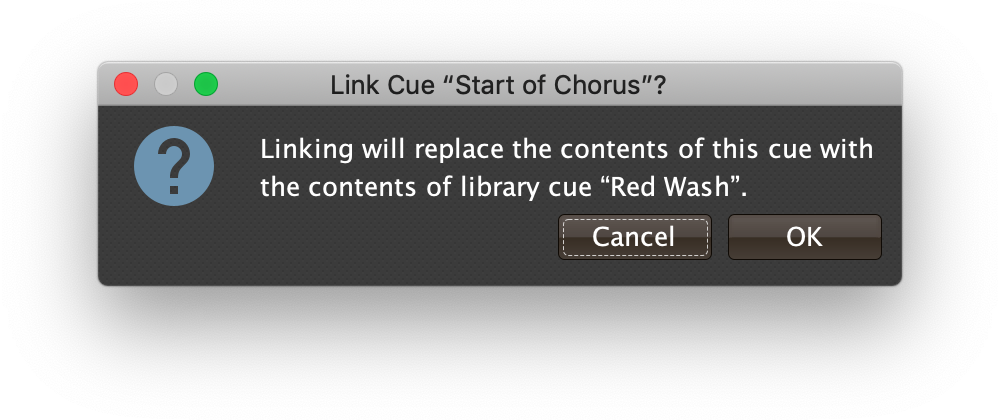
If the cue you are linking to a library cue has any different message configuration or expressions, they will be replaced with the versions in the library when you establish the link, so you will need to confirm that you want the linking process to proceed.
|
If you create a library cue that is more like a template whose details will be adjusted every time you use it, then it does not make sense for each cue that you make from that library cue to start out linked. You can change that by adjusting the library cue configuration, as we explore next. If you are ambitious, you can even write some code to build a user interface to automate the process of building new cues from your library cue.
Configuring Library Cues
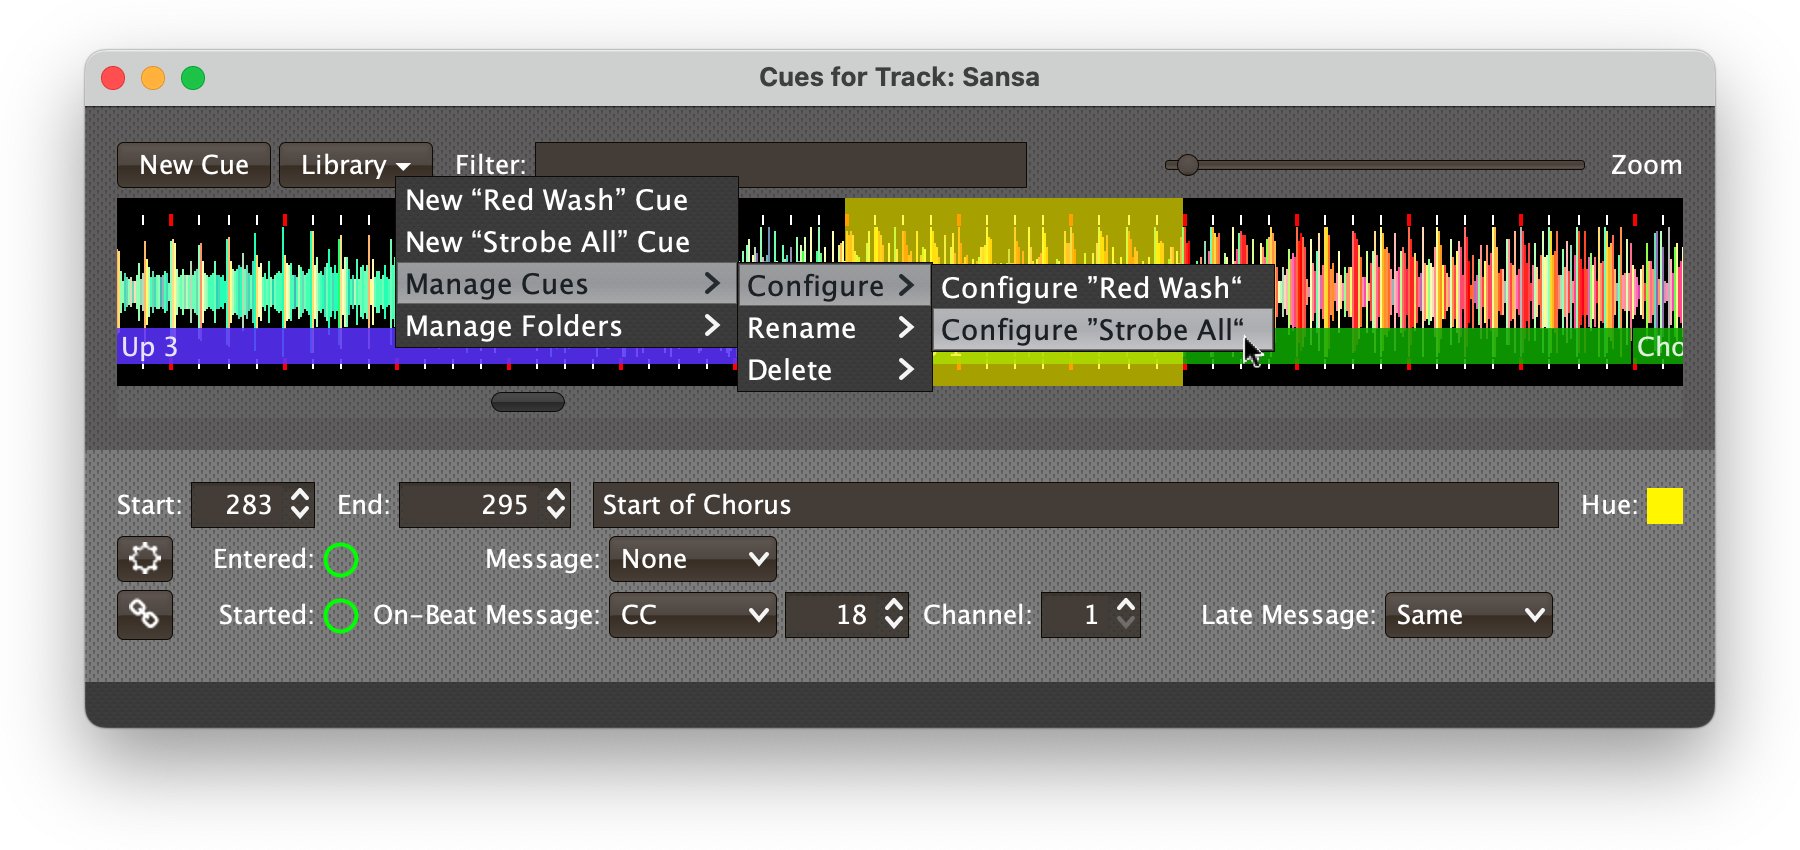
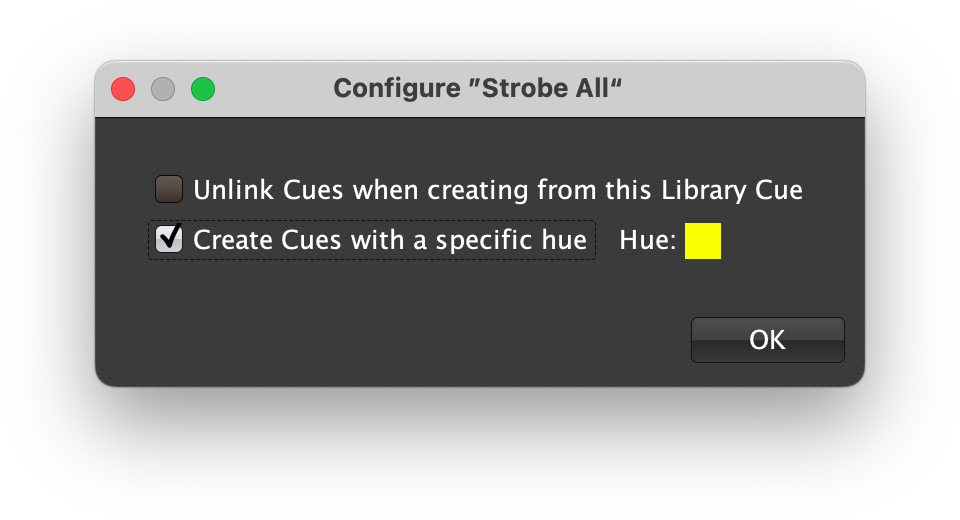
The normal behavior when placing a new cue based on a library cue is to assign it a new color and leave it linked to all other cues created from the same library cue. If you want to change either of those characteristics, you can configure the cue. For example, maybe you want all your “Strobe All” cues to have the same yellow hue to easily recognize them at a glance on all your tracks. To begin, use the menu to open the Configuration window for the cue:
To stop assigning new hues to each cue placed from this library cue, check Create Cues with a specific hue. This displays a hue swatch which you can click to choose a different hue, just as on an individual cue row, and the hue that you choose will be used for each subsequent cue you create from the library cue. A yellow hue might nicely suggest a strobe cue:
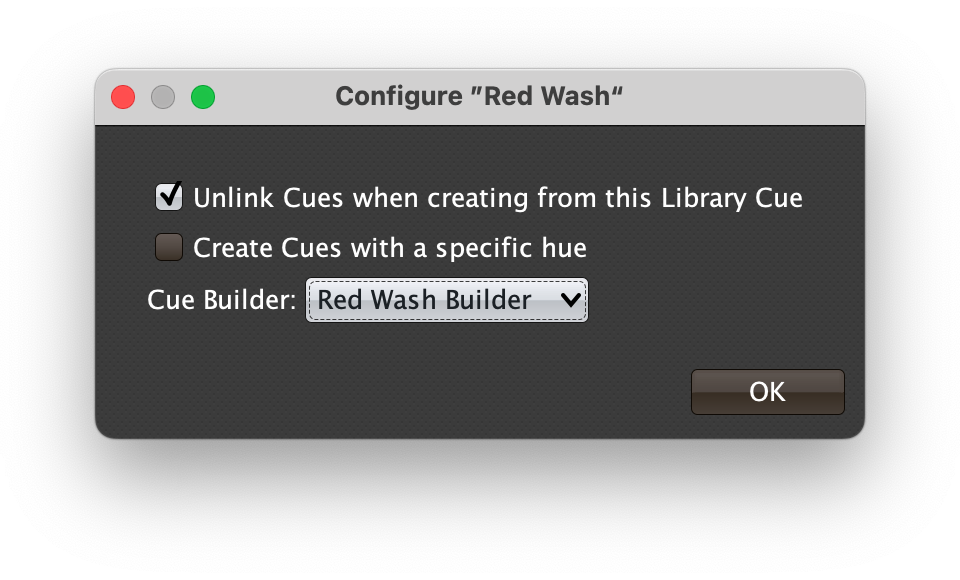
On the other hand, perhaps every “Red Wash” cue is a little bit different, because you adjust the code used by its expressions to vary the group of lights it affects, and how brightly they are lit. In a case like that, you would not want these cues to be linked to each other, so they can each have different expressions. To save having to remember to manually unlink them as soon as they are created, you can change the library cue configuration by checking Unlink Cues when creating from this Library Cue:

Read on to see how you can get even fancier about using a library cue as a factory for building individualized cues.
Cue Builders
Continuing the previous example, suppose our “Red Wash” cue uses a shared function we created to send an OSC message to our lighting software containing the name of a light group, and a DMX level. To avoid having to edit a lot of different expressions and comments to adjust that code for each cue we place, we can register a cue builder that pops open a window where we fill in the necessary information, which it can then use to adjust the cue during the creation process. Here’s what that code would look like for our example (we would place this in the Show’s Global Setup Expression):
(register-cue-builder show "Red Wash Builder"  (1)
  (fn [show context runtime-info cue]
    ;; Configures a cue that starts a red wash for the specified
    ;; fixtures at a chosen level, then ends it.
    (let [parent (get-in runtime-info [:cues-editor :frame])  (2)
          title  (str "Build ”" (:comment cue) "“")
          levels {"Full"   255  (3)
                  "Bright" 200
                  "Half"   128
                  "Dim"    80}
          panel  (seesaw.mig/mig-panel  (4)
                  :items [[(seesaw/label :text "Lights:") "align right"]
                          [(seesaw/text :id :lights :columns 25) "wrap"]
                          [(seesaw/label :text "Level:") "align right"]
                          [(seesaw/combobox :id :level
                                            :model (keys levels))
                           "wrap"]])
          dialog (seesaw/dialog :title title :content panel :modal? true
                                :option-type :ok-cancel)]
    (seesaw/pack! dialog)  (5)
    (.setLocationRelativeTo dialog parent)
    (when (seesaw/show! dialog)  ; Cancel creation of cue if dialog canceled.
      (let [lights (seesaw/text (seesaw/select dialog [:#lights]))
            level  (seesaw/text (seesaw/select dialog [:#level]))]
        (-> cue  (6)
            (assoc :comment (str "Red Wash on \"" lights "\" at " level))
            (assoc-in [:expressions :started-on-beat]
                      (str "(run-red-wash \"" lights "\" "
                           (get levels level) ")"))
            (assoc-in [:expressions :ended]
(str "(end-red-wash \"" lights "\")"))))))))| 1 | This registers our builder function with the show, so it will be available in the Builder menu under the name “Red Wash Builder” when configuring any library cue that is set to be unlinked upon placement. |
| 2 | This finds the Cues Editor window within the runtime information being managed for the Track or Phrase Trigger in which the new cue is being placed. We will use it later to position our dialog over that window, so it is easy to spot when it appears. |
| 3 | This map makes it easy for us to build a dropdown menu of brightness levels that we will translate to DMX values when writing the cue expressions. |
| 4 | These lines build a layout arrangement for our dialog with a text area for typing in the name of the light group, and a menu for choosing the level. We then create the dialog itself. |
| 5 | This line sizes the dialog window to just fit the user interface elements we have laid out inside it, and the next line positions it on the screen centered over the cues editor where we are placing a cue, using the parent value we captured in step 1.
Then we show the window, and if we get back a truthy result from that, we know the user has not clicked the Cancel button. |
| 6 | The last step is to take the incoming cue map that is about to be placed in the Cues Editor window, and modify it to the user’s specifications.
We update the comment to describe the specific wash that was requested, then generate appropriate Started On Beat and Ended expressions for the cue.
The modified value we return gets inserted into the Cues Editor.
(For this example, we are assuming we have already created shared functions named run-red-wash and end-red-wash for these expressions to use.) |
| When you manipulate cues being created with code in this way, it is entirely your responsibility to make sure that you don’t put unsupported or inconsistent values in them. There are no guard rails to protect you from that, like there are when you use the normal user interface to adjust cues. If such a broken cue ends up in your show file, it could prevent the show from opening successfully. So you should keep frequent backups of your show file when you are experimenting with writing cue builder functions. |
After saving the updated Show Global Setup Expression, this cue builder is registered.
If we open the “Red Wash” configuration window again, because the cue is configured to be unlinked and at least one cue builder has been registered, there is a new menu that allows us to attach this cue builder to the library cue:
Once we have applied this configuration to the “Red Wash” library cue, the next time we create a cue using it, instead of having the cue simply appear, we see our new builder dialog for choosing its details:
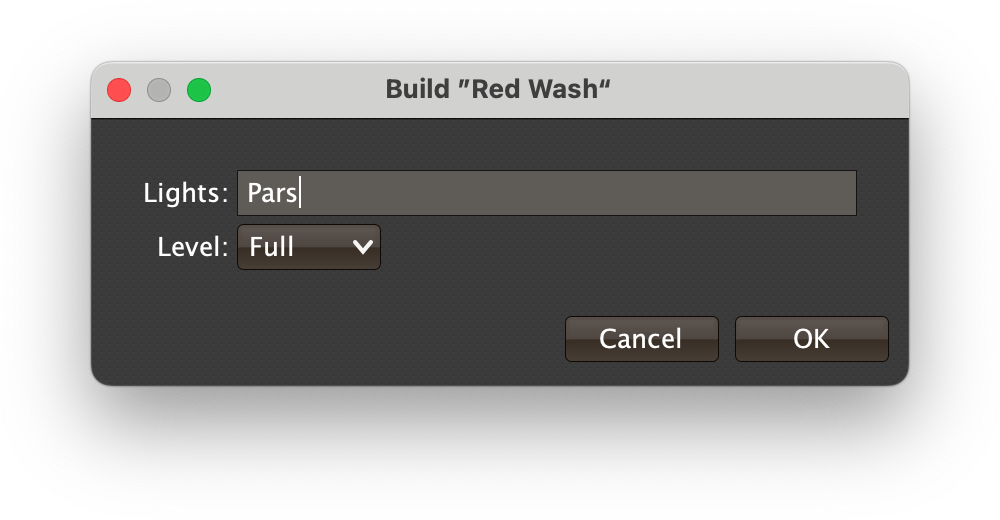
If we click Cancel here, no cue is created, and the selection we had made in the Cues Editor window remains in place. If we type a fixture group name, choose a level, and click OK, the customized cue is created, and as usual its description is selected for editing in case we want to make any further tweaks:
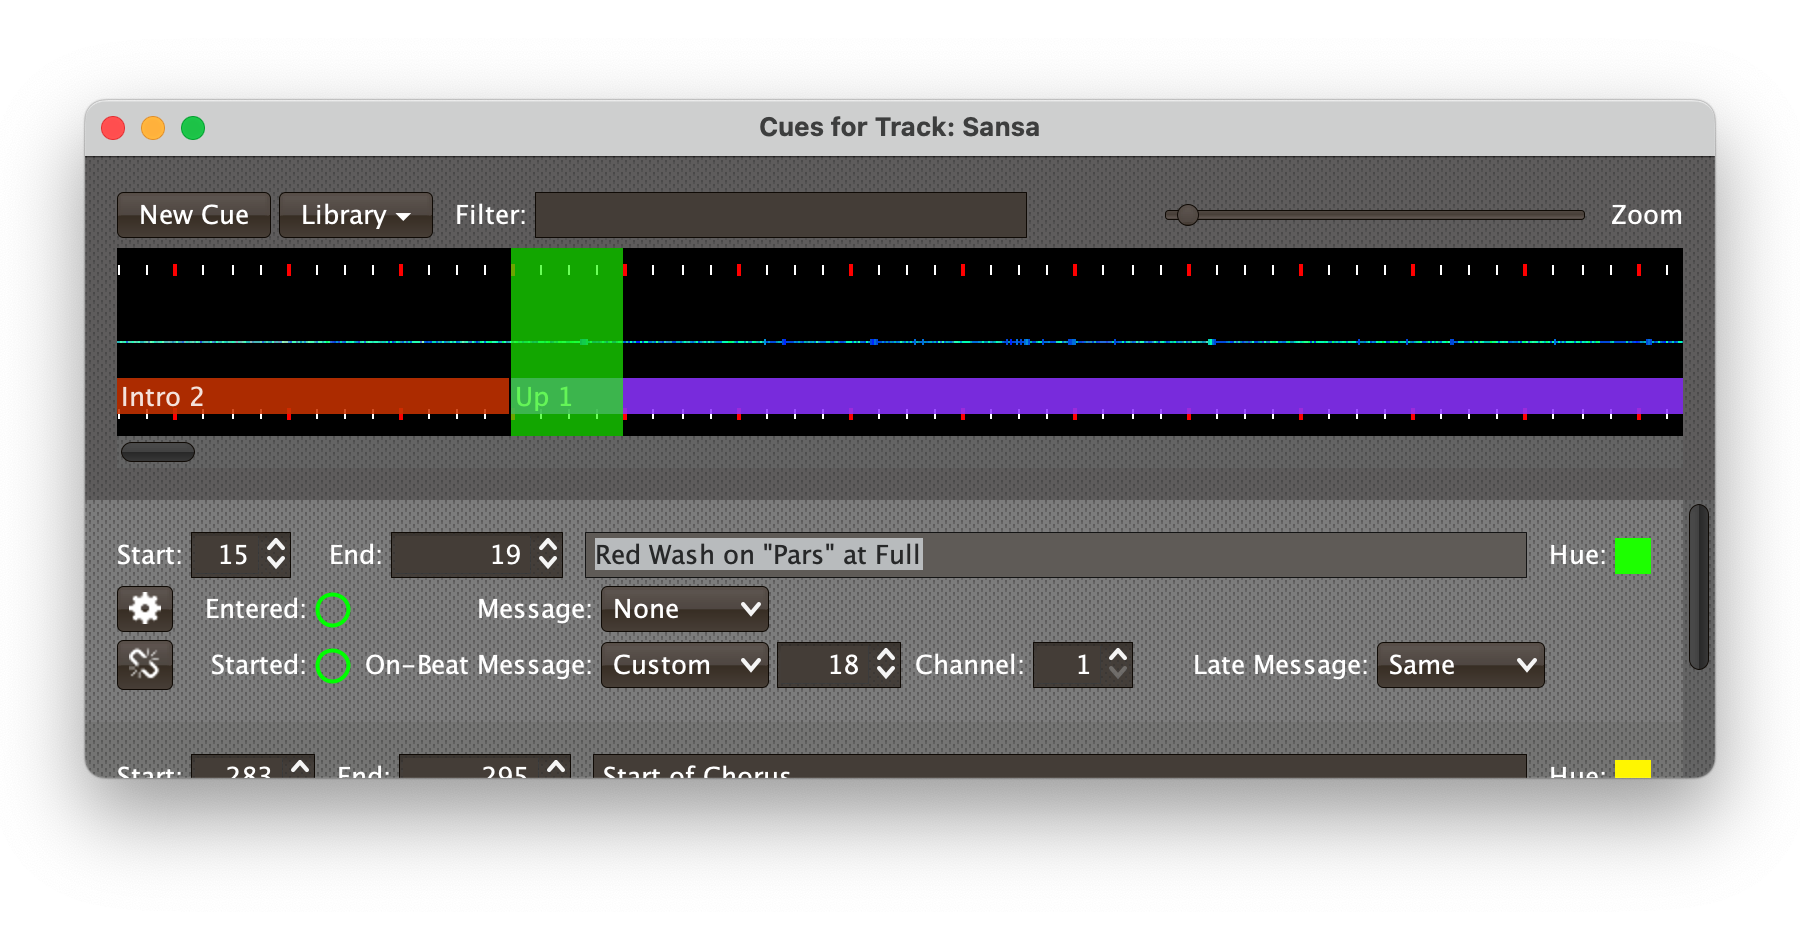
If we inspect the new cue’s expressions, we will see that the Started On-Beat expression corresponds to what we entered, and contains:
(run-red-wash "Pars" 255)And similarly the Ended expression contains:
(end-red-wash "Pars")As you can imagine, especially for complex cues with several parameters and related expressions, this kind of automation can save a lot of time.
| This is more advanced coding than a lot of what BLT requires, so if you are interested in exploring it, don’t hesitate to reach out in the Zulip community for help. |
Rebuilding Cues
For cues created by cue builders in this way, as long as the cue remains unlinked and the builder function is still registered under the same name, you will see a Rebuild Cue option in the cue context menu. Choosing this will re-run the builder using the original selection that was used to place the cue, and unless you cancel it, will replace the cue definition with the results of the choices you made in the builder this time. The start and end positions of the cue being rebuilt are preserved in case you have fine-tuned them manually.
Renaming Library Cues
As noted above, if you change your mind about what a library cue should be called, you can choose the cue you’d like to rename in the submenu:
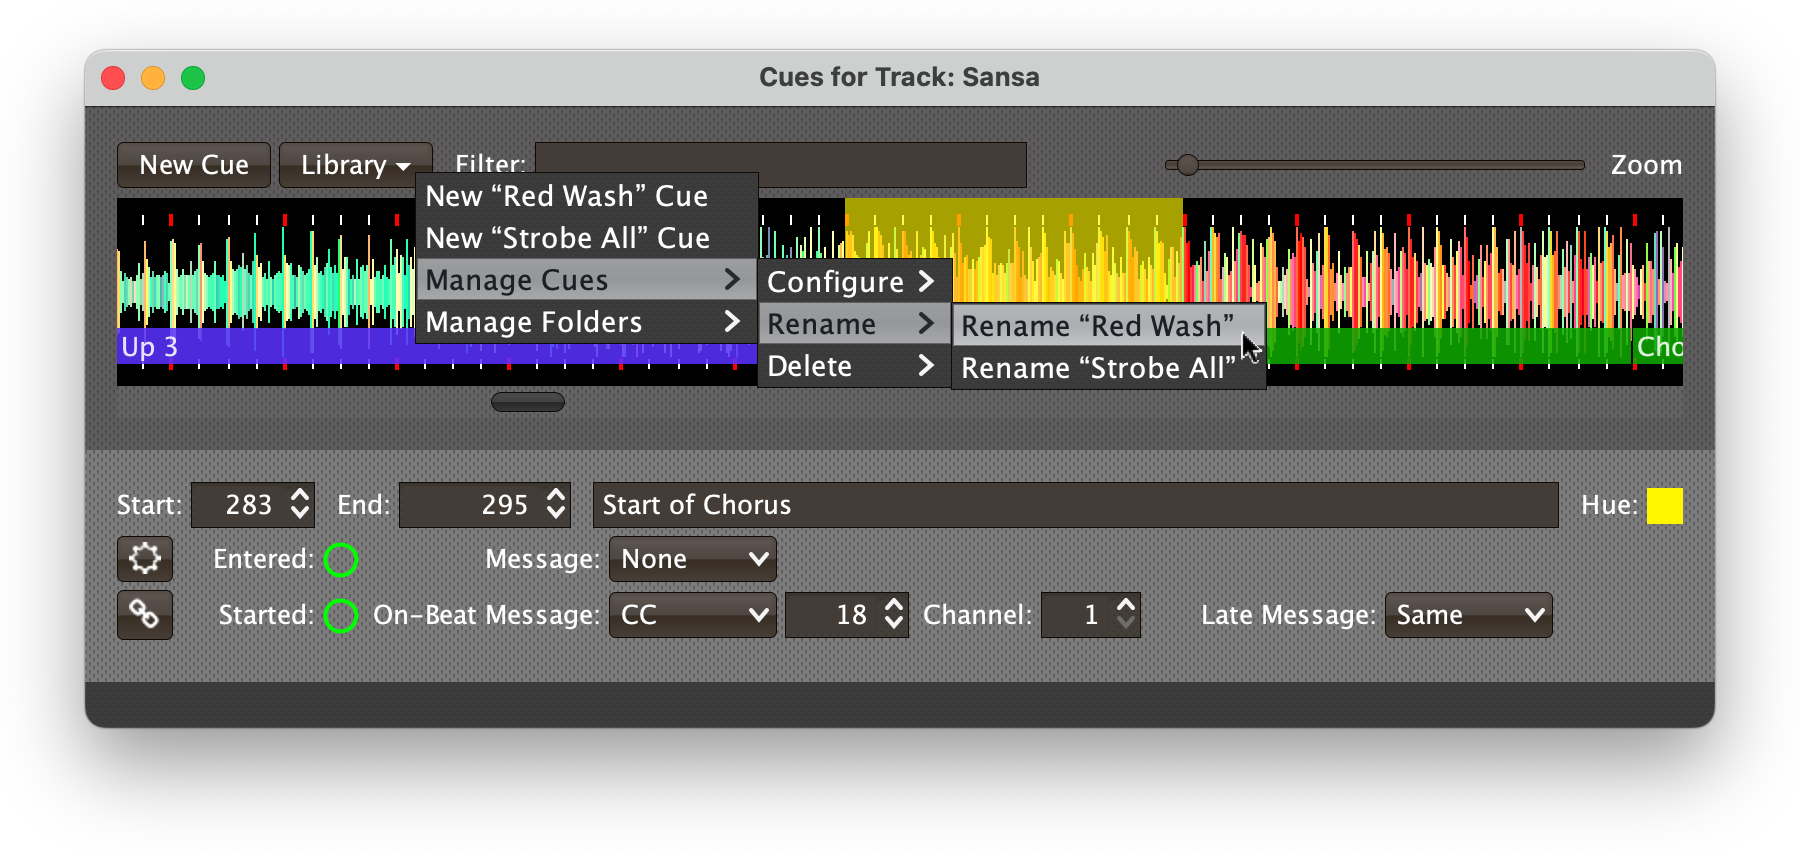
This will bring up a dialog where you can choose a new name for the cue.
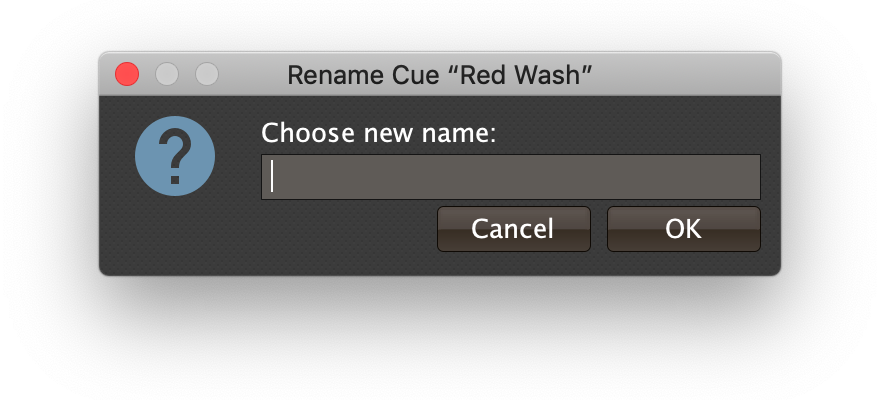
You can choose any name which is not already in use by another library cue, and it will take that new name. The cues that link to it won’t be renamed (since they may all have their own unique names by this point), but they will stay linked to it under its new name.
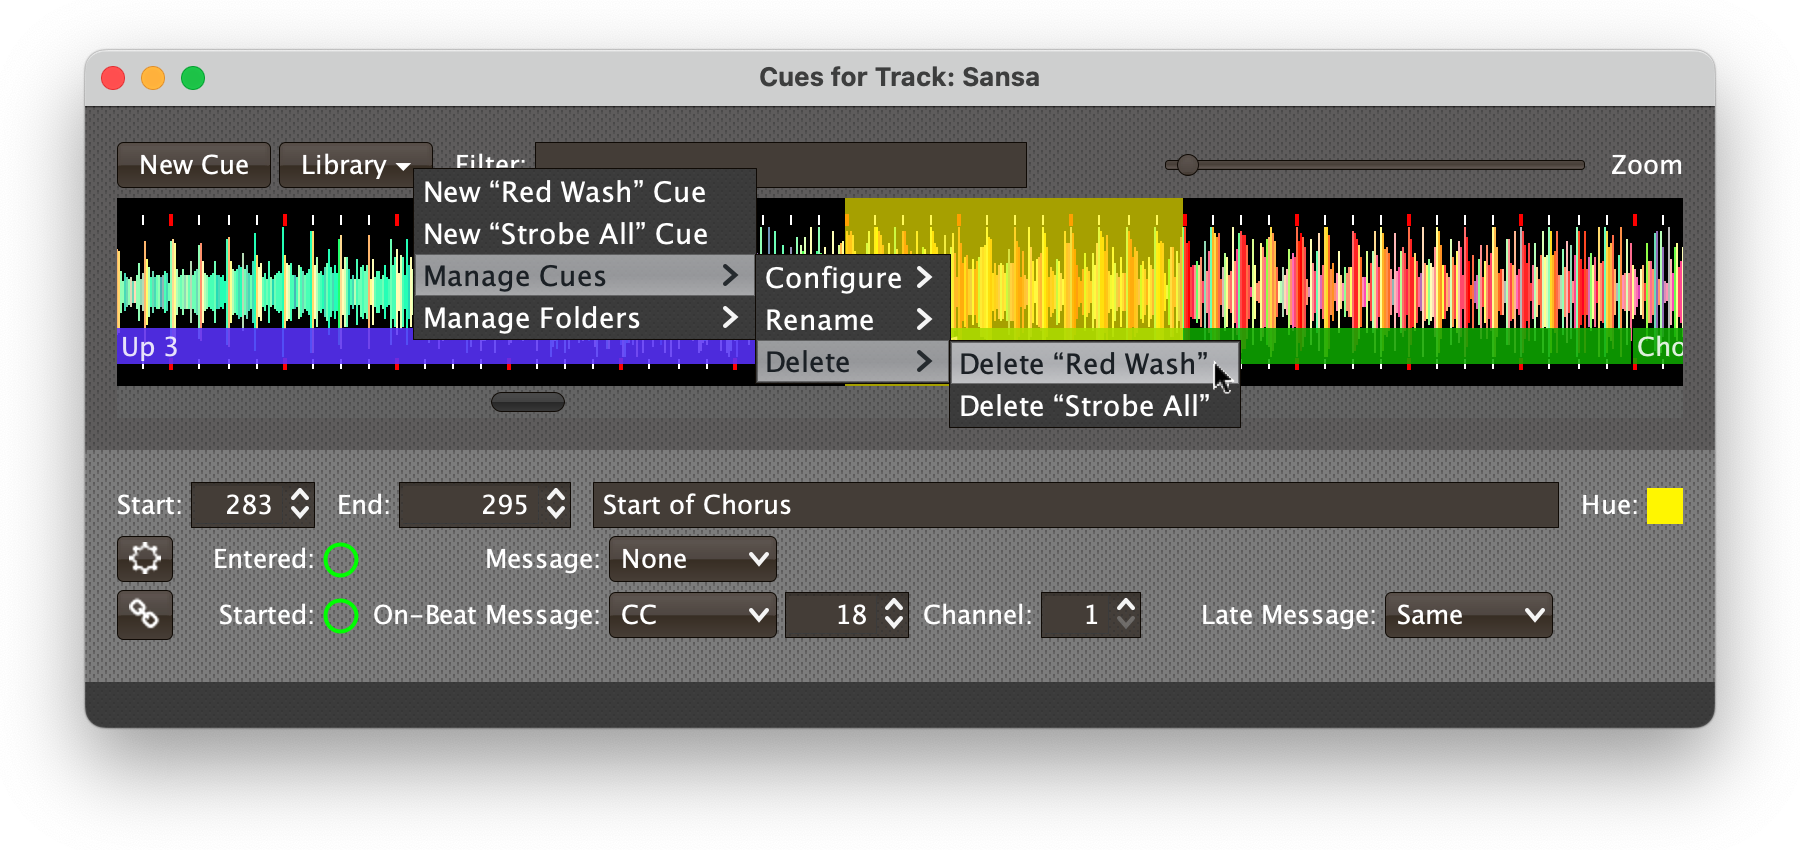
Deleting Library Cues
If you decide a cue no longer deserves to be in the library, you can use a similar submenu to remove it:
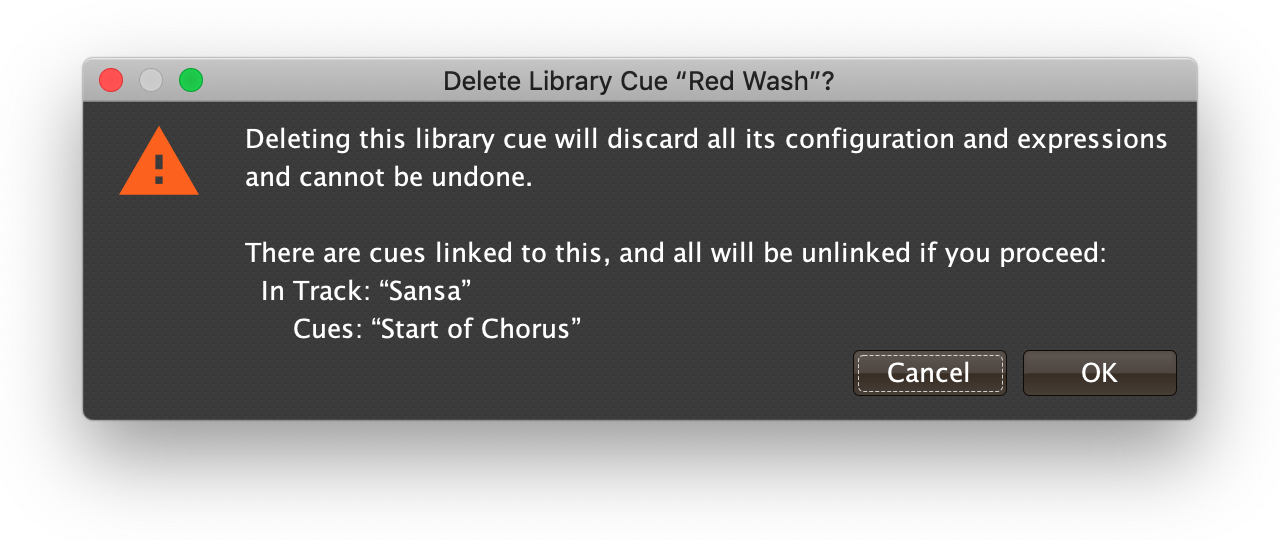
You will be asked for confirmation, since this operation can’t be undone. Also, if the library cue is currently linked to any cues in your show, the confirmation dialog will warn you about this, and explain that those cues will all become unlinked if you proceed with deletion of the library cue.
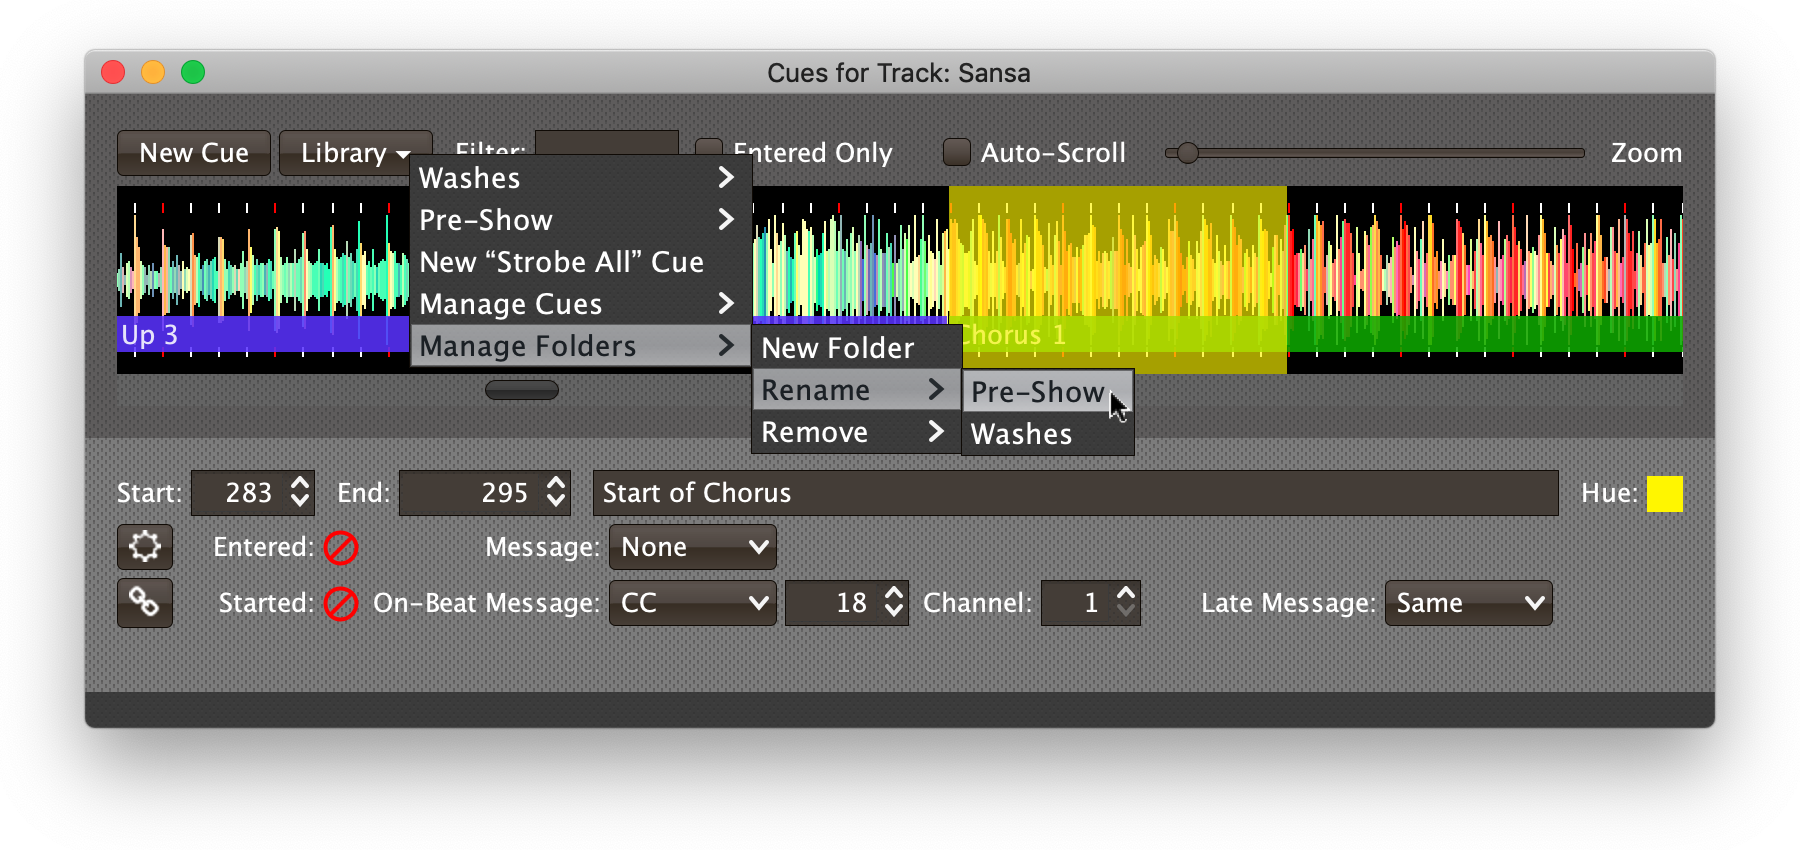
Cue Library Folders
If you collect a large number of cues in your library, the menu can get inconveniently large and make it hard to find the cue you are looking for. You can address that problem by organizing your cues into folders. At the bottom of the Library button menu there is a Manage Folders submenu.
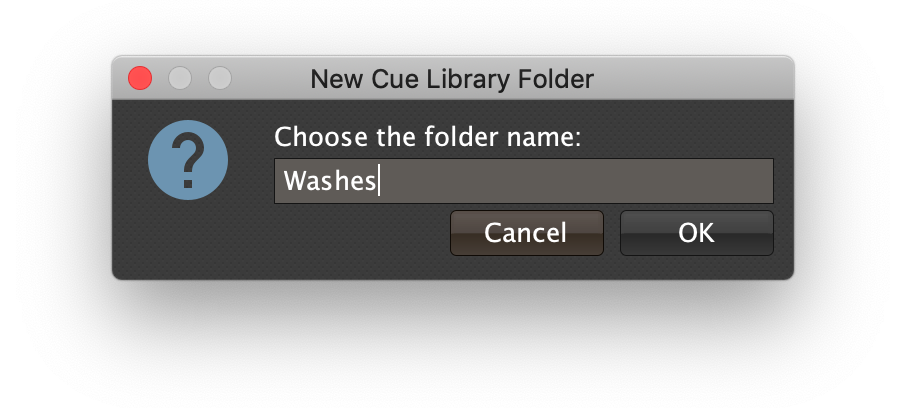
When you have no folders, the only option in that menu is New Folder. Choosing it opens up a dialog in which you can enter the name of the folder you would like to create:
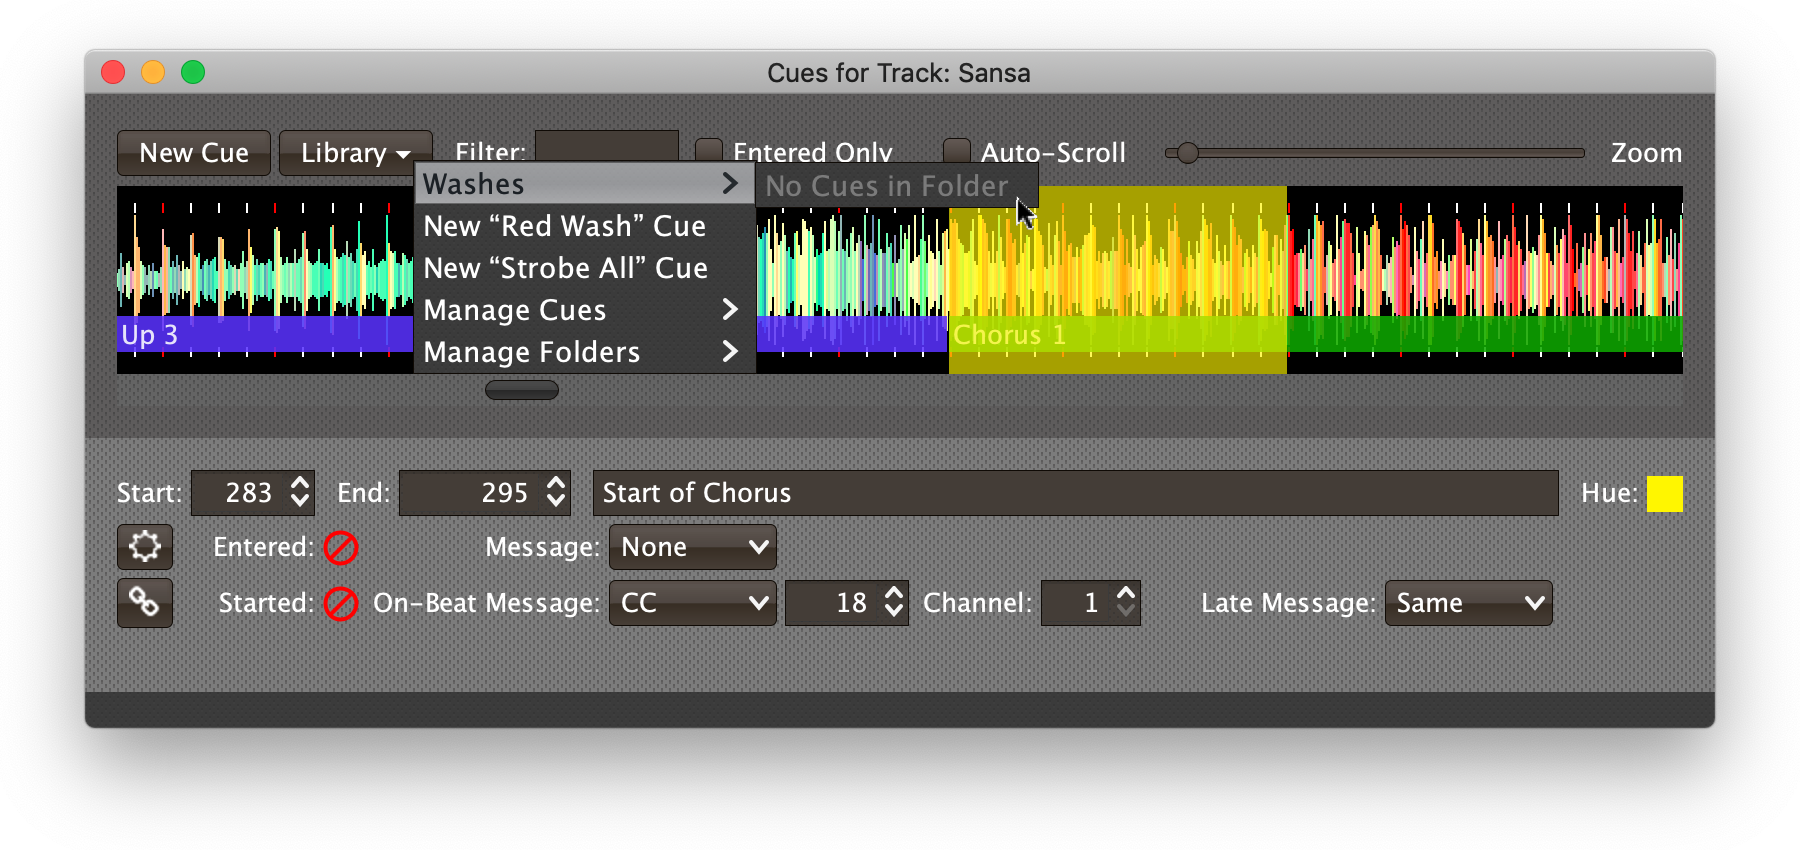
As soon as you have created a folder, the menus for choosing library cues (both in the Library button and in the waveform context menu) expand to show all the folders as submenus before the non-folder cues:
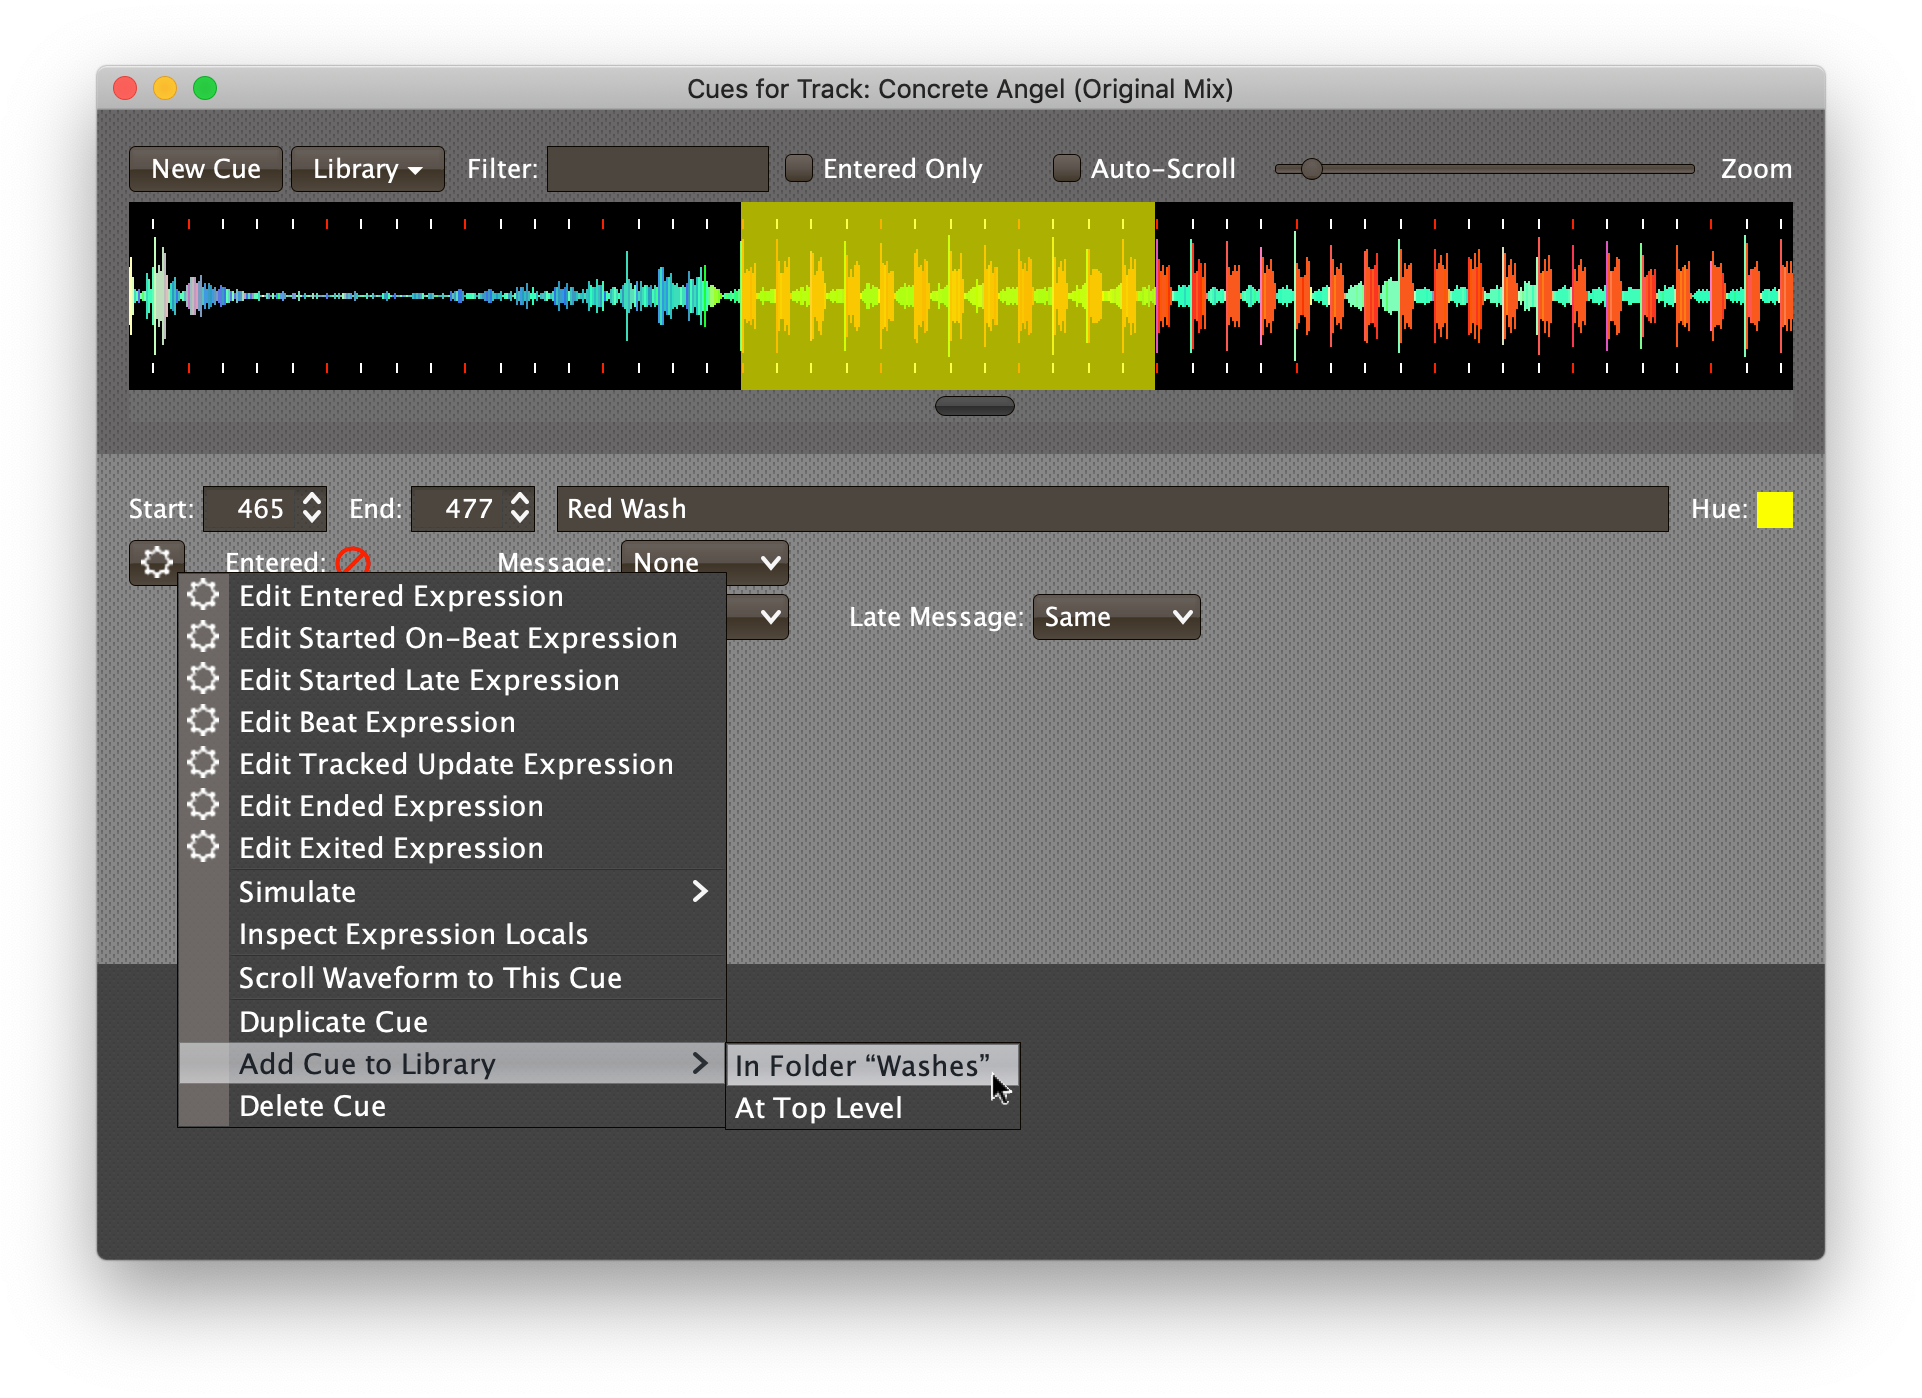
The context menu option for adding a cue to the library also transforms into a submenu allowing you to choose whether you want to add it to a folder or to the top level of the library.
|
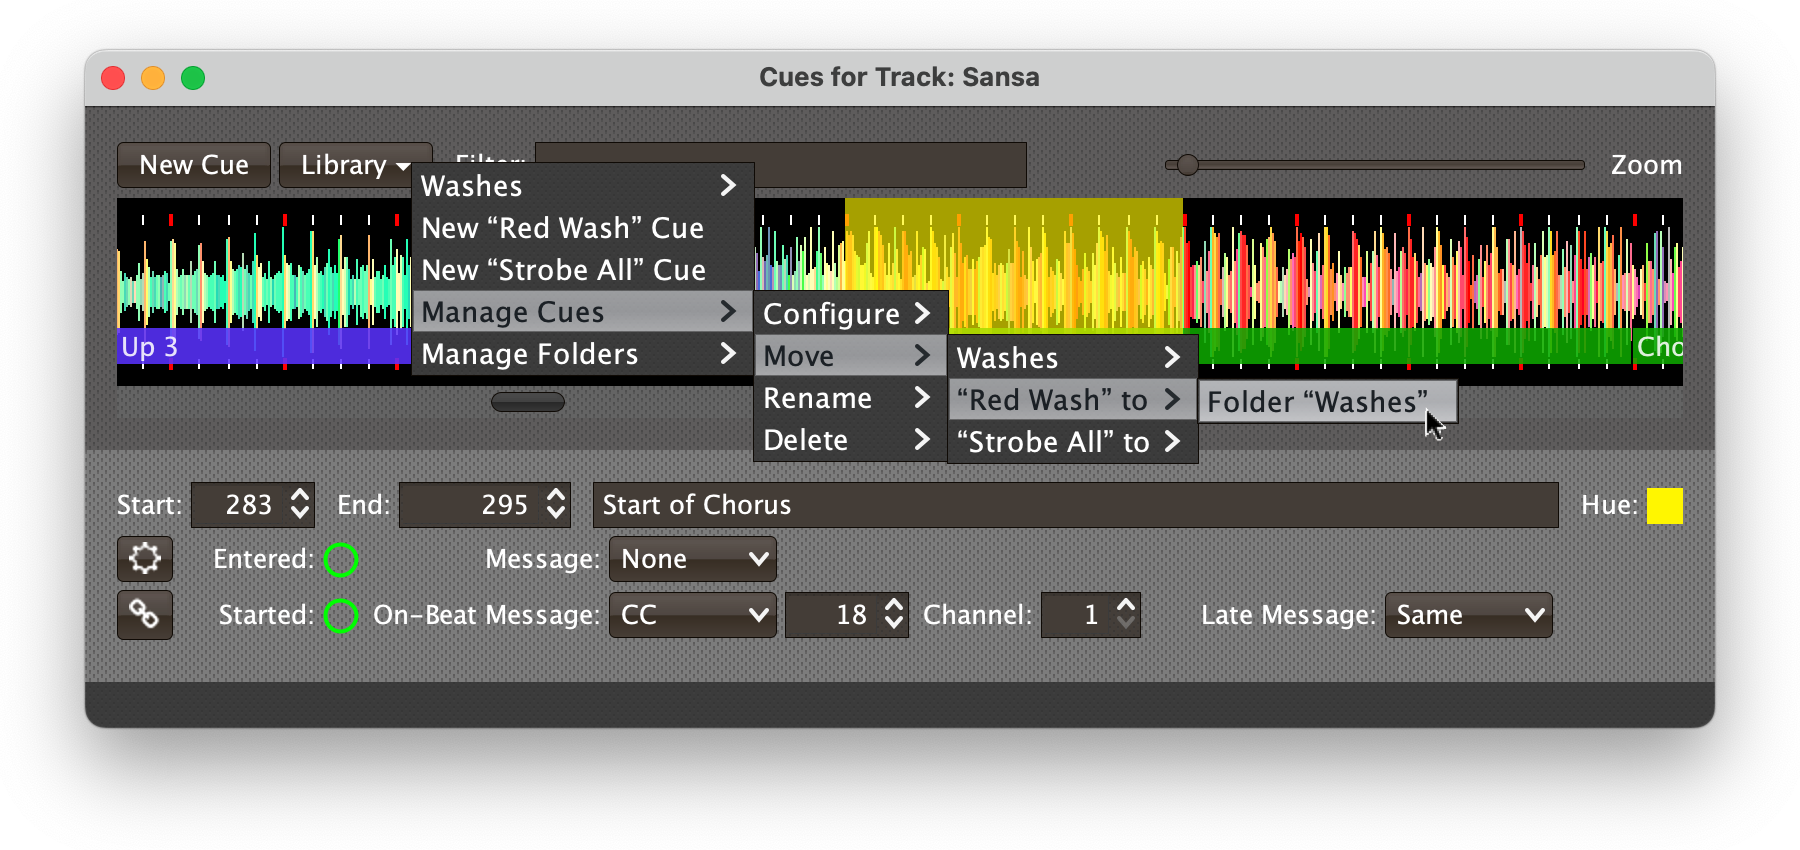
If you have existing cues in the library that you would like to move into your new folders, you can do that using the new submenu that appears as soon as you have created folders:
|
Once you have organized your cues into folders, finding and picking them out of the appropriate submenu can be easier and faster than scrolling through a single giant menu.
And once you have folders, the Manage Folders menu also allows you to rename or remove them. Removing a folder moves any cues you placed inside it back to the top level of the cue library.
Also, once you have moved cues into folders, the link button will help you remember where you’ve filed them by showing the path to the cue that you are linked to: