Beat Pattern Editor User Interface
This started out as a request for assistance and grew into a tool that may be useful to many people. @Kevinnns built some chases that he wanted Beat Link Trigger to advance on appropriate beats, and of course found that different tracks looked better when different beats were used (some looked good advancing on even beats, others on odd beats, others on all beats). Looking for ways to help automate this, first we set up a BeatSender trigger that uses a global entry to control the beats on which a message is sent to the lighting software to advance the chase. Then Kevin could configure tracks in a show to set those variables appropriately when they were playing as tempo master, by configuring the track to be Enabled when Master, and setting the Playing expression to something like this:
(swap! trigger-globals assoc :beat-pattern #{1 3})The track using the above code wants the chase to advance on the odd beats only, so those are the only numbers included in the Clojure set constant being assigned to the :beat-pattern key in the trigger globals (which the trigger responds to using code that will be shown below).
If a track wanted the chase to move on every beat the set #{1 2 3 4} would be used instead.
Any subset of those four numbers can be set in the global entry, and the trigger will act accordingly.
The empty set #{} would pause the chase completely for that track.
This was the best way to do things at the time we were experimenting with it, but in version 8 shared function handling was improved, and you should avoid using trigger-globals.
It’s still available for backwards compatibility, but could go away in a future release.
The rest of this example shows the improved way of communicating between shows and the Triggers window.
|
The Beat Sender Trigger
The trigger is configured to watch the Master Player, and to send a Custom activation message (in our case we left that expression empty because we don’t actually want it to send anything when the track starts and stops, just on the beats themselves).

The “brains” of the trigger are in its Beat Expression, which we will examine now, although this is just to explain how it works. You can download the trigger and import it using Import Trigger in a Trigger context (gear) menu to get all the code and configuration in one easy step.
| If you do import this trigger, and then later move on to working with the more full-featured shows that are developed in this example, you will want to delete the imported trigger, because the shows provide their own improved version, and you don’t want both running at the same time. This is just a heads-up for now, there will be a reminder next to the show download link too. |
(when (and trigger-output ((:beat-pattern @globals #{}) beat-within-bar)) (1)
  (midi/midi-note-on trigger-output trigger-note 127  (2)
                     (dec trigger-channel))
  (midi/midi-note-off trigger-output trigger-note  (3)
                      (dec trigger-channel)))
This version of the trigger sends a MIDI note on appropriate beats, allowing the user to control the note and channel numbers through the normal Message section in the Trigger configuration interface.
| 1 | This is where the configuration global entry gets used.
We first check that there is a valid MIDI output to use (by ensuring that trigger-output has a value), and then check whether the beat that was just reported by the player is present in the set found in :beat-pattern in the trigger globals.
If both of those things are true, it’s time to send our message.
The The expression We then call that set as a function, passing it the current beat number.
Clojure sets can be used as functions in this way, and will return a true value if the current beat is a member of the set.
This is how the beat pattern controls the |
| 2 | Here, once we know that the beat should advance the chase, we send a MIDI note.
We can’t use the trigger Message menu to decide whether to send a Note or CC message, because we need to leave that set to Custom so that trigger activation and deactivation messages don’t mess with the chase.
But we can use the trigger-note and trigger-channel values which get set by the corresponding Trigger configuration spinners, to control the actual note and MIDI channel we use.
We need to use |
| 3 | And, to be polite even though most software doesn’t require it, we follow our note-on message with a matching note-off message. |
If your lighting desk or software works better with a MIDI Controller Change message, you can swap out the Beat Expression code for this variant:
(when (and trigger-output ((:beat-pattern @globals #{}) beat-within-bar)) (1)
  (midi/midi-control trigger-output trigger-note 127  (2)
                     (dec trigger-channel))
  (midi/midi-control trigger-output trigger-note 0
(dec trigger-channel)))| 1 | The logic to decide when to advance the chase is the same as before: we have a connected MIDI device chosen, and the beat that just happened is one of the ones the chase is supposed to respond to. |
| 2 | But this time we send a Controller Change message instead of a Note. Like before, we send a non-zero value followed by a zero value to mark this as a transient event. |
Or, you may not want to use MIDI at all. In fact, in Kevin’s case, it was easier to control his software using OSC, so the actual Beat Expression he is using looks like this:
(when ((:beat-pattern @globals #{}) beat-within-bar)  (1)
(osc/osc-send (:magic @globals) "/magic/0" 1)) (2)| 1 | We no longer need to worry about the selected MIDI device in our when condition, all we care about is that the beat is one we’re supposed to respond to. |
| 2 | This sends an OSC message to the OSC client found at the key :magic in the trigger globals.
The OSC client needs to be created and opened in the trigger Global Setup Expression, and closed in the Global Shutdown Expression, like in the examples shown in the Trigger Expressions section, which demonstrate how to configure a client to talk to Resolume Arena and store it under the key :resolume. |
Adding a beat pattern configuration interface
The system we’ve built so far works great when all the tracks being played are already preconfigured in a Beat Link show with code to automatically set the beat pattern when they are recognized. But that’s not a realistic situation under most circumstances! It would be nice to have an easy way to configure the beat pattern while listening to the track the DJ is playing, to tweak the chase to look good on the fly. So that’s what I built, taking advantage of Beat Link Trigger’s ability for shows to define their own graphical user interface components.
| As noted above, before opening this show, you should delete the standalone Beat Sender Trigger if you imported it into your Triggers window. You do that using the gear or context menu in that trigger’s configuration row. |
Here’s a detailed look at how the resulting BeatPattern show looks and works.
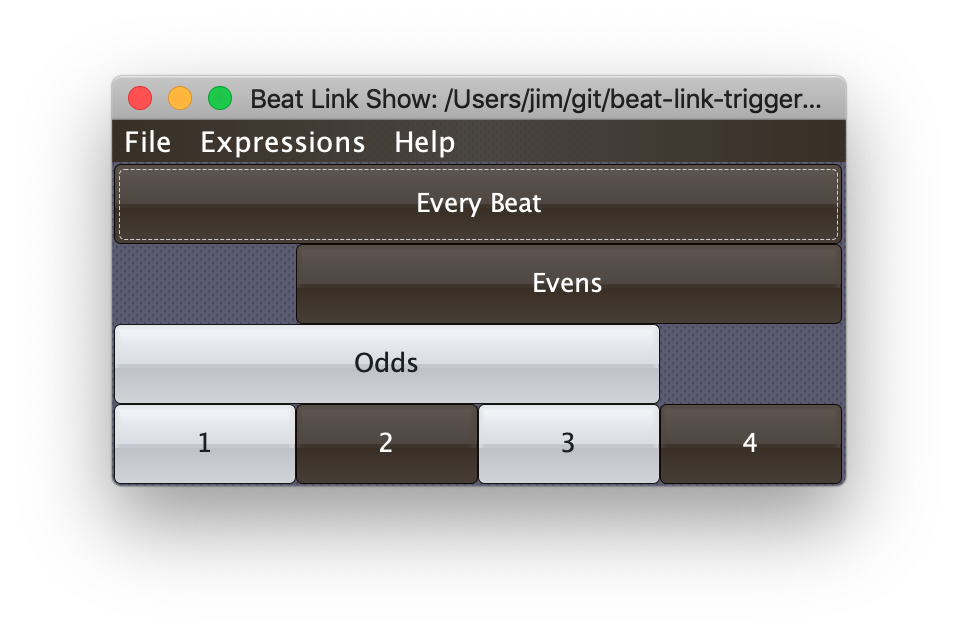
Instead of showing a list of tracks, the show window is taken up by a grid of buttons. Pressing one of the big buttons sets the beat pattern correspondingly. Pressing one of the individual beat buttons toggles that beat active or inactive. If toggling a beat button lands you on a pattern that matches one of the big buttons, the big button lights up too. You can make the window as big as you want and the buttons will grow, for easier targets to mash during a show. Or you can use the fancier version of the show described below to map a physical MIDI controller, giving you nice physical buttons to push, which can also light up to provide feedback about which beats or patterns are active.
The buttons also react when other code changes the beat pattern (for example if a track in another show is configured to change the :beat-pattern trigger global when it starts playing as tempo master).
So this window gives you a good look at what beats are going to advance your chase when the Beat Sender trigger is enabled, and lets you quickly change them to better suit what you are hearing and seeing while a track plays.
You can read on to see exactly how this was done, or you can just download the show and open it whenever you want to use it.
Shared Functions
Most of the code required to build and power this interface is defined as a set of shared functions, which you can examine by choosing .
The first function is the one that builds the click handler to be run when one of the UI buttons is clicked. It’s used when creating each of the buttons.
(defn button-action
  "Builds a click handler for one of the UI buttons which updates the
  globals to reflect the pattern of beats managed by the button.
  For buttons which manage more than one beat, we replace the
  current beats with the button's pattern. For individual beats, we
  just turn that beat on or off. Returns a function which takes the
  button, and updates the beat pattern appropriately given the state
  to which that button is transitioning."
  [pattern]  (1)
  (fn [button]  (2)
    (if (> (count pattern) 1)  (3)
      (swap! globals assoc :beat-pattern  (4)
             (if (seesaw/value button) pattern #{}))
      (swap! globals update :beat-pattern  (5)
             (fnil (if (seesaw/value button)
                     clojure.set/union
                     clojure.set/difference)
                   #{})  (6)
pattern))))| 1 | The builder function itself takes the beat pattern assigned to the button. As noted in the doc string that describes the function, buttons that manage a single beat behave differently than buttons responsible for a pattern of multiple beats. |
| 2 | This is the function that is being returned by the action builder. It takes a single argument, the button that has just been clicked, so it can check whether the button has been turned on or off by the click. |
| 3 | Here is where we check whether the beat pattern has more than one beat in it, which determines how we respond to the button click. |
| 4 | If the button manages more than one beat, then turning the button on sets the whole beat pattern to match the pattern assigned to the button, and turning off the button turns off all beats. |
| 5 | If the button manages just one beat, then turning the button on or off does the same thing to that beat alone. |
| 6 | To protect ourselves against the situation where the beat pattern has not yet been established before the button was clicked, we use fnil inside the update call to replace a missing (nil) value with the empty set. This is an important Clojure technique, but higher-order functions like this take some getting used to for people who haven’t done a lot of functional programming. |
(defn make-button
  "Constructs a toggle button for use in the UI, with the specified id,
  text, and beat pattern."
  [id text pattern]
  (seesaw/toggle :id id :text text  (1)
                 :listen [:action (button-action pattern)]))  (2)
This function is pretty short because it can use the action builder we just looked at to do most of its work. Given an ID to assign the new button, the text to use for its user-visible label, and the pattern (set) of beats it is responsible for, it creates a button to manage those beats.
| 1 | We tell Seesaw to create a toggle button, which is a button that stays on until clicked again, as opposed to a normal momentary-action button. |
| 2 | And we tell the button to call an action handler we build using the previous function, that will update the beat pattern appropriately when clicked. |
That’s all the helpers we need to build the user interface.
(defn build-ui
  "Creates the custom user interface for the beat pattern chooser."
  []
  (let [every (make-button :every "Every Beat" #{1 2 3 4})  (1)
        evens (make-button :evens "Evens" #{2 4})
        odds  (make-button :odds "Odds" #{1 3})
        one   (make-button :b-1 "1" #{1})
        two   (make-button :b-2 "2" #{2})
        three (make-button :b-3 "3" #{3})
        four  (make-button :b-4 "4" #{4})
        panel (seesaw/form-panel  (2)
               :id :pattern-panel
               :items [[every :weightx 1.0 :weighty 1.0 :fill :both  (3)
                        :gridwidth :remainder]

                       [(seesaw/label :text "") :gridwidth 1]  (4)
                       [evens :gridwidth :remainder]

                       [odds :gridwidth 3]  (5)
                       [(seesaw/label :text "") :gridwidth :remainder]

                       [one :gridwidth 1] [two] [three] [four]])]  (6)
panel)) (7)| 1 | The bulk of this function just calls the button-creator function we just saw seven times to create the seven buttons that make up the beat pattern selector, giving them each appropriate IDs, labels, and sets of beats to manage. |
| 2 | Even though the Seesaw documentation calls the GridBagLayout that form-panel creates an “abomination” it is exactly the kind of simple-minded grid our buttons need. |
| 3 | The :items list populates the grid. The first button we add is the Every Beat button, and the weights and :fill both tell the layout that the buttons should always grow to take up the entire allocated space when the window is resized. (These values get passed on to the next item, so setting them once is enough.)
We also say that this button should take up the remainder of its row by specifying :gridwidth :remainder.
(Yes, GridBagLayout is cryptic, but we got it to work.) |
| 4 | For the next row of the grid, we leave an empty cell (by putting an empty label in it, with :gridwidth 1) so the Evens button can line up over the even beats.
Then we place that button, again telling it to take the rest of its row. |
| 5 | The Odds button is similar, but it goes at the start of its row and uses :gridwidth 3 so it lines up over the 1 and 3 beats.
We finish that row with another empty cell, at the end this time. |
| 6 | The last row of individual beat buttons is simpler. We set :gridwidth 1 because these buttons all take a single cell, and then we just list them all. |
| 7 | Finally, we return the panel of buttons we have created, which we will tell the show to install as its UI, in the global setup expression that is coming up shortly. |
There’s one last shared function to look at first though. As noted earlier, we want the buttons to update themselves if other code (like another show recognizing a track) changes the beat pattern. Also, one button may change multiple beats, and we want all the buttons’ state to reflect that. Another part of the global setup expression arranges for the following function to be called whenever the beat pattern has been changed, no matter what caused that.
(defn beat-pattern-changed
  "Called when the beat pattern has changed to update the state of each
  button in the UI to reflect the new pattern."
  [show new-pattern]  (1)
  (let [buttons [[:#odds #{1 3}]  (2)
                 [:#evens #{2 4}]
                 [:#every #{1 2 3 4}]
                 [:#b-1 1]
                 [:#b-2 2]
                 [:#b-3 3]
                 [:#b-4 4]]]
    (seesaw/invoke-later  (3)
     (doseq [[id on-pattern] buttons]  (4)
       (let [button (seesaw/select (:frame show) [id])]  (5)
         (if (set? on-pattern)  (6)
           (seesaw/value! button (= new-pattern on-pattern))  (7)
           (seesaw/value! button
(contains? new-pattern on-pattern)))))))) (8)| 1 | We need access to the show, so we can find the UI and update button states, and we need to know what beats are now active, so we can know what the button states should be. |
| 2 | This list pairs a Seesaw selector (that can be used to find the right button) with the beats that button is responsible for.
In this function, a set means the button should be active only when new-pattern has exactly the same set of beats in it, while an individual beat number means that button should be on whenever that beat is part of the new-pattern set. |
| 3 | To interact safely with user interface objects, Java requires your code to be running in a special “event dispatch thread”.
Since we can’t be sure this function was called from that thread, invoke-later arranges for its body to be run on that thread.
We didn’t have to worry about this in, for example, our button action handler, because such functions are already always called on the event dispatch thread. |
| 4 | This loops over the pairs of button ids and on-pattern values we set up above. |
| 5 | Using the button id we are able to look up the actual button object inside the show’s UI. |
| 6 | Then we check whether we are dealing with a set (beat pattern) or individual beat. |
| 7 | If it’s a set, then we turn the button on if the new pattern matches the pattern of the button exactly, and turn it off otherwise. |
| 8 | If it’s an individual beat, we turn the button on if that beat is present in new-pattern, and off otherwise. |
Global Setup Expression
With those handy shared functions in place, we can build and install the show’s special graphical user interface. The global setup expression runs when the show is opened, so it is the perfect place to do that.
;; Set up the beat pattern selection UI for the show.
(show/block-tracks show (build-ui))  (1)
(show/swap-user-data! show assoc :show-hue 240.0)  (2)

;; Arrange for the checkbox state to be automatically updated if any other
;; code (such as a show track) changes the beat mode.
(add-watch globals :beat-pattern-watcher  (3)
           (fn [_ _ old-state new-state]
             (let [old-pattern (:beat-pattern old-state)  (4)
                   new-pattern (:beat-pattern new-state)]
               (when (not= old-pattern new-pattern)  (5)
(beat-pattern-changed show new-pattern)))))| 1 | This is how you set your own custom UI for a show.
We call show/block-tracks with the show and the UI that gets built by our builder function, and Beat Link Trigger puts it in place, hiding the track UI that would otherwise be there. |
| 2 | This tells BLT to use a particular purple hue to draw the background of the show user interface, and the background of any raw triggers that the show adds to the Triggers window. This provides a visual hint that those triggers belong to the show. |
| 3 | This cool Clojure trick lets us update the UI regardless of how the beat pattern changes.
We register a watch function on the show’s globals atom.
Whenever any code changes that atom, our watch gets called, with the old and new state of the atom. |
| 4 | We only care if our :beat-pattern key changed, so we pull that out of both the old and new global states. |
| 5 | If the old pattern and new pattern are different, we know the beat pattern changed, so we call the shared function we saw earlier that updates the button states to match the new beat pattern. |
| You might wonder if we should remove the watch in the Global Shutdown expression. While we certainly could, we don’t need to worry about that, because BLT empties out the show’s namespace when the show is closed, and that will allow the globals atom, including any registered watchers, to be garbage collected. |
Our Own Trigger
As noted above, the show also contains its own trigger that lives in the Triggers window while the show is open, so that you don’t need to worry about manually importing that separately, or deleting it when you are no longer using the show.
To create such a “raw trigger” managed by a show, you use in the Show window.
The code for this trigger is mostly the same as was shown above, but it uses its show’s globals atom, which is accessible in show raw trigger code as show-shared/globals, instead of relying on the Triggers window globals.
Putting this all together makes for a very nice user interface for managing beat patterns in lighting chases.
Adding MIDI Mapping
Clicking big buttons on a computer screen is fine, but it’s nicer to be able to control shows using physical buttons. To support that, I built an extended version of the show which adds another layer of interface allowing each button to be mapped to a physical MIDI controller button. To set up that mapping, just right-click (or control-click on a Mac) in the button, and a MIDI mapping interface for that button will appear:
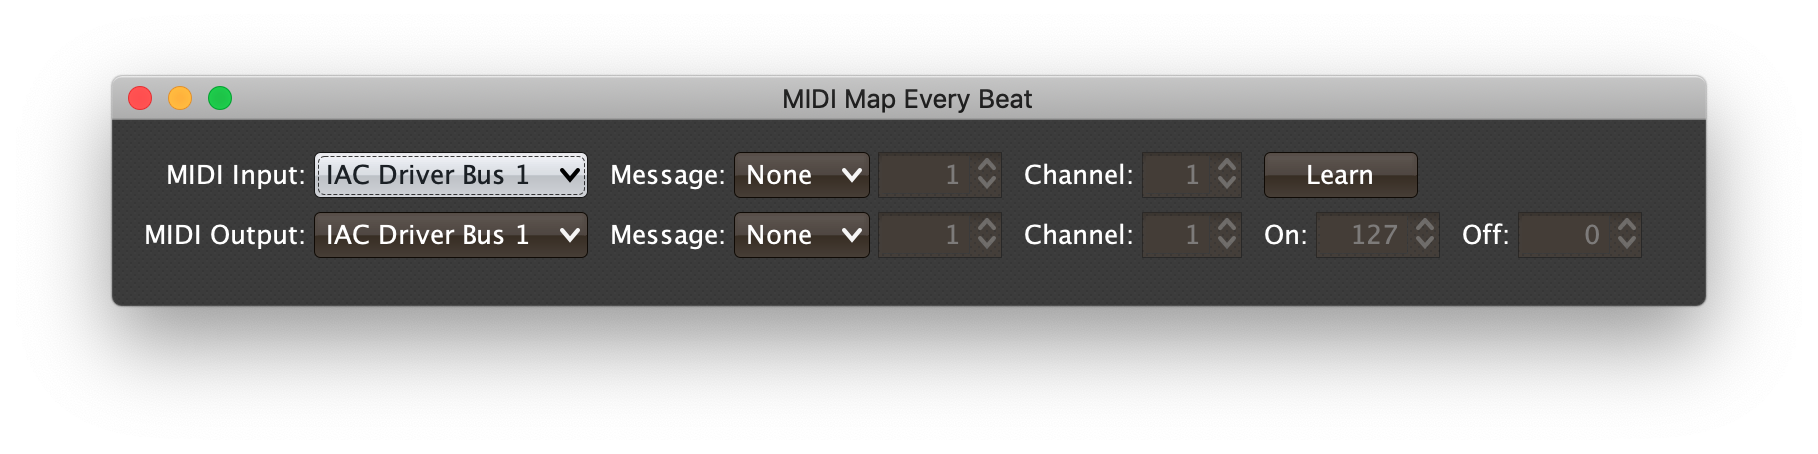
There are two rows in the MIDI mapper. The top row is for configuring the MIDI Note or Control Change message that will activate the beat pattern button when it is sent to Beat Link Trigger, and the bottom row is for configuring a feedback message to be sent out by Beat Link Trigger whenever the button state changes. To begin with, both are disabled by having their Message dropdown set to None. (As soon as you choose a message other than None, the disabled elements of the row will become enabled for you to configure the details.)
Input Mapping
The first step is to choose the MIDI device that you want to respond to. Make sure it is connected to your system and powered on, then choose it in the MIDI Input dropdown. Once you’ve done that, if you know the message, note (or controller number) and channel that you want the button to respond to, you can choose or enter them directly. Otherwise, you can click the Learn button to activate it, and then press the button on the MIDI controller that you want to use, and Beat Link Trigger will update the message, note/controller number and channel to match the first Note On or Controller Change message it receives from the chosen MIDI input. (If you change your mind, you can cancel Learn mode by toggling the Learn button back off before such a message is received.)
Output Mapping
If your controller has LEDs, you can use the feedback mapping to illuminate them to reflect the current state of each mapped button. To do that, select the device that you want to send the feedback messages to in the MIDI Output dropdown (again, once it is connected to your system and powered on). In most cases you probably want to choose the same device you are receiving input from, but it is also possible to send the button state to a different device for display.
If you used Learn to find out the message, note/controller change number and channel for the received message, those will also have been copied to the feedback message, but you are free to override them to send feedback in a different way.
Also, by default the feedback message uses a velocity of 127 to indicate a button has been turned on and 0 to indicate that it has been turned off, but you can change those to whatever values look best on your controller.
Once you are happy with your MIDI mapping for a button, you can simply close the mapping window. The configuration is automatically saved inside the show.
If all you want is to use the show, that’s all you need to know. Go ahead, download and open it. But if you want to understand how it works on the inside, read on!
Shared Functions
It turns out that it required far more code to implement the MIDI mapping features than it did to implement the beat pattern editor itself! Part of that is simply because there are a lot more user interface elements in the MIDI Mapping window than there are in the beat pattern window. But it is also true that Beat Link Trigger itself does not respond to MIDI input, so there was a fair bit of plumbing that needed to be able to written to support that.
Now that this show has worked well for a while, I moved some of that plumbing into Beat Link Trigger, to simplify this show a bit, make it easier to write similar shows in the future, and allow them to share code with each other.
(defn close-mapper  (1)
  "Closes the MIDI mapping window, if any, associated with the supplied
  button, as part of cleanup when the show is shutting down."
  [button]
  (when-let [frame (:frame @(seesaw/user-data button))]
    (.dispatchEvent frame
                    (java.awt.event.WindowEvent.
                     frame java.awt.event.WindowEvent/WINDOW_CLOSING))))

(defn close-input  (2)
  "Closes the MIDI input, if any, associated with the supplied button.
  Used whenever a new device has been chosen, and as part of cleanup
  when the show is shutting down."
  [button]
  (swap! (seesaw/user-data button) update :input
         (fn [old-input]  ; Close existing connection if there was one.
           (when old-input
             (try
               (.close (:transmitter old-input))
               (catch Exception e
                 (timbre/warn e "Problem closing old mapped MIDI input."))))
nil)))| 1 | This function is called by the global shutdown expression for each beat pattern button to check if that button has an open MIDI mapping window and close it, as part of closing the show. |
| 2 | And this function is called at the same time to close any MIDI input that was opened for each button. We don’t need to worry about closing MIDI outputs because those are shared with other Beat Link Trigger expressions, and stay open as long as the device is connected. |
(defn update-mapper-devices
  "If the supplied button has an active MIDI mapping window, updates the
  menus of MIDI inputs and outputs to reflect a change in the MIDI
  environment. If a device which disappeared was chosen in a menu,
  however, it is kept in the menu and kept selected, so that it can be
  reconnected automatically if and when the device reappears."
  [button]
  (when-let [frame (:frame @(seesaw/user-data button))]  (1)
    (let [new-inputs  (util/get-midi-inputs)  (2)
          input-menu  (seesaw/select frame [:#inputs])  (3)
          old-input   (seesaw/selection input-menu)  (4)
          new-outputs (util/get-midi-outputs)  (5)
          output-menu (seesaw/select frame [:#outputs])
          old-output  (seesaw/selection output-menu)]
      (seesaw/config! input-menu :model  (6)
                      (concat new-inputs
                              (when-not ((set new-inputs) old-input)
                                        [old-input])))
      (seesaw/selection! input-menu old-input)  (7)
      (seesaw/config! output-menu :model  (8)
                      (concat new-outputs
                              (when-not ((set new-outputs) old-output)
                                        [old-output])))
      (seesaw/selection! output-menu old-output))))
One of the ways that BLT tries to be friendly is by updating all of its dropdown menus of MIDI devices whenever a device is attached or detached while it is running.
This function is hooked up to be called whenever CoreMIDI4J reports a change in the MIDI environment by our global setup expression.
| 1 | The first thing the function checks is whether there is a MIDI mapping window open for the button, which is tracked under the :frame key of that button’s user data.
If not, there is nothing we need to do, and the rest of the body is skipped. |
| 2 | Having found a MIDI mapping window to update, we find the set of MIDI inputs that are now available. |
| 3 | Then we look up the MIDI input dropdown menu inside the mapping window by searching for the ID we used when creating it. |
| 4 | And we find what device the user has currently chosen in that menu. |
| 5 | The next three lines do the same things for the MIDI output dropdown. |
| 6 | Here we update the MIDI input dropdown to contain only the devices currently available, but we keep around the currently-chosen device at the end of the list even if it is no longer actually available, so it will automatically work right away if it gets reconnected. This is a user-friendliness feature to rescue people from losing configuration if they forget to connect their MIDI controller before launching BLT. |
| 7 | Then we restore the selection that the dropdown had before we messed with its contents. |
| 8 | And we do the same things for the MIDI output dropdown. |
The next function is called whenever a new MIDI input has been chosen in the dropdown menu. It registers a handler function to be called when MIDI events arrive from that input, which is how we can respond to them. It implements both the Learn button, and toggling the button in response to the learned or configured event.
(defn attach-midi-handler
  "Installs a function to be called whenever there is MIDI input from a
  button's newly selected device, to check whether it is mapped to a
  button action, or if a mapping is currently being learned."
  [button show new-input]
  (let [handler (fn [message]  (1)
    (let [learned (atom false)] ; So we don't react to something just learned.
      ;; First handle "Learn" mode if that is active.
      (when-let [mapper (:frame @(seesaw/user-data button))]  (2)
        (let [learn (seesaw/select mapper [:#learn])]
          (timbre/info "in learn")
          (when (and (seesaw/value learn) (3)
                     (#{:note-on :control-change} (:command message)))
            (timbre/info "learning!")
            (seesaw/invoke-later                          (4)
              (let [note? (= :note-on (:command message))] (5)
                (seesaw/value! (seesaw/select mapper [:#message])
                               (if note? "Note" "CC"))
                (seesaw/value! (seesaw/select mapper [:#feedback-message])
                               (if note? "Note" "CC")))
              (seesaw/value! (seesaw/select mapper [:#note])
                             (long (:note message)))
              (seesaw/value! (seesaw/select mapper [:#feedback-note])
                             (long (:note message)))
              (seesaw/value! (seesaw/select mapper [:#channel])
                             (long (inc (:channel message))))
              (seesaw/value! (seesaw/select mapper [:#feedback-channel])
                             (long (inc (:channel message))))
              (seesaw/value! learn false) (6)
              (reset! learned true)))))
      ;; Then, if we didn't just learn this message, see if it matches
      ;; the button mappings, and if so, toggle it.
      (when-not @learned  (7)
        (let [mapping (get-in (show/user-data show)
                              [:mappings (seesaw/id-for button)])]
          (when (and (or (and (= :note-on (:command message))
                              (= "Note" (:message mapping)))
                         (and (= :control-change (:command message))
                              (= "CC" (:message mapping))))
                     (pos? (:velocity message))
                     (= (:note message) (:note mapping 1))
                     (= (inc (:channel message)) (:channel mapping 1)))
            (seesaw/invoke-later (.doClick button)))))))]  (8)
(midi/midi-handle-events new-input handler))) (9)| 1 | First we build the function that we’ll register as our MIDI handler. |
| 2 | In responding to each MIDI event we check if the button has an open MIDI mapper, in case Learn mode is active. If there is no mapper window open, the function skips the whole Learn section. |
| 3 | If the Learn button is active, and we have received a Note On or Controller Change event, then it’s time to learn it! |
| 4 | Because we are about to make changes to GUI objects, we need to do that on the Swing event dispatch thread. |
| 5 | We check if we got a Note or Controller Change, then use that information to populate the various dropdowns and number spinners in the mapping window so they will recognize when the same note or controller is sent in the future.
We need to use inc to add 1 to the channel number, because even though MIDI talks about channels 1 through 16 (so we want to display them to the user that way), they are actually sent over the wire using the numbers 0 through 15. |
| 6 | Then we turn off the Learn button, since we have successfully learned our mapping, and record that we did learn something to suppress the rest of the function this time, because we don’t want to also respond to an event that we just learned. |
| 7 | Unless we just learned the current event, we check to see if it matches our assigned mapping (is the right type of event, has a non-zero velocity, is the right note or controller, and on the right channel). |
| 8 | If all of those checks passed, we pretend the user clicked the button (which again needs to be done on the Swing event dispatch thread). |
| 9 | This attaches the handler function we just finished building to the MIDI input device, so it will be called whenever there is input from that device. |
That’s one of the most complex functions we’ve looked at, but it does do a lot of the core work of supporting the MIDI mapping. The next two are simpler.
(defn change-input
  "Record the MIDI input from which messages should be received for a
  given button by storing it as that button's user data. Opens a
  private connection to it so we can add our own event handler that
  will stop being called when we close this connection. Stores `nil`
  if the input can not currently be found (it was disconnected, or
  present in a loaded file but not on this system)."
  [button show]
  (close-input button)  (1)
  (when-let [selection (get-in (show/user-data show)
                       [:mappings (seesaw/id-of button) :inputs])]  (2)
    (let [device-name (.full_name selection)]  (3)
      (try
        (let [new-input (midi/midi-in
                         (java.util.regex.Pattern/quote device-name))] (4)
          (attach-midi-handler button show new-input)  (5)
          (swap! (seesaw/user-data button) assoc :input new-input))  (6)
        (catch IllegalArgumentException e  (7)
          ;; The chosen output is not currently available
          (timbre/debug e "MIDI mapping using nonexisting MIDI input"
                        device-name))
        (catch Exception e  ; Some other problem opening the device
          (timbre/error e "Problem opening device" device-name
                        "(treating as unavailable)"))))))
This function is called whenever the MIDI input dropdown is changed in a button’s mapping window.
| 1 | The first thing to do is close whatever MIDI input was previously being used by this button, using one of the first shared functions we looked at. This means we will no longer receive, and thus respond to, events from the previously-chosen input. |
| 2 | Then we look at what device has now been chosen.
The actual code has a type hint in front of selection, ^beat_link_trigger.util.MidiChoice, which tells the Clojure compiler what Java class we expect to find, and allows it to write slightly more efficient code, but that is not required for it to work correctly. |
| 3 | Assuming we found a selection, we get the device name from it, and try to open that MIDI device. |
| 4 | Because midi-clj allows you to use regular expressions to search for devices, and Windows MIDI device names sometimes contain square brackets which get interpreted as regular expression ranges, we quote the device name and prevent any such misinterpretations from causing problems. |
| 5 | We then build and attach the event handler function to the newly-opened device, using the function we just examined above. |
| 6 | And we keep track of this open MIDI connection so we can close it later, like in step ①, or when the show itself closes. |
| 7 | We want to gracefully handle an unavailable device being chosen, because that is expected to occur often and not a big deal. Other kinds of problems, if they occur, get logged as errors. |
We handle MIDI outputs differently, because those can be shared across many different shows and expressions, and we never need to worry about closing them. Beat Link Trigger keeps track of a list of opened outputs for reuse, and closes them when the devices disappear, so all we need to do is use that list if we can, and update it if we are the first people to open an output.
So whenever we need to know what output is associated with a button, for the purpose of sending feedback, we call the following function:
(defn chosen-output
  "Return the MIDI output to which feedback messages should be sent for
  a given button, opening it if this is the first time we are using
  it, or reusing it if we already opened it. Returns `nil` if the
  output can not currently be found (it was disconnected, or present
  in a loaded file but not on this system)."
  [button show]
  (when-let [selection (or (get-in (show/user-data show)  (1)
                                 [:mappings (seesaw/id-for button) :outputs])
                           (first (util/get-midi-outputs)))]
    (let [device-name (.full_name selection)]  (2)
      (or (get @util/opened-outputs device-name)  (3)
          (try
            (let [new-output
                  (midi/midi-out  (4)
                    (str "^" (java.util.regex.Pattern/quote device-name) "$"))]
              (swap! util/opened-outputs assoc device-name new-output)
              new-output)
            (catch IllegalArgumentException e  (5)
              ;; The chosen output is not currently available.
              (timbre/debug e "MIDI mapping using nonexisting MIDI output"
                            device-name))
            (catch Exception e  ; Some other problem opening the device.
              (timbre/error e "Problem opening device" device-name
"(treating as unavailable)")))))))| 1 | The first thing we need to do is determine what output the user has chosen. If they have not explicitly chosen any, we default to the first device in the list of available outputs, which is what the dropdown will be displaying too. |
| 2 | Then we find the name of the chosen device. |
| 3 | If that device is already open, we can use it. |
| 4 | Otherwise, we try to open it, using the same precautions about regular expression quoting as we needed in the preceding function, and store it as an opened output for future use, either by us, or the rest of BLT. |
| 5 | And as before, if the device is not found, that means it was a choice made in the past when the device was connected, so we gracefully just return nil, which will turn off feedback attempts.
If some other problem occurred, we log it, and again return nil. |
The next function is another long one, because it creates the entire MIDI mapping graphical user interface, and there are a lot of elements in the window.
(defn midi-map
  "The action which brings up a window for mapping a MIDI controller to
  one of the beat pattern buttons."
  [button show]
  (let [data    (get-in (show/user-data show)  (1)
                        [:mappings (seesaw/id-of button)])
        save    (fn [e] (show/swap-user-data!  (2)
                         show assoc-in
                         [:mappings (seesaw/id-of button) (seesaw/id-of e)]
                         (seesaw/value e)))
        enable  (fn [e & selectors]
                  (seesaw/config! (map #(seesaw/select (seesaw/to-root e) [%])
                                       selectors)
                                  :enabled? (not= "None" (seesaw/value e))))
        close   (fn [e]
                  (swap! (seesaw/user-data button) dissoc :frame)
                  (.dispose (seesaw/to-root e)))
        outputs (util/get-midi-outputs)  (3)
        inputs  (util/get-midi-inputs)
        panel   (seesaw.mig/mig-panel
                 :items [["MIDI Input:" "alignx trailing"]
                         [(seesaw/combobox :id :inputs
                           :model (concat inputs
                                     ;; Add selection even if not available.
                                     (when (and (:inputs data)
                                                (not ((set inputs)
                                                       (:inputs data)))))
                                           [(:inputs data)])
                           :listen [:item-state-changed  (4)
                                    (fn [e]
                                      (save e)
                                      (change-input button show))])]
                         ["Message:" "gap unrelated"]
                         [(seesaw/combobox :id :message
                           :model ["None" "Note" "CC"]
                           :listen [:item-state-changed
                                    (fn [e]
                                      (save e)
                                      (enable e :#note :#channel))])]
                         [(seesaw/spinner :id :note
                           :model (seesaw/spinner-model 1 :from 1 :to 127)
                           :listen [:state-changed save] :enabled? false)]
                         ["Channel:" "gap unrelated"]
                         [(seesaw/spinner :id :channel
                           :model (seesaw/spinner-model 1 :from 1 :to 16)
                           :listen [:state-changed save] :enabled? false)]
                         [(seesaw/toggle :id :learn :text "Learn")
                          "gap unrelated, span 2, wrap unrelated"]
                         ["MIDI Output:" "alignx trailing"]
                         [(seesaw/combobox :id :outputs
                           :model (concat outputs
                                   ;; Add selection even if not available.
                                   (when (and (:outputs data)
                                   (not ((set outputs) (:outputs data))))
                                   [(:outputs data)]))
                            :listen [:item-state-changed save])]
                         ["Message:" "gap unrelated"]
                         [(seesaw/combobox :id :feedback-message
                           :model ["None" "Note" "CC"]
                           :listen [:item-state-changed
                                    (fn [e]
                                      (save e)
                                      (enable e :#feedback-note
                                              :#feedback-channel
                                              :#feedback-on
                                              :#feedback-off))])]
                         [(seesaw/spinner :id :feedback-note
                           :model (seesaw/spinner-model 1 :from 1 :to 127)
                           :listen [:state-changed save] :enabled? false)]
                         ["Channel:" "gap unrelated"]
                         [(seesaw/spinner :id :feedback-channel
                           :model (seesaw/spinner-model 1 :from 1 :to 16)
                           :listen [:state-changed save] :enabled? false)]
                         ["On:" "gap unrelated"]
                         [(seesaw/spinner :id :feedback-on
                           :model (seesaw/spinner-model 127 :from 0 :to 127)
                           :listen [:state-changed save] :enabled? false)]
                         ["Off:" "gap unrelated"]
                         [(seesaw/spinner :id :feedback-off
                           :model (seesaw/spinner-model 0 :from 0 :to 127)
                           :listen [:state-changed save] :enabled? false)]])
        root (seesaw/frame :title (str "MIDI Map " (seesaw/text button))  (5)
                           :content panel
                           :on-close :nothing
                           :listen [:window-closing close])]
    (swap! (seesaw/user-data button) assoc :frame root)  (6)
    (seesaw/value! panel data)  (7)
    (seesaw/pack! root)  (8)
    (.setLocationRelativeTo root button)
(seesaw/show! root)))| 1 | We start by looking up the current configuration of the window, which is stored in the show’s user data, so that it will persist between runs of Beat Link Trigger. |
| 2 | We define some helper functions: save updates the show user data with the new state of a user interface element, to record user actions so the MIDI event handler can honor them, and so they can be restored the next time the show is opened.
enable lets us enable or disable a group of UI elements in response to the user choosing None or some other value in the Message menu.
And close is used when closing the window, to let the button know the window is gone before actually closing it. |
| 3 | We get the current sets of MIDI input and output choices, and proceed to build the panel that contains all the GUI elements.
As we did when updating the input/output menus in responses to changes in the MIDI environment (in beat-pattern-update-mapper-devices), we take care to include the previously-chosen device in the menu (if there was one) even if that device is not currently available. |
| 4 | We add GUI event listeners to call our helper functions when the user makes changes.
In this case, we both save the new choice in the show, and open the MIDI device and hook up our MIDI event handler.
Other elements will also save, and sometimes call other helpers like enable as appropriate. |
| 5 | Here we create the actual window, setting the panel we just built as its content, and arrange to call our close helper when the user asks to close it. |
| 6 | We tell the button that it now has a MIDI mapper window open for it, which many of the functions we saw above rely on. |
| 7 | We initialize the content of all our UI elements with whatever was saved in the show, so that the window opens up showing the correct current values. |
| 8 | Finally, we tell the window to take whatever size best fits its contents, position it centered over the button it belongs to, and make it appear on the screen. |
The function button-action remains unchanged from the earlier version of the show, believe it or not! We do need to tweak the function that creates the button itself slightly, though, to add the context menu that opens the MIDI mapping window:
(defn make-button
  "Constructs a toggle button for use in the UI, with the specified id,
  text, and beat pattern."
  [show id text pattern]
  (seesaw/toggle :id id :text text
    :user-data (atom {})  ; Holds MIDI input and mapping window when open.
    :listen [:action (button-action tpattern)]
    :popup (fn [event]  (1)
             [(seesaw/action :name "MIDI Map"
                :tip "Link this button to a MIDI controller."
                :handler (fn [_]
                           (if-let [mapper (:frame @(seesaw/user-data event))]
                             (seesaw/show! mapper)  (2)
(midi-map (seesaw/to-widget event) show))))]))) (3)| 1 | This popup is the only thing we needed to add to the previous version. It makes a "MIDI Map" option appear when someone right-clicks (or control-clicks) on the button, and calls the embedded handler function when that option is chosen. |
| 2 | The handler first checks to see if there is already a MIDI mapper open for the button, and if there is, this line just selects that window and brings it to the front if needed. |
| 3 | Otherwise, we call the big function we just looked at which builds the MIDI mapper window for this button, makes a note of the fact that it is open (so logic like the above can work), and displays it. |
The build-ui function, which creates the main show user interface (holding the grid of beat pattern buttons) is essentially the same as the version we examined for the non-mappable show.
The only difference is that it needs to take the show as an argument, so it can pass it along to the new version of make-button each time we call that, because access to the show is needed when calling the new midi-map function.
In the non-mappable version of beat-pattern-changed, we embedded a local value that listed all the button selectors and the beat patterns they managed.
This time we need that information in more than one function, so we pull it out as a shared variable named beat-pattern-buttons:
(def beat-pattern-buttons
  "The selectors of buttons which make up the beat-pattern UI, and the
  beat patterns they map to. Sets are applied or removed as a whole,
  individual beat values are toggled independently."
  {:#odds  #{1 3}
   :#evens #{2 4}
   :#every #{1 2 3 4}
   :#b-1   1
   :#b-2   2
   :#b-3   3
   :#b-4   4})
And here is the updated version of beat-pattern-changed which has a new responsibility.
In addition to updating the GUI button states in response to the new beat pattern, it also sends MIDI feedback for any buttons which are configured to do that, so that the MIDI controller LEDs can also be updated:
(defn beat-pattern-changed
  "Called when the beat pattern has changed to update the state of each
  button in the UI to reflect the new pattern, as well as sending any
  MIDI feedback messages which buttons may have mapped."
  [show new-pattern]
  (seesaw/invoke-later
   (doseq [[id on-pattern] beat-pattern-buttons]  (1)
     (let [button (seesaw/select (:frame show) [id])]
       (if (set? on-pattern)
         (seesaw/value! button (= new-pattern on-pattern))
         (seesaw/value! button (contains? new-pattern on-pattern)))
       (let [mapping  (get-in (show/user-data show)  (2)
                              [:mappings (seesaw/id-for button)])
             velocity (if (seesaw/value button)  (3)
                          (:feedback-on mapping 127)
                          (:feedback-off mapping 0))]
         (when-let [output (chosen-output button show)]  (4)
           (when (= "Note" (:feedback-message mapping))  (5)
             (if (pos? velocity)
               (midi/midi-note-on output (:feedback-note mapping 1) velocity
                                  (dec (:feedback-channel mapping 1)))
               (midi/midi-note-off output (:feedback-note mapping 1)
                                   (dec (:feedback-channel mapping 1)))))
           (when (= "CC" (:feedback-message mapping))  (6)
             (midi/midi-control output (:feedback-note mapping 1) velocity
(dec (:feedback-channel mapping 1))))))))))| 1 | Here’s where we use the new shared beat-pattern-buttons variable instead of embedding the raw data.
Otherwise, this function is so far unchanged. |
| 2 | And here is the new part of the function, for sending feedback to configured MIDI devices. We start by looking up the button’s MIDI mappings. |
| 3 | If the button is now active, we look up the velocity the user configured as feedback for the "on" state, otherwise we use the value configured for the "off" state. |
| 4 | We check that the button’s configured MIDI output is currently connected. If not, the rest of the function is skipped. |
| 5 | If the button is configured to send feedback as MIDI notes, we send a Note On if the feedback velocity is non-zero, and a Note Off if it is zero. In either case, we send it to the configured note. |
| 6 | For controller changes, it doesn’t matter what the velocity is, we always just send a controller change message with that velocity to the configured controller. |
Global Setup Expression
Much of this is familiar from the non-mapped example, we just have a few additions to support MIDI mapping.
;; Set up the beat pattern selection UI for the show.
(show/block-tracks show (build-ui show))  (1)

;; Arrange for the checkbox state to be automatically updated if any other
;; code (such as a show track) changes the beat mode.
(add-watch globals :beat-pattern-watcher  (2)
           (fn [_ _ old-state new-state]
             (let [old-pattern (:beat-pattern old-state)
                   new-pattern (:beat-pattern new-state)]
               (when (not= old-pattern new-pattern)
                 (beat-pattern-changed show new-pattern)))))

;; Register a function to reconnect any mapped buttons and refresh any
;; feedback state whenever the MIDI environment changes, in case a
;; mapped controller has suddenly become available. Also, call the
;; UI-refresh function once now to set things up as they should
;; initially appear.
(let [refresh-ui (fn []  (3)
                   (seesaw/invoke-later
                    (doseq [id (keys beat-pattern-buttons)]  (4)
                      (let [button (seesaw/select (:frame show) [id])]
                        (update-mapper-devices button)  (5)
                        (change-input button show)))  (6)
                    (beat-pattern-changed show
                                          (:beat-pattern @trigger-globals))))
      listener (reify uk.co.xfactorylibrarians.coremidi4j.CoreMidiNotification
                 (midiSystemUpdated [_this]  (7)
                   (refresh-ui)))]
  (swap! globals assoc :listener listener)  (8)
  (uk.co.xfactorylibrarians.coremidi4j.CoreMidiDeviceProvider/addNotificationListener
   listener)  (9)
(refresh-ui))| 1 | As noted in the discussion of the changes to build-ui, we pass the show as an argument now, because it’s needed when building the MIDI mapper windows.
And, as before, the next line sets the show to use a distinctive purple hue for its window background, and for its raw trigger in the Triggers window. |
| 2 | This is completely identical to the older version.
All the new smarts are built into beat-pattern-changed. |
| 3 | In the old version, we only had to update the UI once, when the show loaded. Now we want to do it whenever a MIDI device gets attached or detached as well, because we need to update the MIDI device menus in any open MIDI mapping windows, open the MIDI connections if any buttons are configured to listen to a newly-attached device, and send feedback to any newly-attached devices that are configured to receive it. This defines a function that we will call to do those things. |
| 4 | We loop over the button information we stored in beat-pattern-buttons, and look up each button within the show graphical interface. |
| 5 | This updates the button’s MIDI device menus if it has a mapping window open. |
| 6 | This opens the now-chosen input device for the button, in case that has changed as a result of the MIDI environment change. (Since we call this function once when the show opens, this is also how we initially open the button’s configured input.) This also installs our MIDI event handler function so the button responds properly to MIDI events received from that input. |
| 7 | We create a listener object that can be called when changes to the MIDI environment are detected.
Our implementation just calls the refresh-ui function we defined above. |
| 8 | We store a reference to this listener object in the show globals so that we can unregister it when the show is closed. |
| 9 | And finally, we register it with CoreMidi4J so that it will be informed whenever MIDI devices are added to or removed from the system.
And, as noted above, we call refresh-ui one time ourselves, to set up the initial state of the beat pattern buttons in both the interface window and on any attached feedback controllers, and to open the buttons’ MIDI connections and install their MIDI event handlers. |
Global Shutdown Expression
;; Stop reacting to changes to the MIDI environment.
(uk.co.xfactorylibrarians.coremidi4j.CoreMidiDeviceProvider/removeNotificationListener
 (:listener @globals))  (1)

;; Close any MIDI inputs the buttons were using, and any MIDI mapper
;; windows they had open.
(doseq [id (keys beat-pattern-buttons)]  (2)
  (let [button (seesaw/select (:frame show) [id])]
    (close-input button)
(close-mapper button)))| 1 | This is what we just mentioned in ⑧ above, the code to tell CoreMIDI4J to stop telling our listener when MIDI devices are added to or removed from the system. |
| 2 | Here we loop over all the beat pattern buttons in the interface, so we can be a good citizen and close any open MIDI mapping windows they might have, and any MIDI devices they were listening to, as part of the show closing. |
So, as promised, a lot more code was added in order to support the MIDI mapping capability. But it was worth it, and hopefully this makes sense and can inspire you to create other great user interfaces as Beat Link Trigger shows!