Editing Track Cues
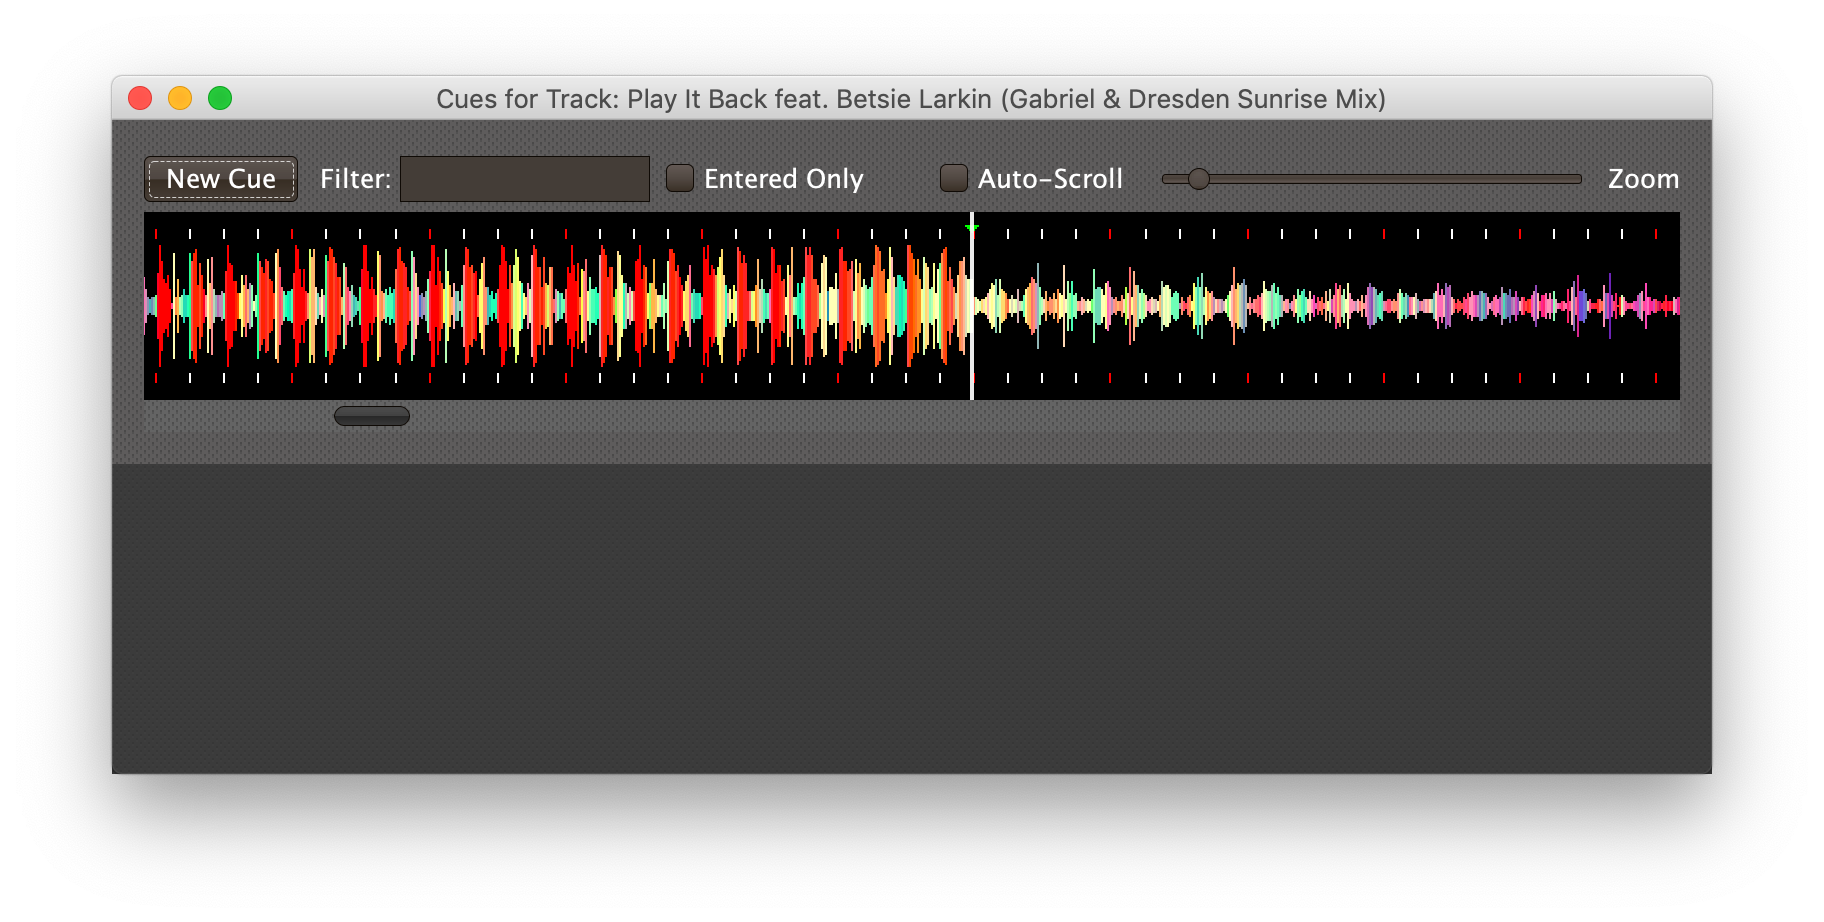
Tracks (and now, phrases) have settings and expressions that allow you to make things happen when they load or start and stop playing, but you will often be interested in more specific parts of the track being played. That’s where Cues come in. To add Cues to a Track, choose Edit Track Cues in the Track’s context menu, as described in the previous section. That will open a new window for viewing and editing details about that Track’s Cues:
Before introducing the various ways to add Cues to the track, let’s explore the features available at the top of the window.
| This kind of window is also used for editing cues within Phrase Triggers, although it has a slightly different appearance and set of features in that context. |
Cues Window Header Elements
At the top of the Cues window, above any Cues that you have added to it, is a header that shows a scrollable and zoomable view of the track waveform and beat grid, much like the one that appears in The Player Status Window, except that you can manually scroll this one to the section you want to see regardless of whether any players are currently playing it.
If any are, you will see their playback position(s) marked on the waveform as illustrated above, but they will not cause the waveform to scroll to follow them unless you
check the Auto-Scroll checkbox.
Although you won’t want to do that when you are editing cues, it can be nice when running a show, as it makes it easy to follow along as Cues approach and run.
You can also interact with cues in this window. Hovering the mouse pointer over a cue displays information about it. Clicking on one with your mouse will scroll its configuration row into view in the lower section of the window if it was not already visible. Dragging an edge left or right will adjust the beat on which the cue begins or ends. Right-clicking or control-clicking a cue brings up the cue context menu which gives you many other options, and clicking on a cue with the Option or Alt key held down is a quick way to simulate its Started On-Beat and Ended events.
The New Cue button creates a new cue on the first beat of the Track, unless you have selected a beat range first as described below.
As with the Show window, if you type any text in the Filter box, only Cues that match that text will be visible. Similarly, if you check the Entered Only checkbox, only Cues that currently have a player positioned inside them will be visible. This is a great way to narrow down your focus to watch what is going on with cues the DJ is currently playing.
| The Entered Only and Auto-Scroll checkboxes are only visible when Beat Link Trigger is Online (or you are Simulating Playback), because they only make sense in the context of being able to detect that a player has loaded the track. |
Adding Cues to a Track
The Cues window doesn’t do much until you add at least one Cue. As mentioned above, you can use the New Cue button to do this, and then edit the cue to position it where you want it, but it is easier to specify where you want it on the beat grid first. To do that, you can click and drag in the waveform view to highlight the beats that you want the Cue to run for. Dragging over the eight beats past where the player was cued in the above example sets up a selection like this:
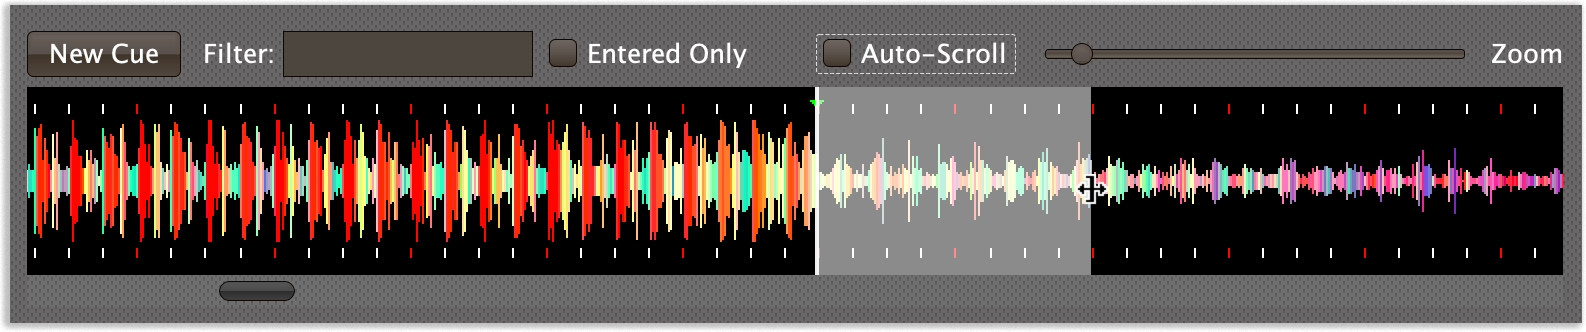
If your aim was slightly off, you can drag the edges of the selection to adjust them, as suggested by the cursor in the image above, or you can shift-click to grow or shrink the cue, perhaps after scrolling the waveform to a different section. Also remember that you can adjust the Zoom slider to make it easier to position your cue.
Alternately, you can click to select a single beat, then shift-click another to specify the entire range without dragging. If you created a beat selection by accident and want to get rid of it, you can either drag it back down to nothing, or click a single beat outside the selection and then shift-click it to deselect it.
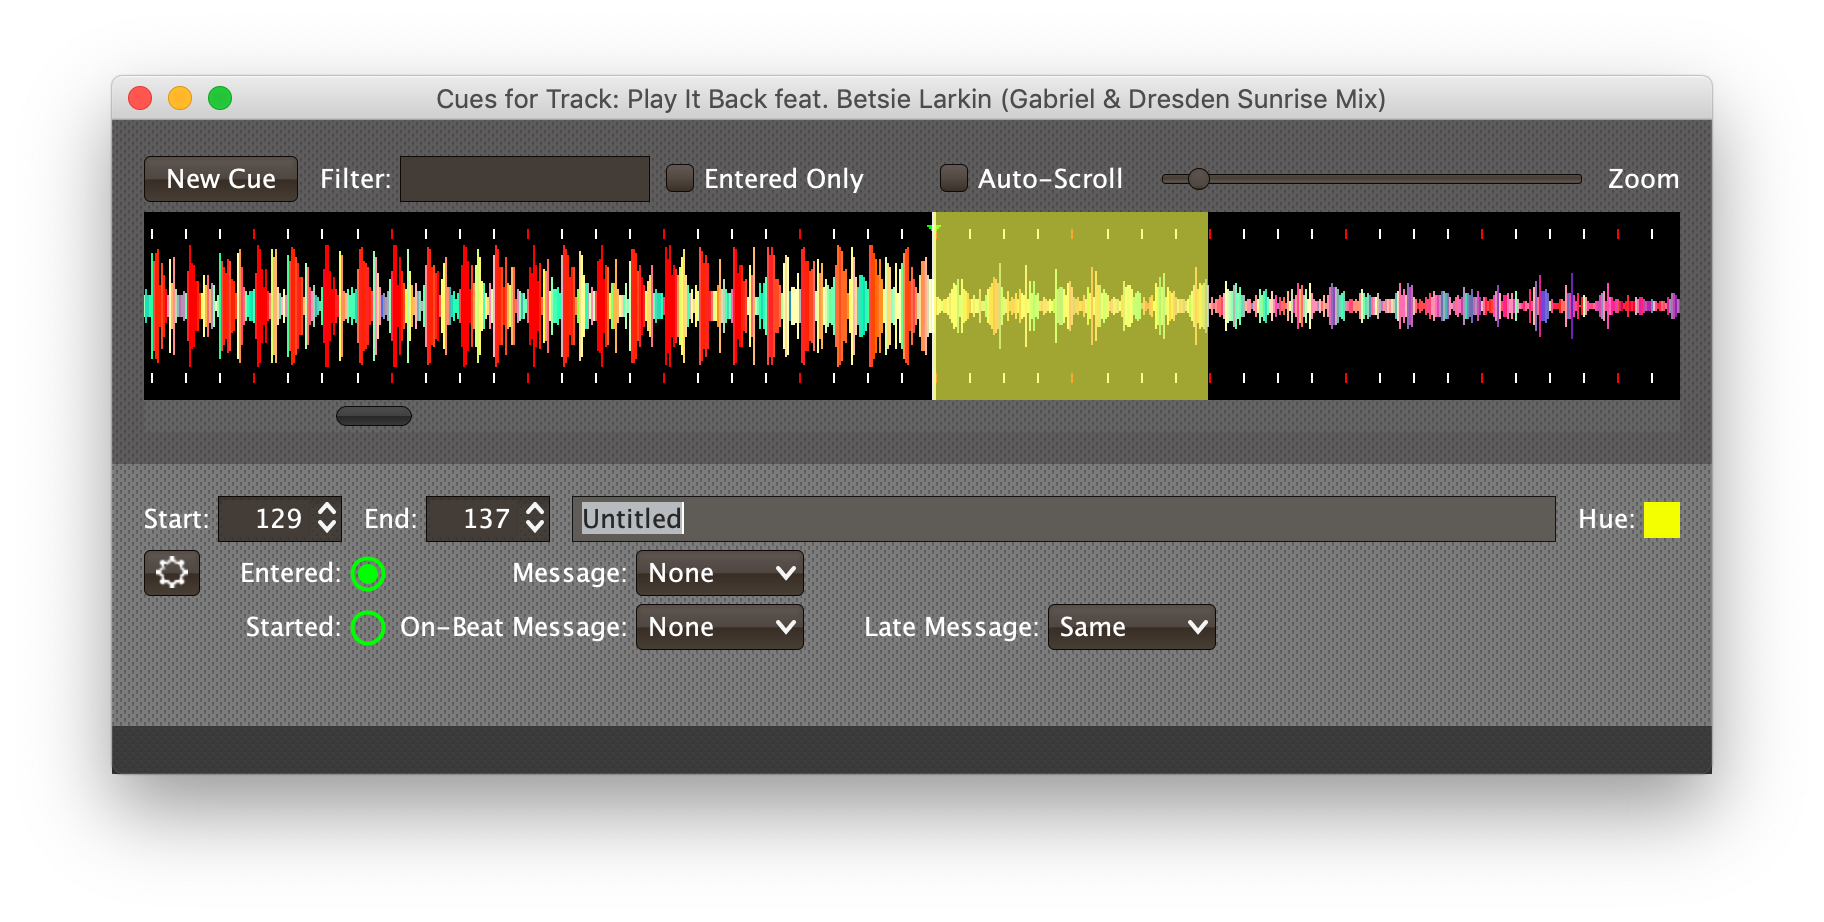
Regardless of how you do it, once you have the right beats selected, clicking the New Cue button will create a new cue covering the chosen beats:
Cue Row Elements
Start and End Spinners
You can see and adjust the beats on which the Cue starts and ends using these two fields, either by typing new values, or clicking the arrows. However, it is probably even more convenient to simply drag the edges of the cue in the waveform, which also works.
The End must always be at least one beat past the Start, and neither can extend outside the beat grid of the Track.
Cue Name
To help understand the purpose of the cue, you can give it a name.
The default is Untitled (with a numeric suffix if needed to keep it distinct), but as soon as the cue is created, the Name field is selected and ready for you to type something more meaningful.
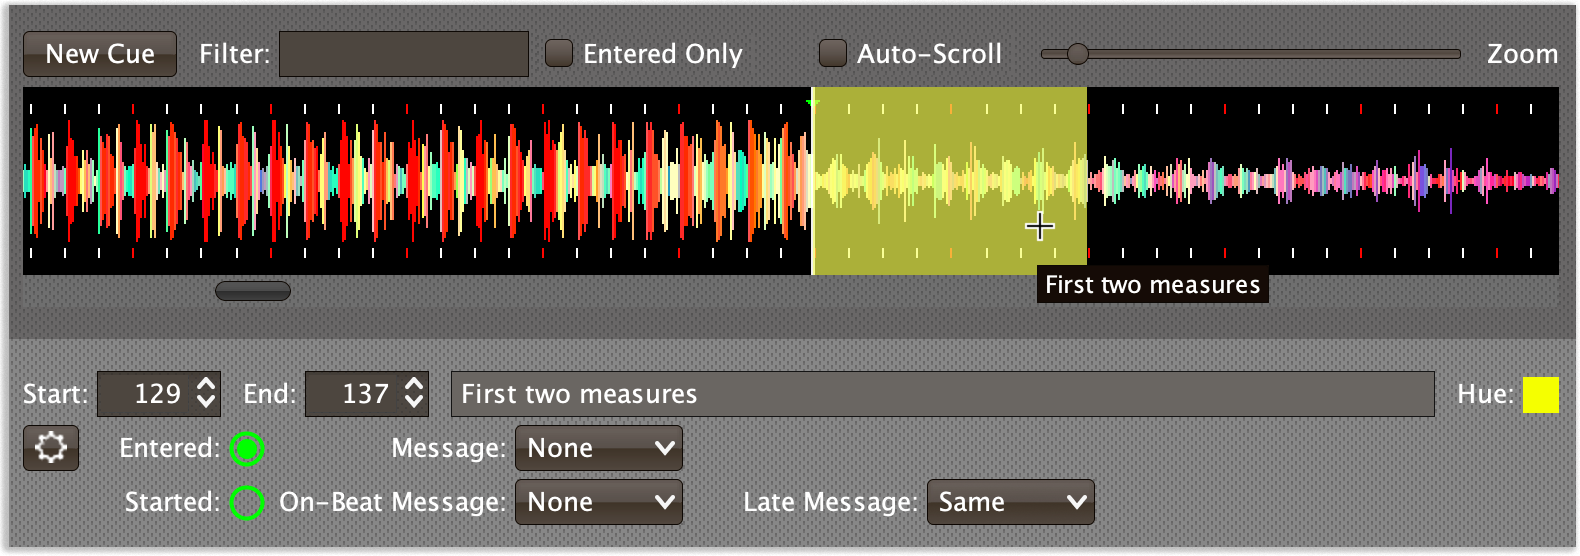
For this example, we’ll type “First two measures”, since we placed the cue at the point where this track begins playback after being loaded.
The cue name also appears as a tool tip when you hover the mouse pointer over the cue in the waveform:
Cue Hue
Cues are assigned distinct hues when they are created to help you tell them apart (and to tie the cue in the waveform to the corresponding detail row below), but you can also assign each cue a specific hue if that helps organize your show, by clicking the Hue swatch in the Cue row. That will bring up a color picker window where you can choose the exact hue you want.
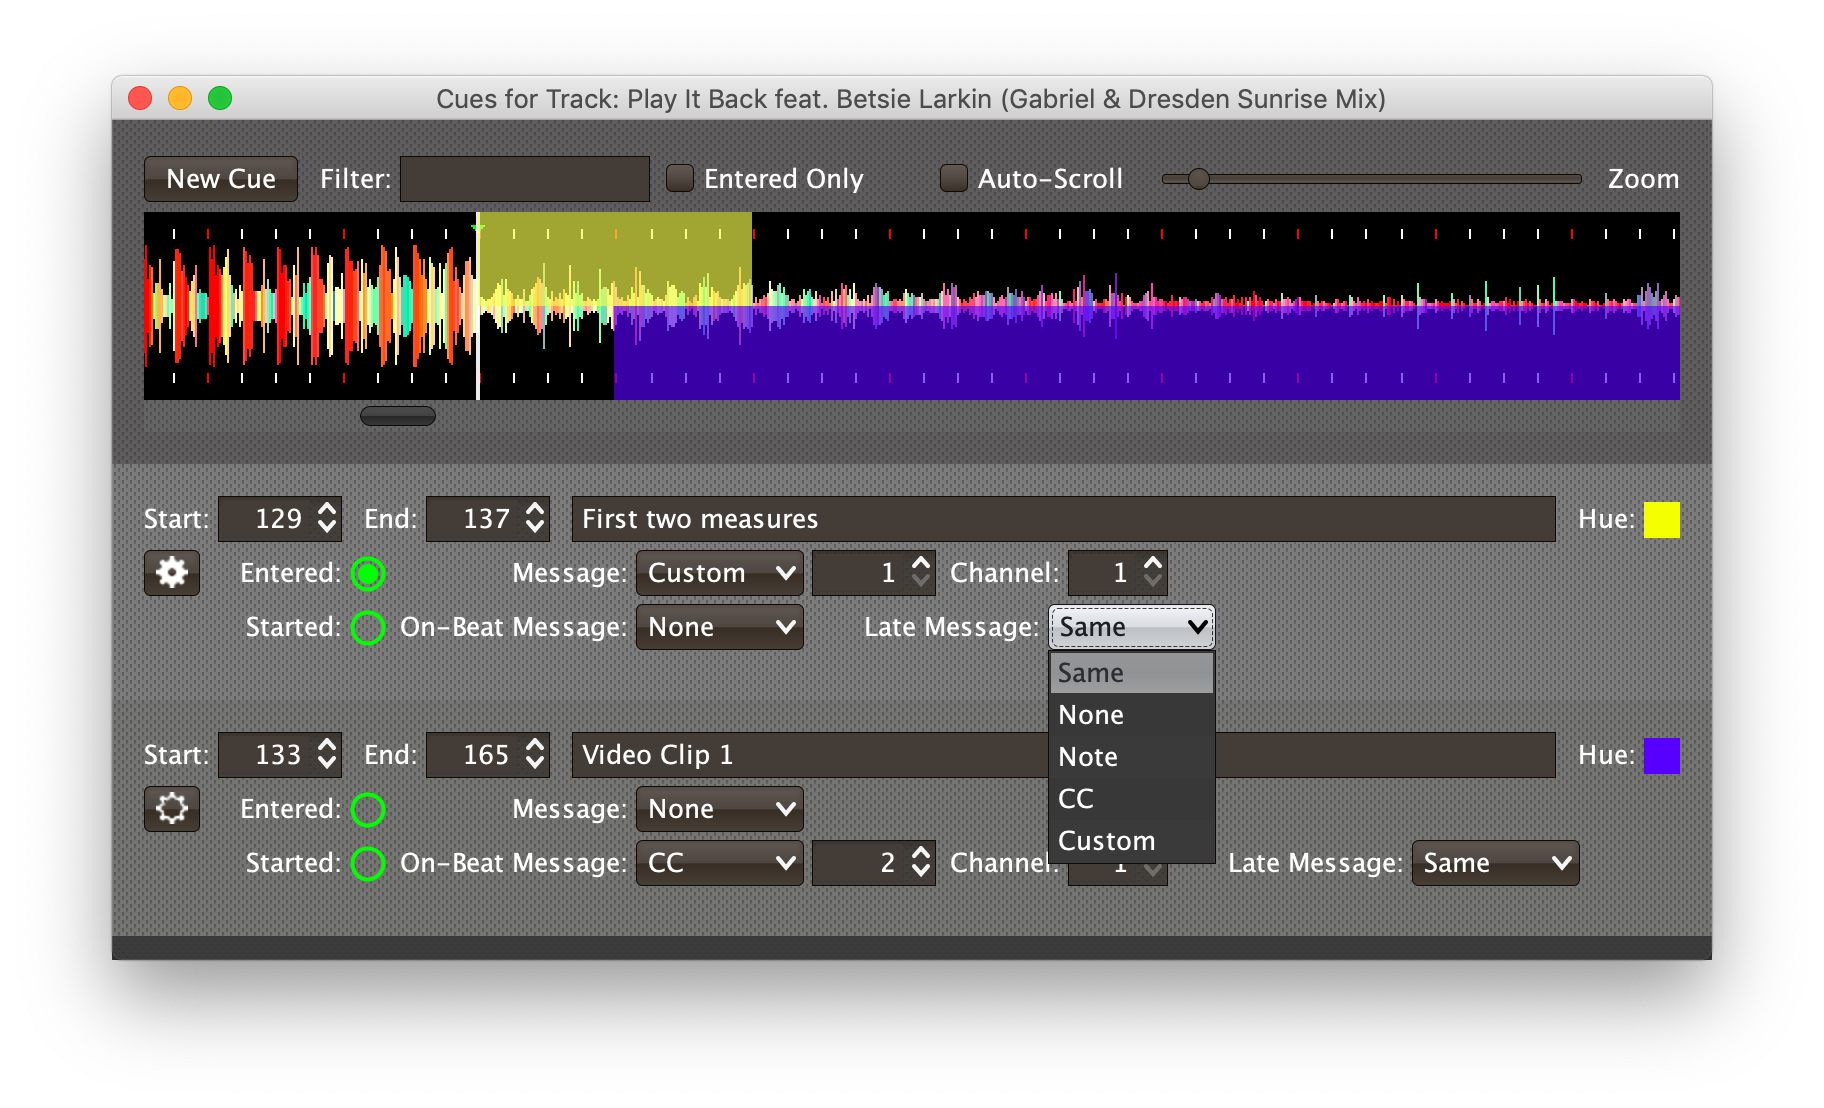
If cues overlap each other, Beat Link Trigger draws them in separate lanes to make it easier to tell where each begins and ends. It can handle even very complex sets of overlapping cues, adjusting them into a minimal set of lanes. Here’s an example of what it would look like if we added a second cue called “Video Clip 1” that overlaps part of our first cue:
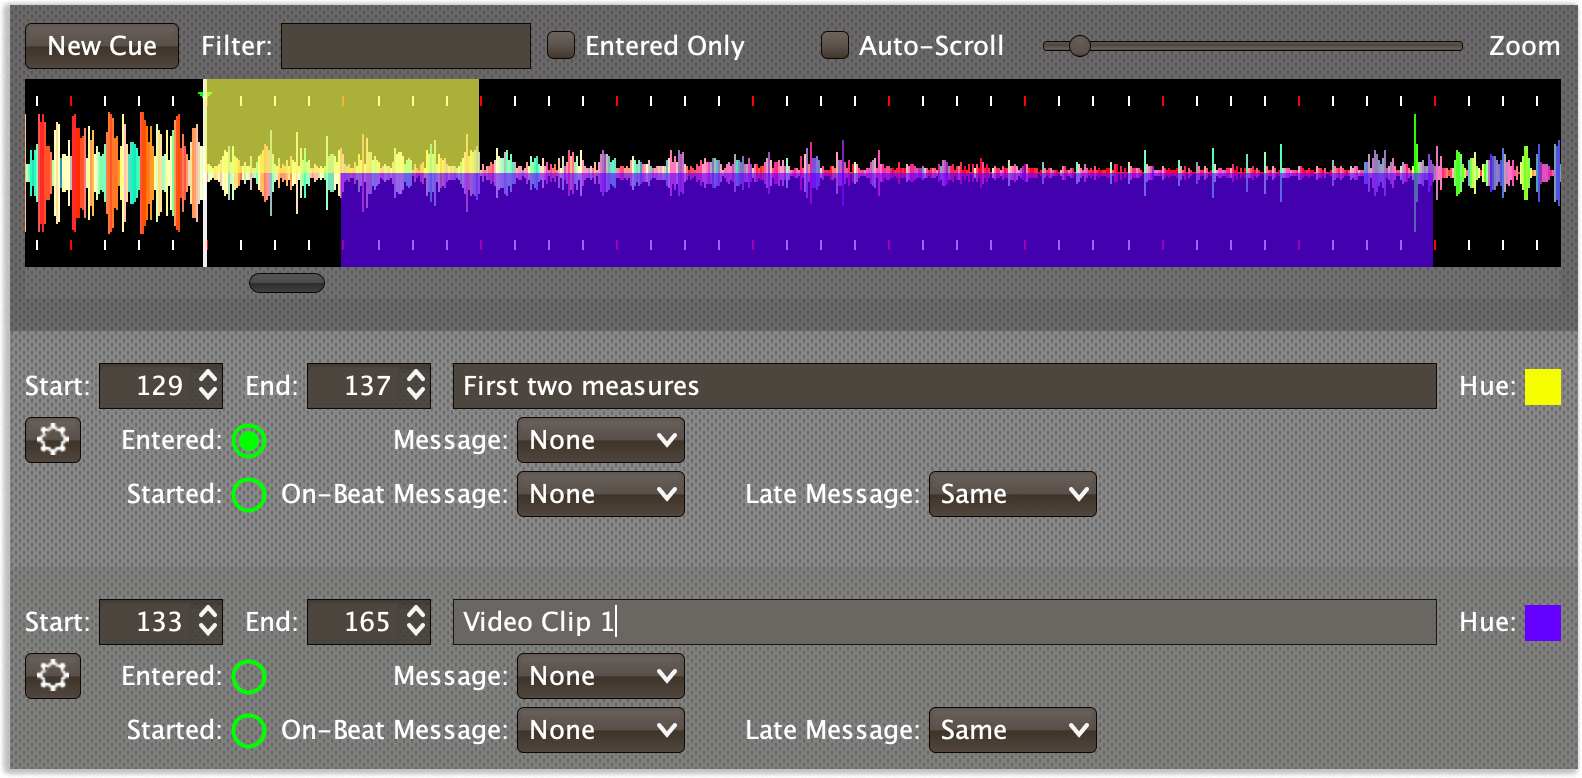
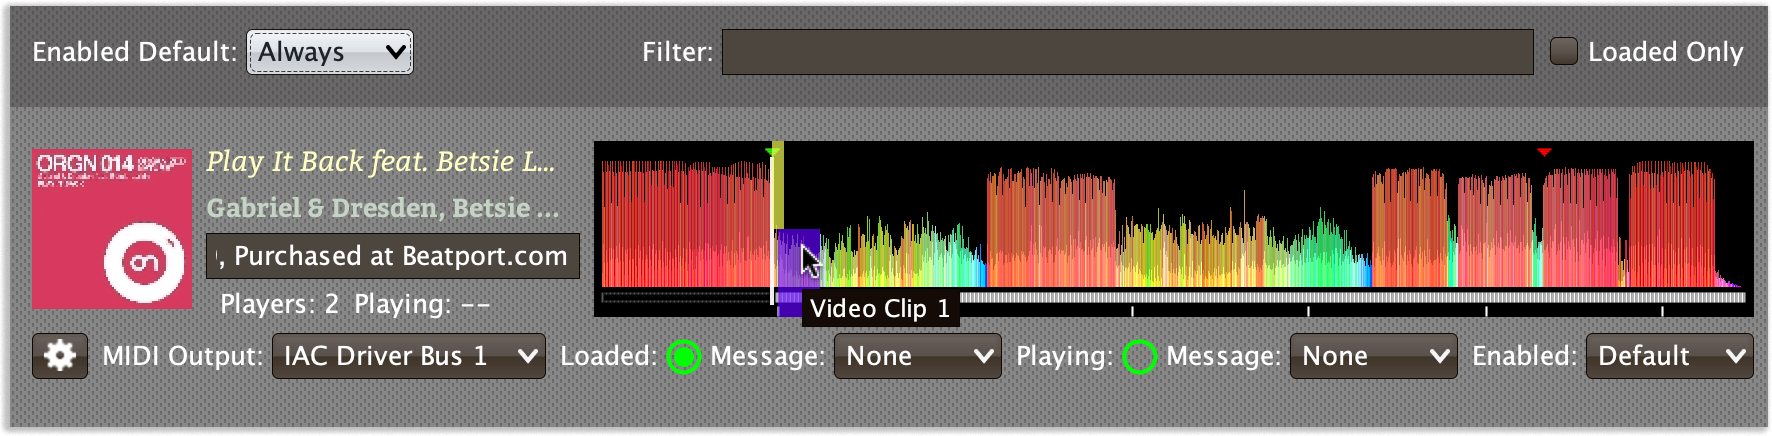
Cues are also visible, and show their names as tool tips, in the waveform preview drawn in Track rows in the Show window, so you don’t even need to open the Cues Editor for a quick reminder of what cues are coming up:
Context Menu Button
Below the first row of cue configuration elements there is a gear button that allows you to access the cue’s Context Menu with a regular mouse click. The gear will be filled in if any Expressions have been added to the Cue, and hollow otherwise. The contents of the menu itself are described below.
Entered Status
To the right of the context menu button there is an Entered Status indicator which has two parts. The outer ring indicates whether the Cue’s Track is currently enabled (a green circle) or disabled (a red circle with a slash). If any player is currently positioned anywhere inside the Cue, there is a filled circle inside the enabled indicator ring:
| State | Indicator |
|---|---|
Disabled, Not Entered |
|
Enabled, Not Entered |
|
Disabled, Entered |
|
Enabled, Entered |
|


Entered Message Menu
The Entered Message Menu determines what kind of MIDI message is sent when the first player moves into the cue (as long as the Cue’s Track is Enabled), or when the last player that had been positioned inside the cue moves out of it.
As a shortcut for testing your Entered Message configuration, clicking on the Message label with the Option or Alt key held down is a quick way to simulate the Entered and Exited events.
|
The player does not need to actually be playing for Entered/Exited messages to be sent: if the track loads and the player auto-cues within the Cue, or the DJ uses cue/loop call, needle jump, the jog wheel, or search to move into or out of the cue, its state will update and the appropriate messages will be sent. For cues within phrase triggers the situation is different because the phrase trigger will only ever be active if the underlying phrase (and track) are actually playing. |
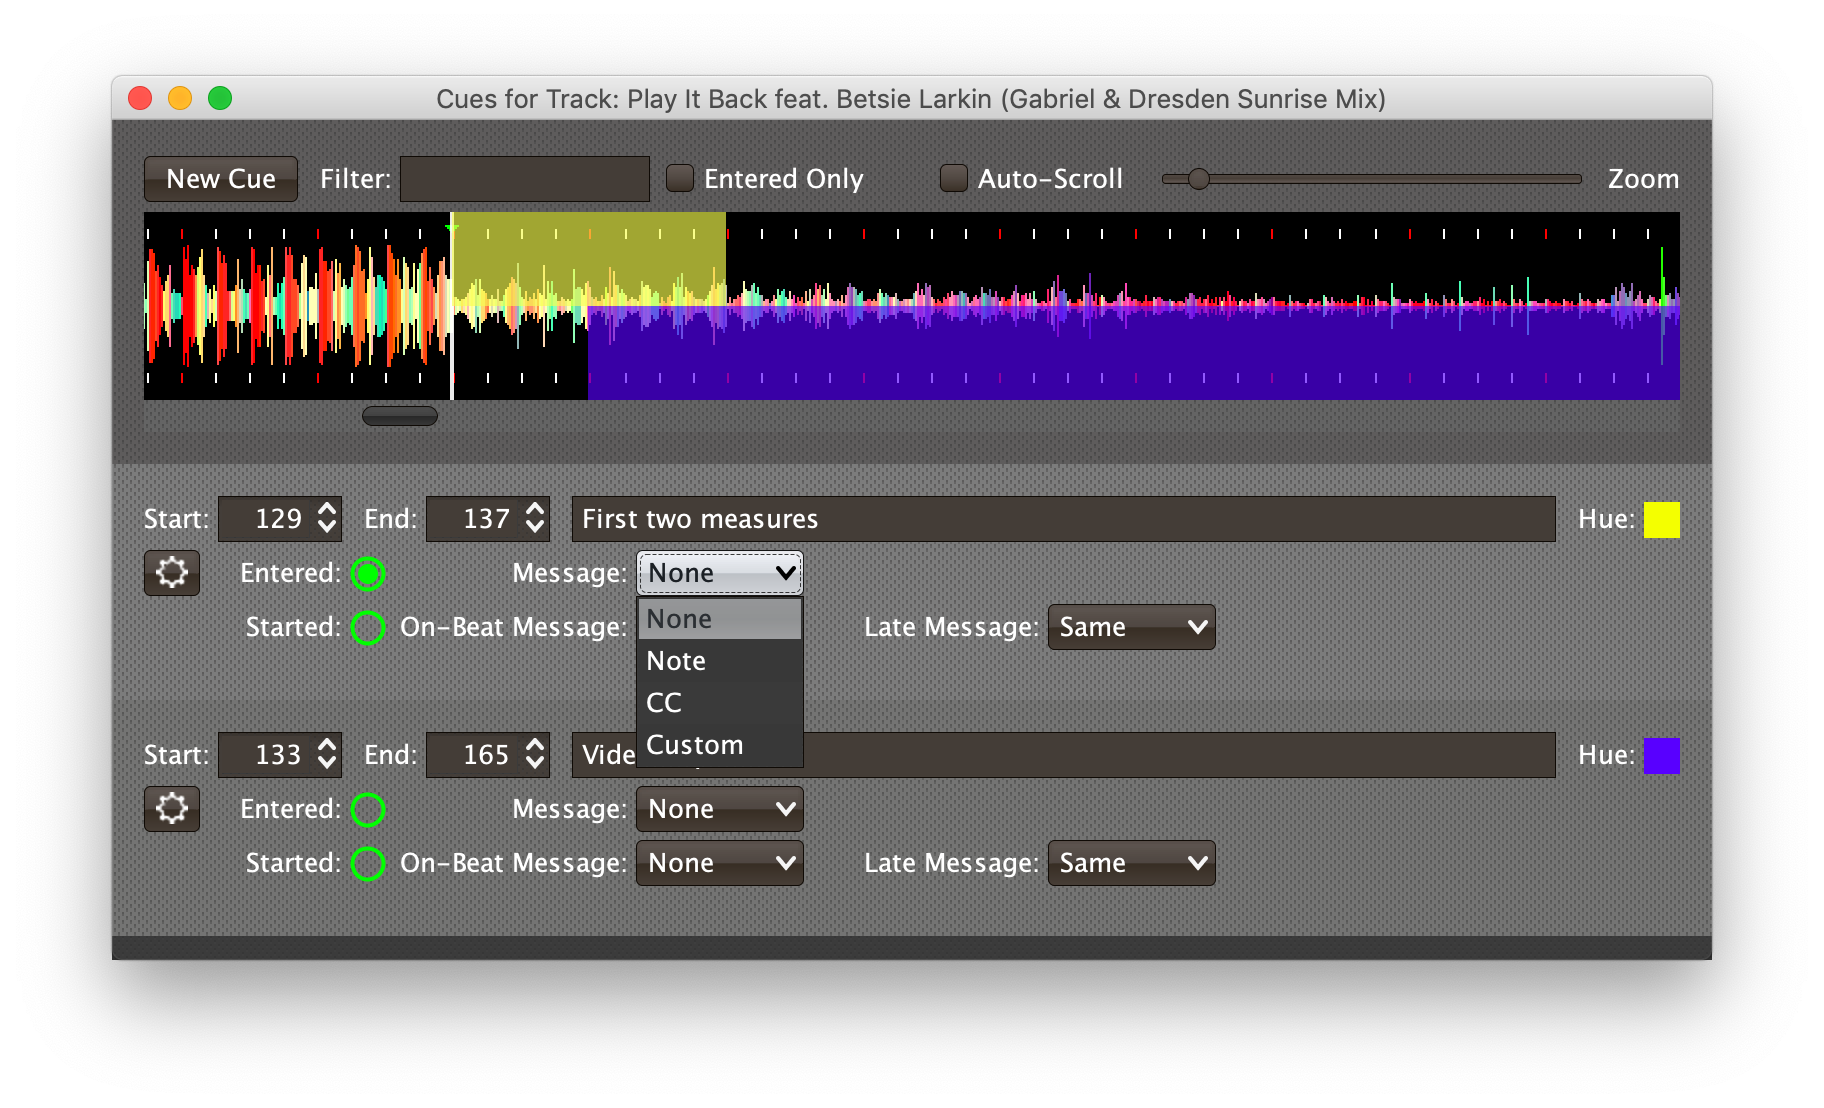
- None
-
With this setting, which is the default, nothing is sent when the Track loads or unloads.[1] When None is chosen, there are no interface elements visible to configure the message. They will appear once you choose a message type to send.
- Note
-
With this setting, the Show sends a Note On message, with velocity 127 and the note number shown to the right of the menu, when the first player moves inside the Cue (as long as the Cue’s Track is enabled), and a Note Off message when the last player that had been inside the Cue moves back out of it, or the Track is disabled.

The Channel on which the Entered / Exited messages are sent is configured just to the right of the note selector.
- CC
-
With this setting, the Show sends a Control Change message, with value 127 and the note number shown to the right of the menu, when the first player moves inside the Cue (as long as the Cue’s Track is enabled), and a CC with value 0 when the last player that had been inside the Cue moves back out of it, or the Track is disabled.
- Custom
-
When this option is chosen, you can send any kind of message you want when the Cue is entered and/or exited, by writing code as described in the Expressions section. This gives you the most flexibility because in addition to MIDI messages, you can send arbitrary UDP packets, HTTP requests, or whatever you might need. The expression editors for the Entered Expression and Exited Expression are accessed through the cue context menu.
If you choose Custom and have not yet written an Entered expression, the expression editor will be opened to let you do that. You can also open that editor using the cue context menu.
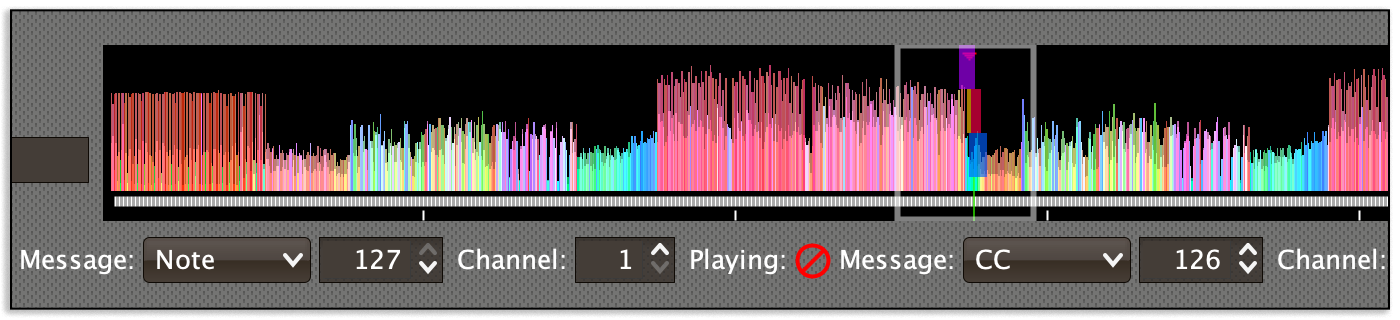
Entered Note / Controller Spinner
Found immediately to the right of the Entered Message Menu (unless None is chosen as the Message type), this field lets you set the MIDI note number used for Note-based entered and exited messages, or the controller number used for Control Change-based entered and exited messages. The value is also available to your Cue expressions if they want to use it.
Started Status
Below the Entered Status indicator there is a Started Status indicator. Like the Entered Status indicator, it has two parts. The outer ring indicates whether the Cue’s Track is currently enabled (a green circle) or disabled (a red circle with a slash). If any player is currently playing inside the Cue, there is a filled circle inside the enabled indicator ring:
| State | Indicator |
|---|---|
Disabled, Not Started |
|
Enabled, Not Started |
|
Disabled, Started |
|
Enabled, Started |
|
Started On-Beat Message Menu
The Started On-Beat Message Menu determines what kind of MIDI message is sent when the first player begins playing the Cue, as long as it does so from the very first beat of the Cue (and as long as the Cue’s Track is enabled), or when the last player that had been playing inside the cue moves out of it or the Track becomes disabled, if it was started on its first beat.
| As a shortcut for testing your Started On-Beat Message configuration, clicking on the On-Beat Message label with the Option or Alt key held down is a quick way to simulate the Started On-Beat and corresponding Ended events. |
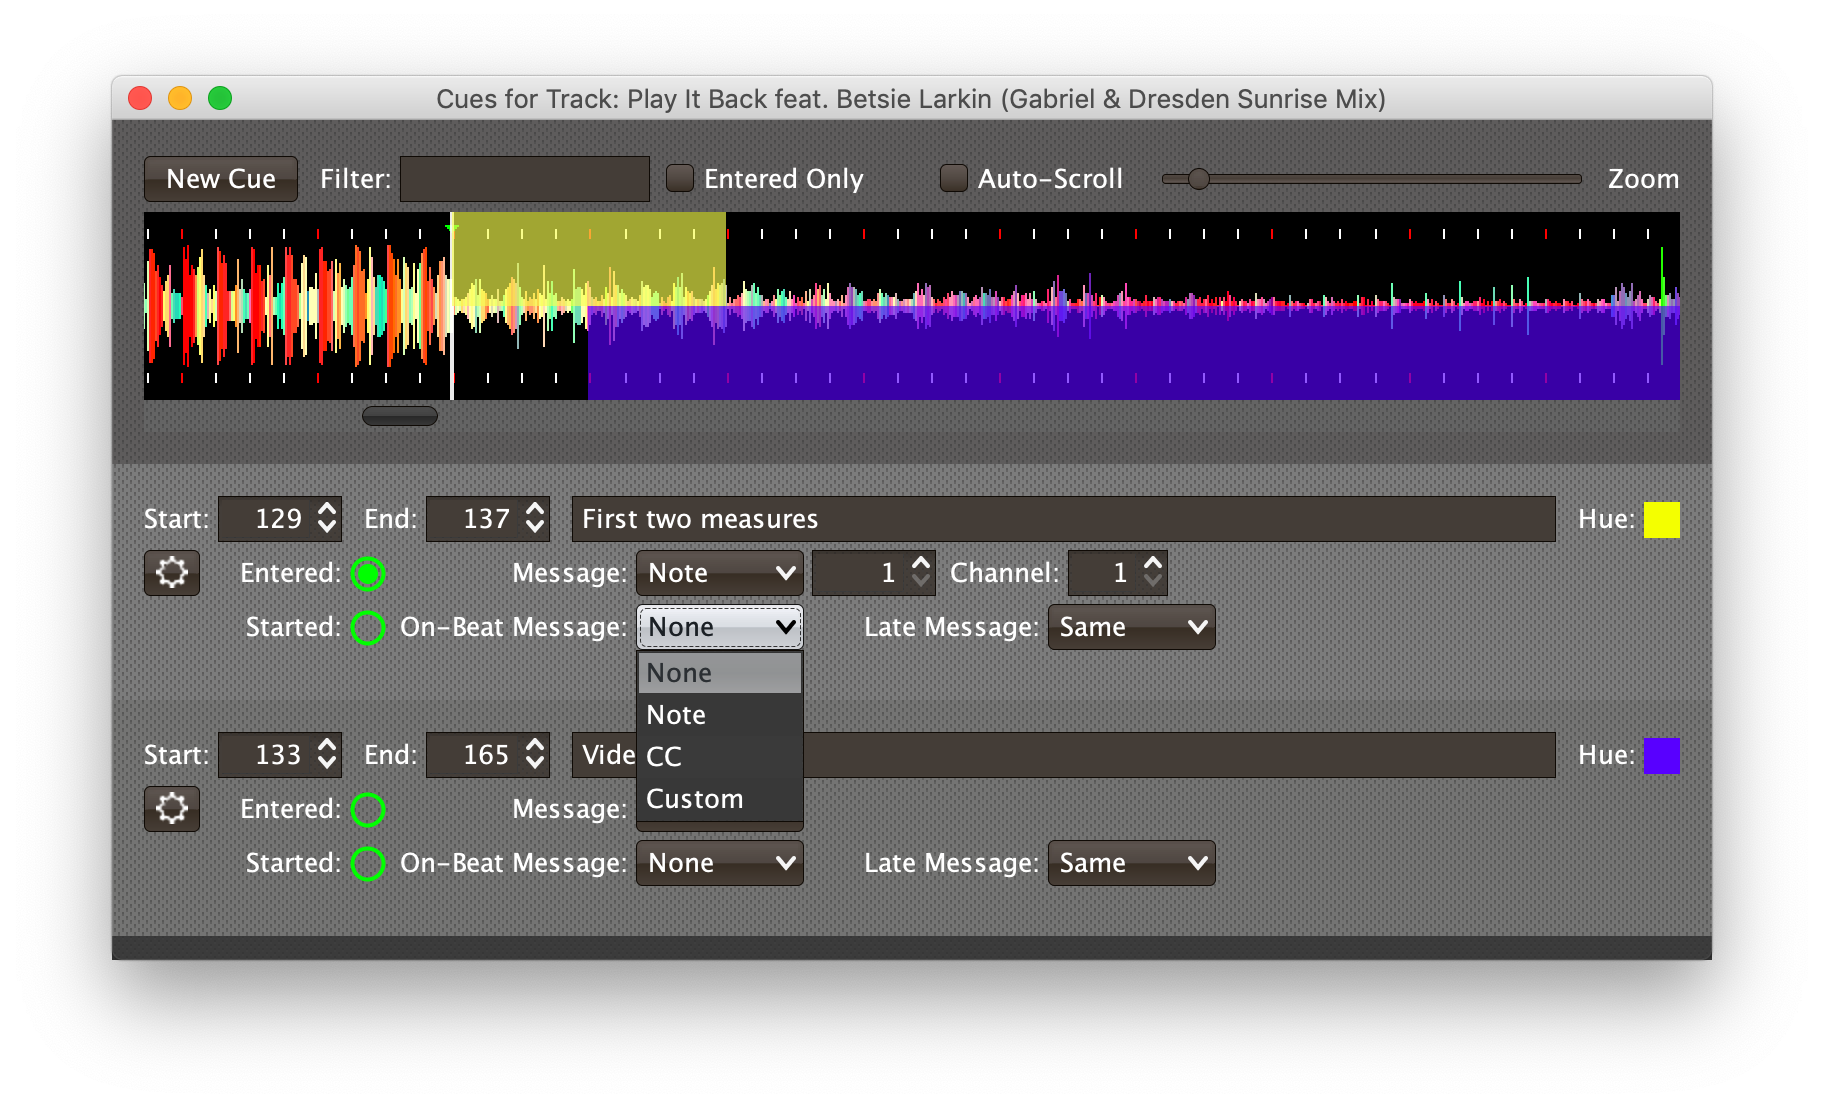
- None
-
With this setting, which is the default, nothing is sent when the Cue starts on its first beat or ends after having started that way.[1] When None is chosen, there are no interface elements visible to configure the message. They will appear once you choose a message type to send.
- Note
-
With this setting, the Show sends a Note On message, with velocity 127 and the note number shown to the right of the menu, when the first player starts playing the Cue from its first beat (as long as the Cue’s Track is enabled), and a Note Off message when the last player that had been playing the Cue stops doing so, or the Track is disabled (as long as the Cue started playing from its first beat).

The Channel on which the Started On-Beat / Ended messages are sent is configured just to the right of the note selector.
- CC
-
With this setting, the Show sends a Control Change message, with value 127 and the note number shown to the right of the menu, when the first player starts playing the Cue from its first beat (as long as the Cue’s Track is enabled), and a CC with value 0 when the last player that had been playing the Cue stops doing so, or the Track is disabled (as long as the Cue started playing from its first beat).
- Custom
-
When this option is chosen, you can send any kind of message you want when the Cue is started on-beat and/or ended from that state, by writing code as described in the Expressions section. This gives you the most flexibility because in addition to MIDI messages, you can send arbitrary UDP packets, HTTP requests, or whatever you might need. The expression editors for the Started Expression and Ended Expression are accessed through the cue context menu.
If you choose Custom and have not yet written a Started On-Beat expression, the expression editor will be opened to let you do that. You can also open that editor using the cue context menu.
Started On-Beat Note / Controller Spinner
Found immediately to the right of the Started On-Beat Message Menu (unless None is chosen as the Message type), this field lets you set the MIDI note number used for Note-based started on-beat and ended messages, or the controller number used for Control Change-based started on-beat and ended messages. The value is also available to your Cue expressions if they want to use it.
Started Late Message Menu
The Started Late Message Menu determines what kind of MIDI message is sent when the first player begins playing the Cue, as long as it missed playing the very first beat of the Cue (and as long as the Cue’s Track is enabled), or when the last player that had been playing inside the cue moves out of it or the Track becomes disabled, if it was started somewhere after its first beat.
| As a shortcut for testing your Started Late Message configuration, clicking on the Late Message label with the Option or Alt key held down is a quick way to simulate the Started Late and corresponding Ended events. |
- Same
-
With this setting, which is the default, cues which start late will be treated as if they had started playing with the initial beat of the cue, so the settings of the Started On-Beat Message Menu will be used, and there are no separate interface elements visible to configure the Late Message.
Most of the time you will want to leave the Late Message set to Same. Unless you have a memory point or hot cue positioned precisely at the beat, the only way you can be certain that the cue will be detected as starting on-beat is if you are playing into it. And unless it is a long cue, and you expect to have loops or memory points that jump to later beats inside it that you want to treat differently, the difference between starting on-beat and starting just after the beat is not generally visible in the results triggered in the system you are controlling via Beat Link Trigger.
- None
-
With this setting nothing is sent when the Cue starts after its first beat or ends after having started that way.[1] When None is chosen, there are no interface elements visible to configure the message. They will appear once you choose a specific message type to send.
- Note
-
With this setting, the Show sends a Note On message, with velocity 127 and the note number shown to the right of the menu, when the first player starts playing the Cue from somewhere past its first beat (as long as the Cue’s Track is enabled), and a Note Off message when the last player that had been playing the Cue stops doing so, or the Track is disabled (as long as the Cue started playing after its first beat).

The Channel on which the Started Late / Ended messages are sent is configured just to the right of the note selector.
- CC
-
With this setting, the Show sends a Control Change message, with value 127 and the note number shown to the right of the menu, when the first player starts playing the Cue from somewhere past its first beat (as long as the Cue’s Track is enabled), and a CC with value 0 when the last player that had been playing the Cue stops doing so, or the Track is disabled (as long as the Cue started playing after its first beat).
- Custom
-
When this option is chosen, you can send any kind of message you want when the Cue is started late and/or ended from that state, by writing code as described in the Expressions section. This gives you the most flexibility because in addition to MIDI messages, you can send arbitrary UDP packets, HTTP requests, or whatever you might need. The expression editors for the Started Expression and Ended Expression are accessed through the cue context menu.
If you choose Custom and have not yet written a Started Late expression, the expression editor will be opened to let you do that. You can also open that editor using the cue context menu.
Started Late Note/Controller Spinner
Found immediately to the right of the Started Late Message Menu (unless Same or None is chosen as the Message type), this field lets you set the MIDI note number used for Note-based started late and ended messages, or the controller number used for Control Change-based started late and ended messages. The value is also available to your Cue expressions if they want to use it.
Cue Context Menu
Each Cue row has a context menu attached to it, which can be accessed by right-clicking (or control-clicking) anywhere on the row’s background, but you can also open the context menu with a regular mouse click on the button with a gear icon in it. Most of the menu is devoted to editing various expressions to customize the Cue, as described in the Expressions section. The gear icon next to an expression will be filled in if that expression has a value, and the gear in the button will be filled in if any expression associated with the Cue has a value.
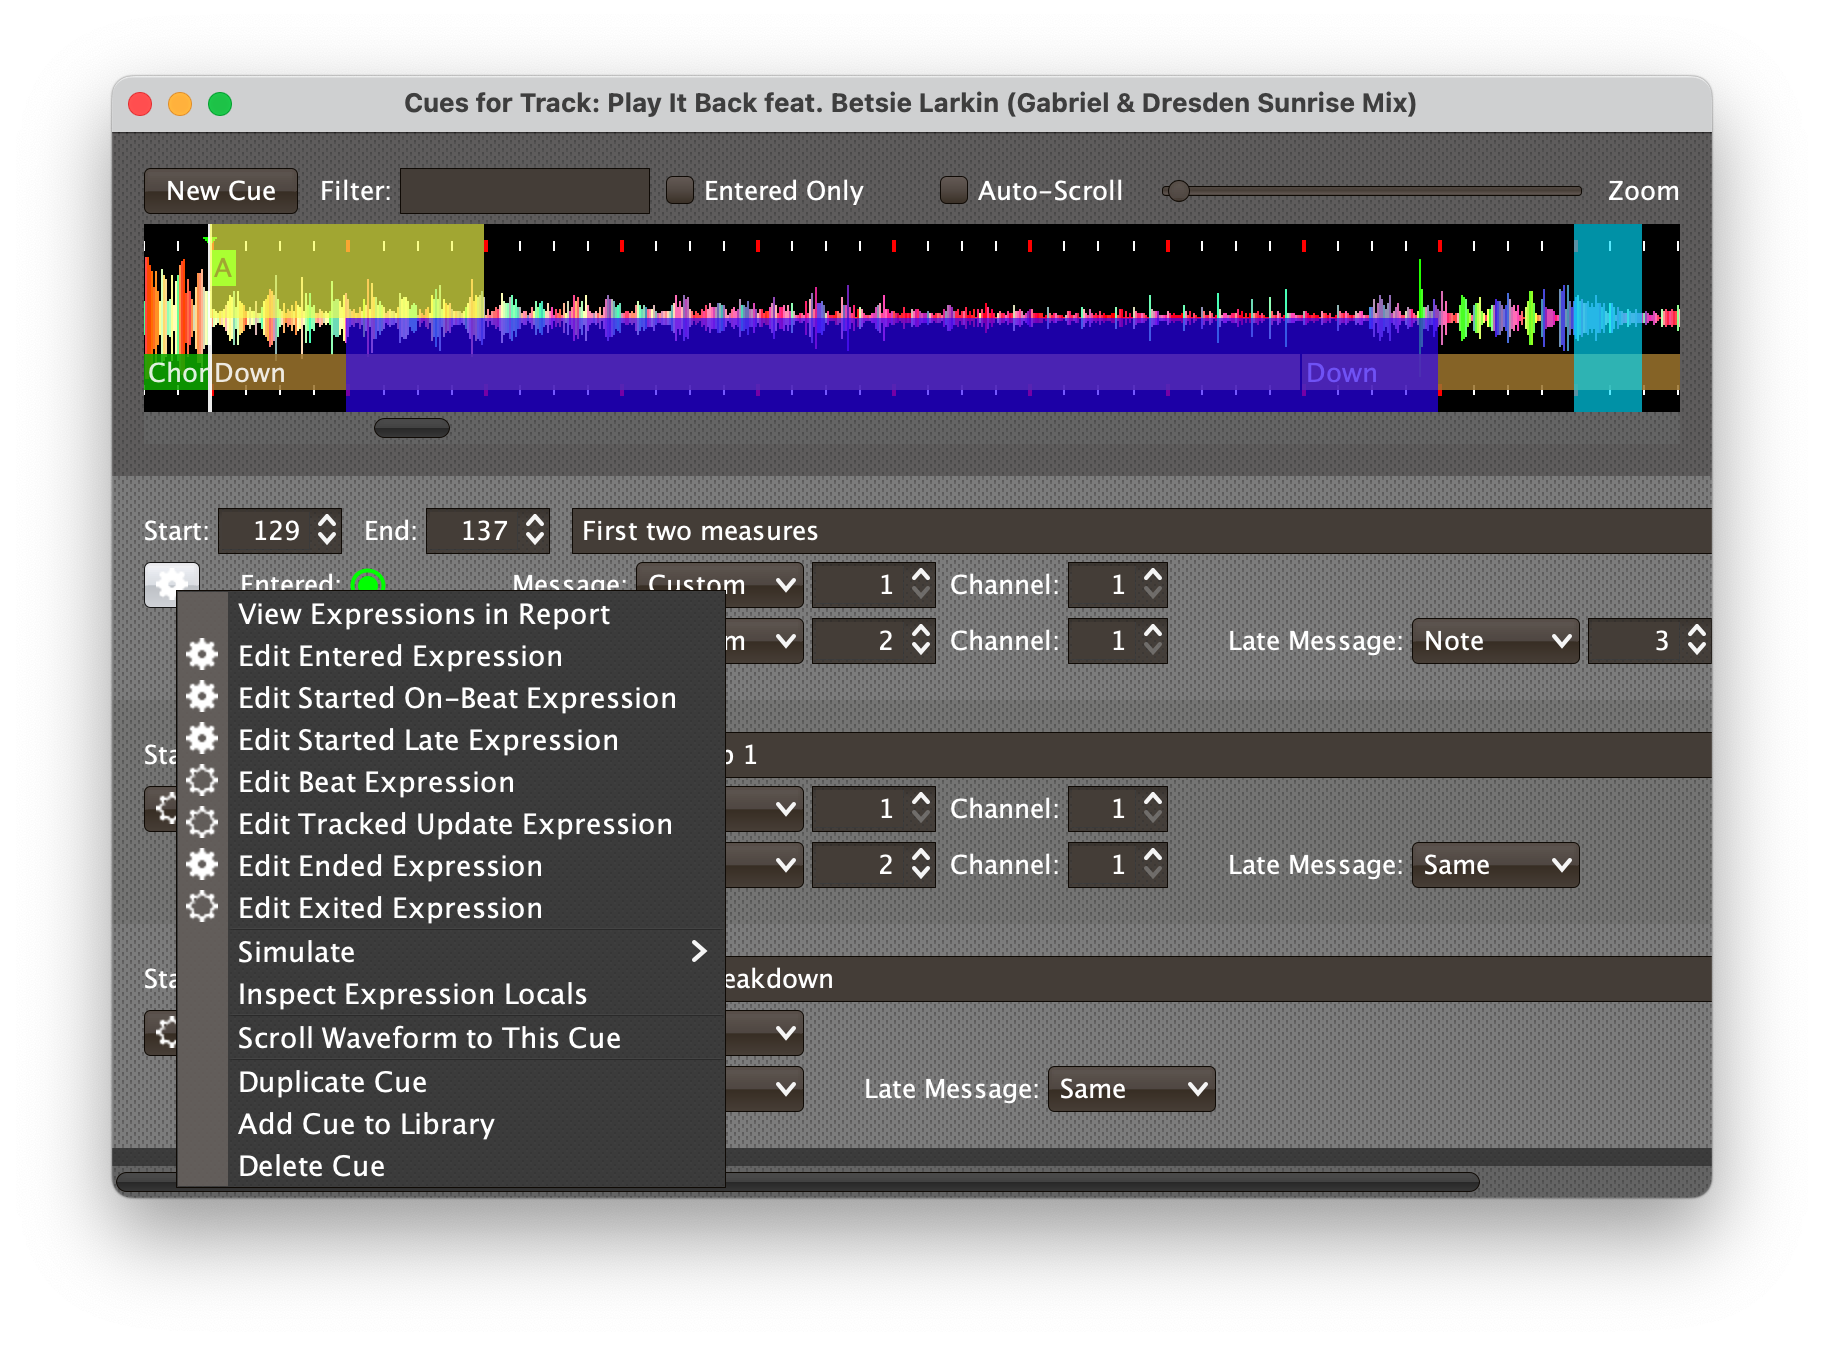
The menu starts with the expression-related options, allowing you to open editors to create or edit Clojure code that runs at well-defined moments to customize the behavior of the Cue. If you have created any expressions for the cue, the View Expressions in Report option will be present at the top of the menu. Selecting it tells your system browser to open the Expressions Report and scroll it to the section that holds this cue’s expressions.
The expression-related options are followed by the Simulate submenu, which allows you to test your MIDI mappings and custom expressions as described in the next section.
The Inspect Expression Locals option allows you to explore any values that have been set up by expressions in any Cue or the Track itself to re-use or share with each other. See Inspecting Locals and Globals for more details.
Choosing Scroll Waveform to This Cue does just what it sounds like, ensuring that the cue is visible in the waveform display at the top of the window. You can zoom the waveform out if you want to be able to see more cues and context, or in if you want to see more detail. See Navigating Cues below for more ways to find what you are looking for.
The Duplicate Cue option makes a copy of the chosen Cue, appending the word “Copy” (and possibly a number) to its name to keep it unique. You can use this if you need to create several cues that have common elements.
The Add Cue to Library option adds the cue contents to the show cue library, making it easy to create other cues in any track or phrase trigger which send the same messages. See The Cue Library for more details.
Finally, the Delete Cue option does just what it sounds like, after confirming that you want to discard any expressions and settings you have configured for that Cue.
| In addition to accessing the context menu from the cue row, you can bring it up by right-clicking or control-clicking on the cue in the waveform at the top of the window. |
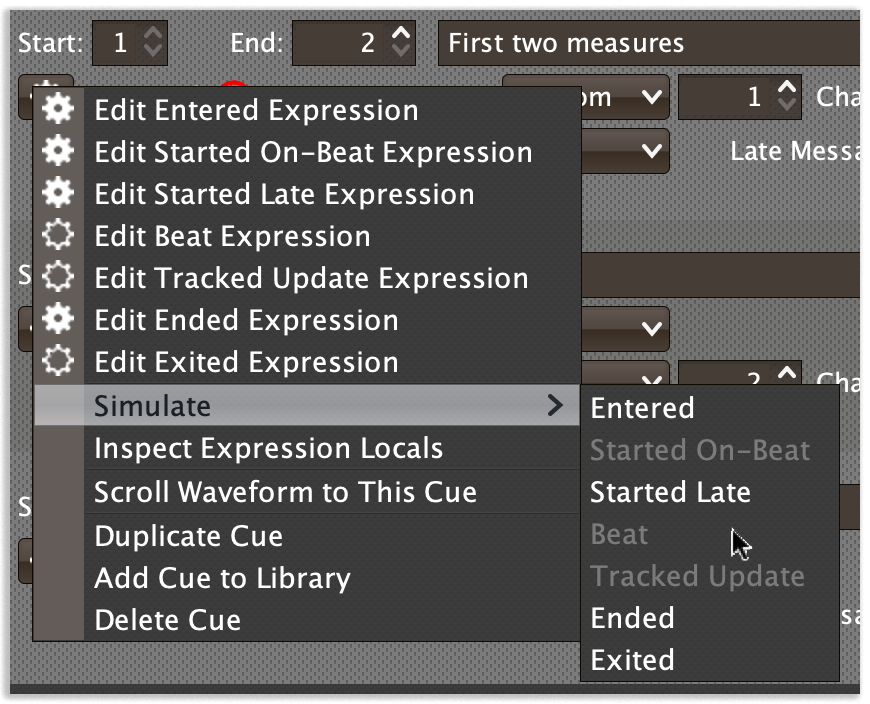
Simulating Cue Events
The Simulate submenu allows you to pretend that an Entered, Exited, Started, Ended, Beat or Tracked Update event has occurred, and send the corresponding MIDI messages and/or run the custom Expressions you have configured for those situations.
|
This can allow you to set up MIDI mappings in other software, like Ableton Live, that requires actual MIDI messages in order to learn them, even when you are working in offline mode because you don’t currently have access to your CDJs. |
The corresponding option will be disabled if there is no MIDI message or Expression configured for that event.
As a shortcut to simulating the most common pair of cue events (Started On-Beat and Ended), you can hold down the Option (or Alt) key while clicking and releasing the mouse over the cue rectangle in the track waveform at the top of the window.
You also can use the Option / Alt-click shortcut to simulate events from a cue’s editor row using the message labels. Option / Alt-clicking and releasing on the Message label in the Entered row simulates Entered / Exited events. Option / Alt-clicking on the On-Beat Message label in the Started row simulates Started On-Beat and corresponding Ended events, and Option / Alt-clicking on the Late Message label simulates Started Late and corresponding Ended events.
If you need to make sure a set of related cues work properly together when a track plays, and you don’t have any actual player hardware handy to go online with, you can Simulate Playback, as long as any code in your cues does not need to interact too deeply with an actual Pro DJ Link network.
Navigating Cues
Beat Link Trigger tries to make it easy for you to find the cue you want to work with. Here are some of the things that it does automatically, and others you will likely find helpful to try when working with a large number of cues.
-
The list of cues is kept sorted by their start and end beats (and then their names, if you have multiple cues starting and ending on the same beat).
-
You can type text in the Filter box at the top of the window to narrow the display to only cues whose name contain the text you typed.
-
You can click the Entered Only check box to only show the cues that currently have players positioned in them. This can be handy when you are running a show.
-
When you create a new Cue, the list of cues is automatically scrolled to ensure the new cue is visible. (If your new cue is hidden by the Filter or Entered Only settings, Beat Link Trigger will pop up a dialog to remind you why you are not seeing it.) If needed, the track waveform at the top of the window is also scrolled to show the new cue.
-
You can also scroll a Cue’s configuration row into view by clicking on the cue in the waveform display at the top of the window.
-
Finally, as noted in the Context Menu section above, you can use a Cue’s context menu to scroll the waveform to reveal the cue within the track beat grid.
Scrolling and Zooming
Unless you happen to be using Auto-Scroll mode to have the cues editor waveform follow the track’s playback on a CDJ, you can of course use the normal scroll bar to choose the part you want to see, and the Zoom slider at the top of the window to control how much of the waveform is visible at once. But if you have a great many cues to enter or edit, you might want faster ways to get around without having to lose your context and focus. Nicholas Maddix inspired some features that can help a lot:
-
If you are using mouse with a vertical scroll wheel, rolling it while the mouse is inside the cues editor waveform will zoom the track in or out, keeping the same section under the mouse pointer if possible.
-
If you are using a multitouch trackpad, you can use the vertical scroll gesture to zoom in and out while keeping the context under the mouse pointer fixed in the same way as with a scroll wheel.
-
A horizontal scroll wheel (less common), or trackpad horizontal scrolling gesture, can be used to scroll the waveform left or right without moving out of the waveform down to the scroll bar.
-
Finally, whenever there is a cues editor open on a track (as long as it is not in Auto-Scroll mode), the section of that track’s waveform that is currently visible in the cues editor is highlighted with a white outline on the track overview in the Show window:
When you click anywhere in this full-track preview, the cues editor waveform will scroll to center the section you clicked on. Dragging to the left or right will scroll the cues editor waveform to the corresponding point, and dragging up or down will zoom the cues editor waveform out and in.
Learning these options will enable you to quickly get to exactly the part of the waveform where you want to work on cues.