Responding to Inbound MIDI Messages
Using the Inbound MIDI Show
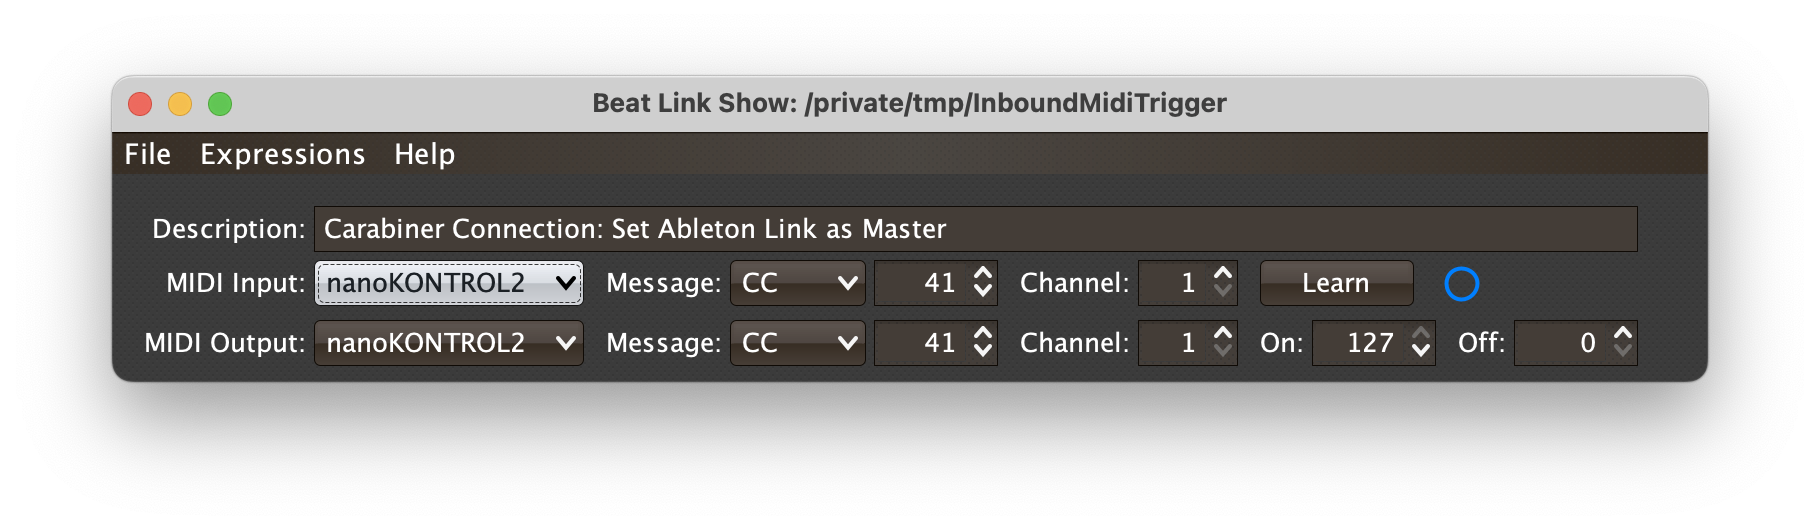
If you just want to use the show to make BLT do something when it receives a MIDI message, start by downloading and opening the Inbound Midi Trigger show. You will end up with a user interface that looks like this:
Your fresh copy will start out without any learned MIDI mappings, so we will start by explaining how to teach it how to work with your MIDI device.
|
As shipped, the show is configured to tell the Carabiner Connection window to set the Ableton Link session as the tempo master when it receives a particular MIDI message. Of course, that requires BLT to be posing as a player with a real player number, as explained in Working with Ableton Link, and you can use the new Settings window to set up the necessary Full Sync mode when going online. After explaining how to learn the MIDI mapping you want to use, this example will discuss how you can change the show to do other things instead. The current behavior is reflected in the Description text field, which you can change when you customize the show for your own purposes. |
Learning a MIDI Mapping
Connect the MIDI controller you want to map to the Ableton Link Master button, then choose it in the MIDI Input dropdown. The Learn button should enable at that point, because an available MIDI input has been chosen. Click Learn, then press the button you want to use on your MIDI controller. This will populate the message, note number, and channel values for you. Then, whenever you press that button on your controller, it will be as if you pressed the Ableton Link Master radio button in the Carabiner Connection window.
You probably also want to set the MIDI Output to the same device. Then whenever the Ableton Link master button is active, that button on the controller will be lit up, so you can tell by glancing at your controller too. If you don’t want that functionality, you can set the Message dropdown to None in the MIDI Output row.
The little blue indicator to the right of the Learn button will flash whenever the chosen input message is seen. The mapping that you have learned is saved with the show, so you only need to learn it once.
Changing What your Mapping Does
Once you have the proper mapping learned, if you want to have it do something other than telling Carabiner to make Ableton Link the tempo master, you can edit the show’s Shared Functions and swap in the behavior you want instead.
The first step is to figure out the Clojure code necessary to implement whatever action you want to take place upon receipt of the MIDI message. You may be able to find that code by browsing through this guide and all the other integration examples. If not, ask in the Zulip channel and we’ll help!
There are two functions that you need to change, and they are right at the top of the Shared Functions, to make them easy to find and edit.
(defn action-callback
  "This function will be called when a MIDI message is received
  that matches our mapping configuration."
  [message]
  ;; This is the code you replace to make the show do something other
  ;; than telling Ableton Link to become the tempo master in response
  ;; to your mapped MIDI message.
  (when (pos? (:velocity message))  (1)
    (carabiner/appoint-ableton-master)))  (2)
The action-callback function is called whenever the mapped MIDI message is received, so it’s your chance to do whatever you need to do.
| 1 | This first part will likely stay the same, unless you want to use the MIDI velocity in a different way. As written, any value of the learned note or control other than zero will be interpreted as a signal to take the desired action. |
| 2 | This code is what will change. The function call that is there is what tells the Carabiner window to make the Ableton Link session in control of the tempo, as described here. |
(defn feedback-callback
  "This is called frequently during UI updates. The truthiness of the
  value it returns controls whether the feedback sent to the
  configured MIDI output should be in its On or Off state."
  []
  ;; This is the code you replace to make the show reflect something
  ;; other than the Ableton Link master state on your MIDI controller.
  (carabiner/master-ableton))  (1)
The feedback-callback function is called regularly to ask whether the mapped MIDI output should be in an On or Off state, to let you visually check some Beat Link Trigger state without having to look at its user interface.
In this case we call a function that returns a true value if Ableton Link is the current tempo master, meaning the button will light up only when that is true.
You would replace this function call with whatever is necessary to achieve the same result for your mapping goals.
Finally, once the show is working the way you want, don’t forget to change the Description field to reflect what it is now doing! This is especially important when you might want to have more than one mapping running at the same time, to let you keep track of which is which. Speaking of that…
Responding to Multiple Mappings
You can make multiple copies of the show file, and edit the above two functions in the Global Setup expression and the Description field to have each copy do different things in BLT. If you open all these shows at the same time, they will all be active and doing their own thing side by side. You can arrange them however is convenient on your screen.
Understanding the Example
The rest of this section dives into the details of how the show is implemented, for those who want to learn how they can do similar things on their own. If that’s not you, feel free to wander off and just use it!
Shared Functions
As is usually the case for shows that provide custom graphical interfaces, most of the code lives in the Shared Functions. You’ve already seen two of them, the callback functions at the top which you customize to change what happens when the learned MIDI message is received, and how MIDI feedback is sent.
Because the code is lengthy, rather than quoting it all here, I’ll just provide some key commentary. You may want to follow along by opening the Shared Functions editor for the show, or the Expressions Report. There is also a line-by-line discussion of some very similar code in the Beat Pattern example. And please ask in the Zulip channel if you have any questions!
close-input-
checks the
:inputkey in the showglobalsto see if there is an open MIDI input, and if so, closes it, removes it from theglobals, and disables the Learn button in the user interface. chosen-output-
is called to look up the MIDI output associated with a choice in the dropdown menu, opening it if it has not already been. It returns the output, if it was found, or
nilotherwise. send-feedback-
looks up the details of the MIDI output mapping, and sends an appropriate MIDI message to indicate the current on/off state being monitored by
feedback-function. update-devices-
is called once when the show loads, and thereafter whenever CoreMidi4J tells us that something has changed about the MIDI environment (e.g. a device has been attached or detached). It is responsible for updating the MIDI Input and MIDI Output dropdown menus to reflect the currently-available set of choices (while also preserving whatever was configured the last time the show was used, in case it is temporarily unavailable).
attach-midi-handler-
is called when a MIDI input is chosen that is presently available (including when the show loads, if its saved input is still valid). It creates and installs a function that will respond appropriately to MIDI messages received from that input.
There are two different paths the handler can take when such a message comes in. Normally, it just compares it to the configured MIDI mapping, and only if the message matches the configured values, calls
action-callback, to take whatever action you have decided the mapping should cause. But if the Learn button is active, the alternate path is taken, and any incoming message sets the mapping configuration to match it. In either case, the function also causes the blue “MIDI received” indicator to flash.
animate-ui-
creates and starts a background thread that is responsible both for fading out the blue MIDI indicator over time, and checks whether the current MIDI feedback state desired by
feedback-functionmatches the last MIDI that was sent to the configured output; if not, it sends an appropriate feedback message and records it. These operations happen 30 times per second, which is why the thread sleeps for 33 milliseconds between iterations of its loop. It loops until it sees the show is closing, which the Global Shutdown expression indicates by setting a:shutdownelement in the showglobals. change-input-
is called when a choice of MIDI input is made (including when the show is first opened). It first closes any previously-opened input, then tries to find the newly chosen one, and if it can, opens a connection to it and calls
attach-midi-handlerto handle MIDI messages from it. It also keeps track of the opened input under the key:inputin the showglobals, so it can be closed later. It updates the enabled state of the Learn button to reflect whether it was successful at opening the input.Finally, it spawns a background thread that waits for two seconds, and then forces a feedback message to be sent to the configured MIDI output. It does this because it can take a while for the MIDI environment to stabilize when the show is first opened or when a device is connected, so this maximizes the chance of the controller state settling on the right value shortly thereafter.
activity-color-
is a helper function that is used to fade out the blue MIDI reception indicator over time. It calculates the appropriate level of transparency to be used in drawing it, given how much time has passed since a MIDI message was received.
midi-blue-
is a
varthat holds the blue color used to draw that indicator. paint-midi-state-
is the function that draws the MIDI activity indicator. If the MIDI output device is connected, it uses
activity-colorto determine how to draw the indicator dot itself; if it’s not connected, it draws a gray dot instead. It always draws the outer ring, either inmidi-blueif the MIDI input device is connected or in red otherwise.
build-ui-
is the function that puts a bunch of these things together, and creates all the user interface elements that make up the show. It starts by gathering the mapping configuration into
data, the available MIDI inputs and outputs intoinputsandoutputs, and sets up two helper functions:-
saveupdates the mapping data in the show from the current choices in the interface elements, and -
enablesets the enabled state for one of the rows depending on whether the MIDI message of that row is set to None.
Then it creates the
panelthat holds all the user interface elements and lays them out, and the elements themselves, attaching event listeners to respond appropriately to actions taken by the user. Finally, it tells the new user interface elements to update themselves to reflect the mapping information that was gathered indata. This is an area where theseesawwrapper for Java Swing really simplifies matters. -
refresh-ui-
is a much simpler function that is called whenever the MIDI environment changes (a device is attached or detached), and when the show is loaded, to update the interface state appropriately.
midi-change-listener-
is a
varthat holds a Java object implementing the interface that can be registered with CoreMidi4J, acting as a bridge to the show and callingrefresh-uiwhenever CoreMidi4J notices a change in the MIDI environment.
Global Setup Expression
The Global Setup expression is much shorter, so we can go over the entire thing:
;; Make sure BLT is recent enough for this show, then set up the UI.
(show/require-version show "7.9")  (1)
(show/block-tracks show (build-ui))  (2)

;; Register our function to reconnect any mapped devices and refresh
;; feedback state whenever the MIDI environment changes, in case a
;; mapped controller has suddenly become available. Also, call the
;; UI-refresh function once now to set things up as they should
;; initially appear.
(uk.co.xfactorylibrarians.coremidi4j.CoreMidiDeviceProvider/addNotificationListener
   midi-change-listener)   (3)
(refresh-ui)  (4)

;; Finally, start the thread that updates the MIDI received indicator,
;; and sends configured feedback.
(animate-ui) (5)| 1 | This makes sure the version of BLT is recent enough to run the show, since it depends on the improved expression compilation introduced in version 8. |
| 2 | As seen in other shows with graphical interfaces, this tells BLT to hide the normal track interface, and replace it with the one returned by our interface builder function. |
| 3 | This is how our change listener object is registered with CoreMidi4J. |
| 4 | And here is the promised call to interface update function as the show opens. |
| 5 | Not much to say beyond the comment in the file, except perhaps to link to the animate-ui description. |
Global Shutdown Expression
And there is a bit of cleanup to do when closing the show.
;; Stop reacting to changes to the MIDI environment.
(uk.co.xfactorylibrarians.coremidi4j.CoreMidiDeviceProvider/removeNotificationListener
  midi-change-listener)  (1)

;; Close any MIDI input we were using.
(close-input)  (2)

;; Stop the thread that is animating the UI and sending feedback
(swap! globals assoc :shutdown true) (3)| 1 | This unregisters the change listener object so it will no longer be notified of changes to the MIDI environment. |
| 2 | We want to close the MIDI input if the show had one open. |
| 3 | And as noted above, this is how the interface animation thread knows to stop looping. |