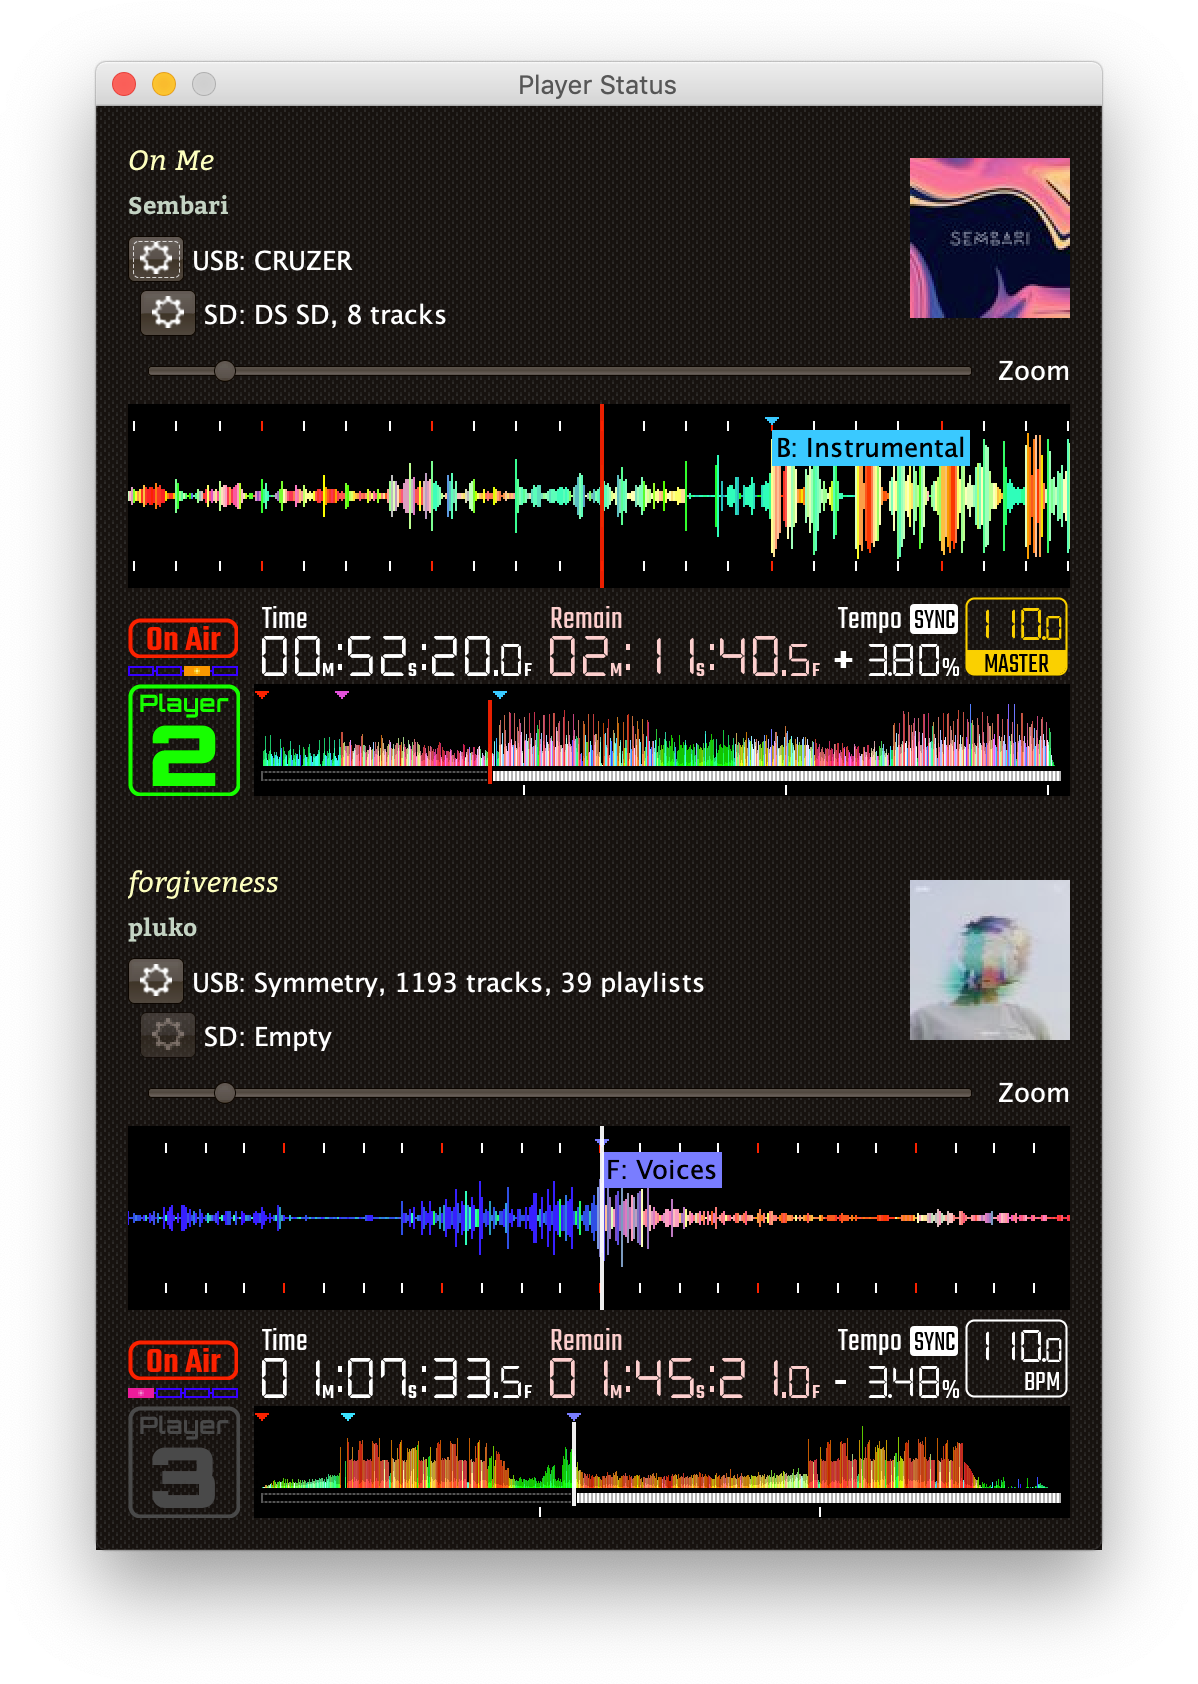
The Player Status Window
Beat Link Trigger can take advantage of track metadata and related information from the players to provide you a rich view of what is happening right now on all the decks; to see this, choose once you are online with a DJ Link network.
BLT can also tell the decks to load tracks from media found anywhere on the network (in one of the player slots, or on a computer or mobile device running rekordbox in export mode). The Player Status window offers a shortcut for doing this from the media loaded in each player, or you can choose to find tracks anywhere. You can also adjust many player settings, for example to establish a standard configuration in between DJ sets, by choosing . These options are described in more depth later in this section
As shown in the example view above, the Player Status window can be a valuable resource on its own for running visuals for a show, even if you don’t have any triggers set up.
Only players currently visible on the network will appear in this window. The player number will be bright green if it is currently playing, and gray if it is stopped. (The playback position indicators in both the full track preview and—if you have it showing—the scrolling wave detail view, will also be white when playing and red when stopped.)
Playback Position
Beginning with the nexus series of players, enough information is sent over the network to get a rough idea of where a playing player is positioned in the track, and BLT will do the best it can to infer and display that.
In addition to the current track time (position) and remaining time, the current playback pitch (speed, shown as a percentage change from normal speed, + meaning faster and - meaning slower), the current effective tempo (combining the track tempo with the playback pitch) and master/sync status are displayed above the track waveform preview.
Precise Position
The CDJ-3000 sends additional information, much more frequently, which allows BLT 7.3.0 or later to track its location much more accurately, even when the DJ is moving around but not playing, or jumping or looping inside individual beats. When this information is available, the time display will read Precise Time:

|
Although Beat Link can do a good job of tracking the playback location on players other than the CDJ-3000 for tracks that are being played normally, the only information it has available are the beat packets which tell it when the player has reached a particular beat, and which can be translated to a time using the track’s beat grid. It can combine these with the playback speed information which comes more frequently (in status packets sent several times per second), to interpolate the current playback position in between beats. However, on older players, if the DJ is playing a track backwards, no beat packets are sent. And if the track is looping, the correct position can not be detected except if and when the loop happens to cross a beat boundary, causing a beat packet to be sent. So you can not assume time information is accurate for such players during reverse or loop playback, especially for small loops that start or end in the middle of beats. This also means that if the DJ uses the touch strip to “needle jump” to an arbitrary point in the track on an older player, the time may start out slightly wrong, since we can only assume playback started at the beginning of the beat that was landed on. But after that (or once the DJ changes back to playing forward without a loop), as soon as the player reaches the next beat marker, the time will resynchronize, and stay tracked well as long as normal playback continues. None of these situations are a problem with the CDJ-3000, however, where we can track the playback position wonderfully using the precise position packets the players send with great frequency. And on pre-Nexus players, no position tracking is possible at all. |
The current beat playing is shown above the player number, and individual beat (white) and bar (red) marks are drawn in the waveform detail view (although if you zoom out to see more of the track, the individual beats go away, and only bars are drawn).
| The white tick marks below the full-track preview waveform at the bottom of a player row are minute markers, so you can see at a glance how long the track is and how much is left. |
Hot cues are shown above the waveform as green triangles (or, if the DJ has assigned them a specific color, that color will be used instead of green). Memory points as shown as red triangles, and loops as orange triangles. The loop body is shown in the scrolling waveform detail section.
For players older than the CDJ-3000, only loops that are stored in the track can be displayed; loops and memory points created on-the-fly by the DJ are not visible over the network. On CDJ-3000s, we can display loops that are created on-the-fly, and we distinguish those from the loops stored in the track by drawing inactive stored loops in gray rather than orange, the same way the CDJ-3000 draws them on its own display.
If the DJ has assigned a label (text comment) to a memory point, loop, or hot cue, that will also be shown in the scrolling waveform detail section (but not in the smaller full-track preview). For hot cues, both the letter identifying the hot cue, and the text comment (if any), will be drawn using the color assigned by the DJ.
If you are using a compatible mixer, and it (and the players) are all configured to display their On-Air status, and the player numbers are properly configured to match the mixer channels that they are connected to, then you can use the "On-Air" indication above the player number as an additional hint about when you need to pay attention to it.
| If you are using a mixer that doesn’t support the channels-on-air feature, but does support MIDI, checkout the clever workaround that was developed as sn integration example. |
Larger Waveform Windows
If you would like to display an even more detailed view of a track waveform, for example because you are live-streaming a performance and want to overlay that on your video feed, you can open up a resizable window containing just the scrolling waveform details. If you move the mouse over the scrolling waveform in the Player Status window, the cursor becomes a magnifying glass. Clicking on the waveform opens it in a separate window that you can resize, position, and zoom independently. Each player’s waveform detail window will remember how you have sized and positioned it so that the next time you open it you will find it configured the same way. If the window is already open when you click on the waveform in the Player Status window, it will simply be brought to the front if it was hidden.
| You can now also access waveform data (along with far more information than is displayed in the Player Status window) to build your own custom stream overlay using the embedded overlay server. |
Non-rekordbox Metadata
The Player Status window is a lot less useful if non-rekordbox tracks are being played, because no waveform information or beat grids will be available, so it will not even be possible to calculate Time Played or Remain information. So most sections of the window will be blank when such tracks are loaded.
When Beat Link Trigger is using a standard player number, it can still usually get (and display) title and artist information for tracks loaded from digital audio files, and even from audio CDs if they were burned with the CD-TEXT extension.
For other audio CDs, the only information we receive from the player is the track number, which shows up as a title like TRACK 01.
| In order to reliably obtain title and artist information for non-rekordbox tracks, you need to make sure that is checked. If you are already online, this will require you to briefly go offline to switch numbers. If you have four players on the network, you will also have to turn one of them off and leave it off, unfortunately. |
Loading and Playing Tracks
|
Unless you are using a real player number, this feature will not work well for non-rekordbox media. Although Crate Digger can be used to provide a simplified and faster view of a player’s rekordbox media, browsing other kinds of media uses menu requests to the players, which will likely fail unless you are using a real player number. The XDJ-XZ does not allow any software other than rekordbox to tell it to load tracks, and it does not support Fader Start (which is needed to remotely start/stop tracks), so this section won’t be useful to you if you have an XDJ-XZ, unless you also have some other CDJs linked to it, in which case you will be able to control those. The CDJ-3000 will let you load tracks, but it does not support Fader Start either, so you won’t be able to start or stop them playing. The Opus Quad is even more limited, but when you’re working with one this menu is instead used to attach metadata archives so that BLT can work with that hardware, despite its lack of support for the actual Pro DJ Link protocol. |
During pre-show and after-show situations, when there is no DJ on stage, it can be convenient to cue up and play tracks from Front of House. If you can ensure that the tracks are inserted into one of the players’ media slots before the show (or at the end of the show), you can use Beat Link Trigger to accomplish this, either by choosing , or using the popup menu associated with a particular media slot in the Player Status window as shown in the screenshot below:
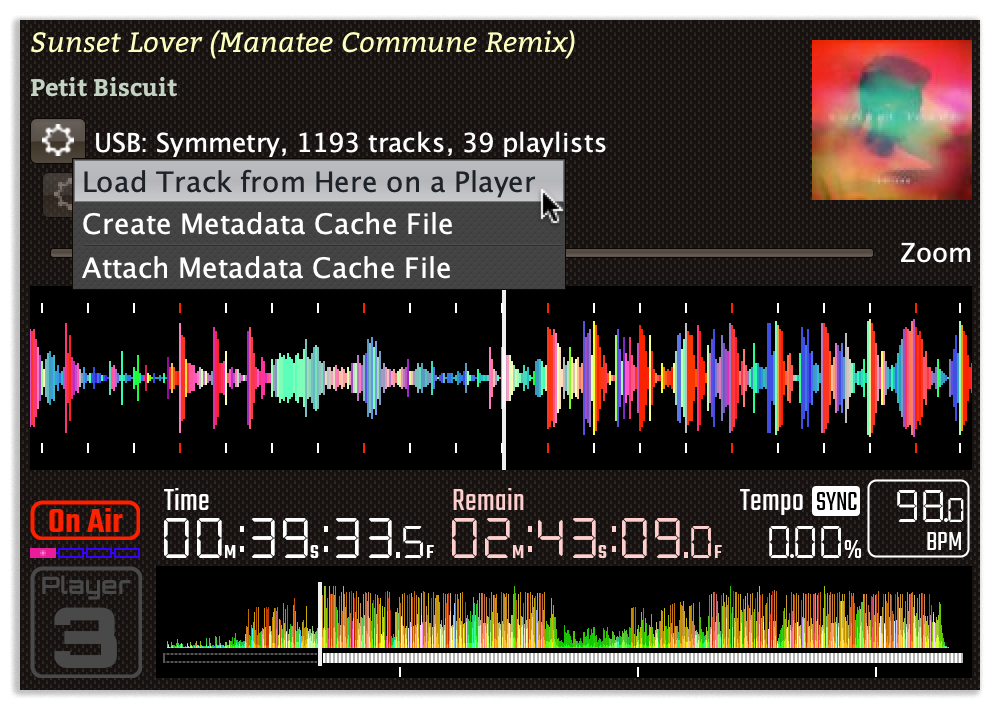
Either method opens the interface shown below; the advantage of starting from a media slot’s popup menu is that the corresponding section of the loader interface will be automatically opened for you.
| If there are any computers or mobile devices running rekordbox on the network, they will also show up as places that you can tell players to load tracks from, even though they aren’t visible in the Player Status window. |
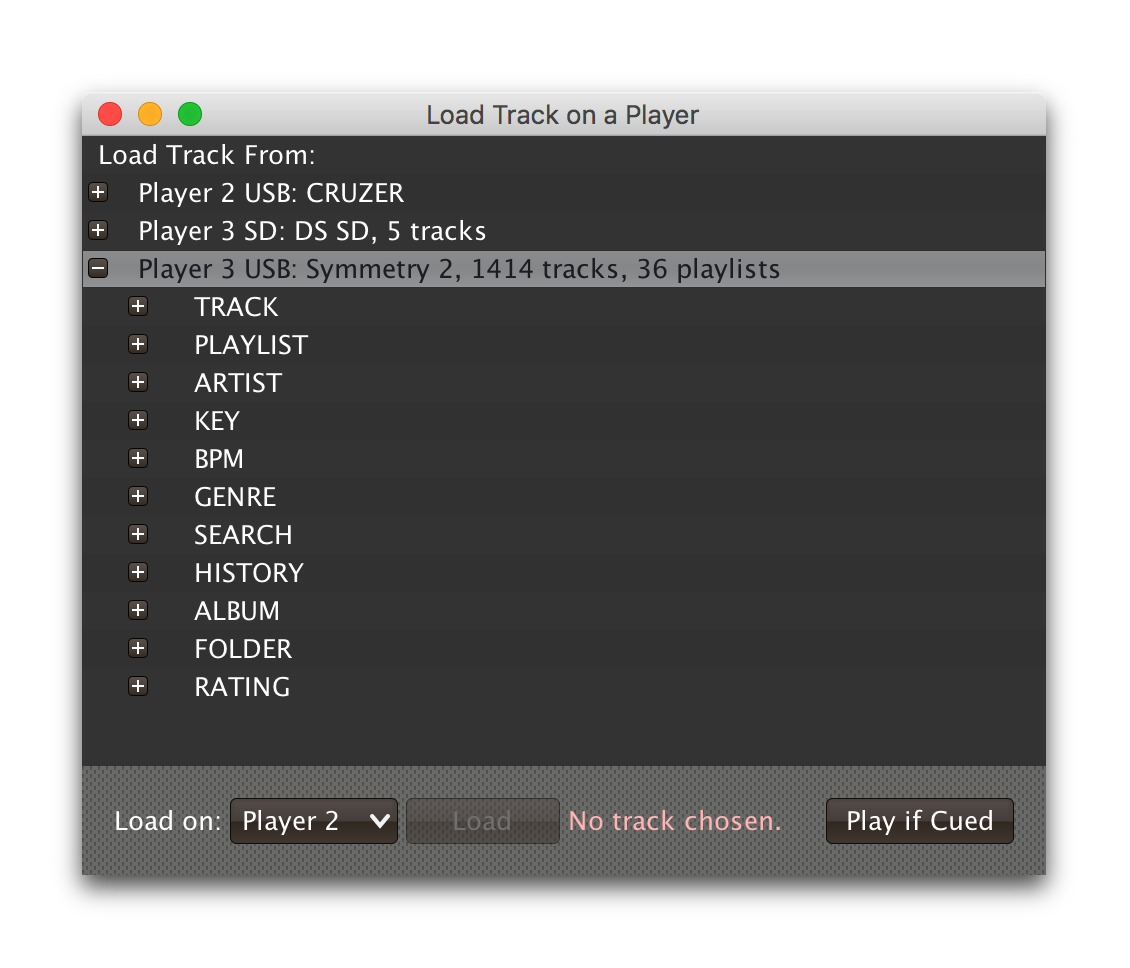
This window allows you to drill down through the menu hierarchy associated with the media mounted in any player slot, just as if you were on the player itself. The top-level elements are the mounted media libraries themselves, showing the media name and, for rekordbox media, the total number of tracks and playlists present on the media.
The actual sections available for each media library will depend on what the DJ chose to enable when configuring it within rekordbox.
(Non-rekordbox media will only have the FOLDER menu, which shows the raw filesystem.
That is also available on rekordbox media, in case there are some non-rekordbox tracks in there.)
And if you are not using a real player number, the sections available are a simplified subset offered by Crate Digger, but they are faster and more reliable than asking the players.
|
You can click on the + icon to expand a section, or double-click anywhere in that row of the tree.
The same actions will collapse an already-expanded section (although the icon will be labeled - in that case).
Selecting a row that corresponds to an individual track enables the Load button:
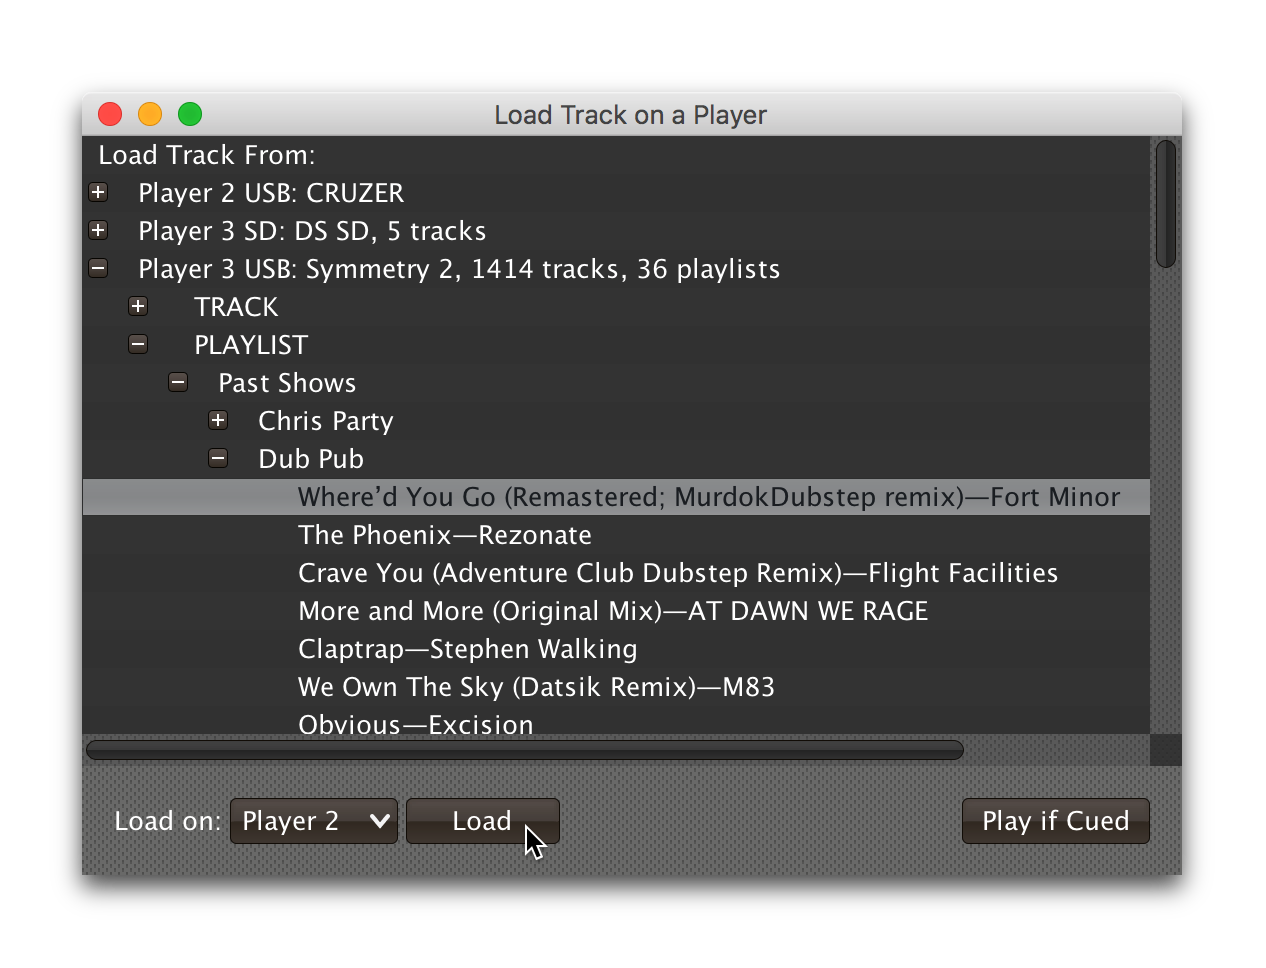
Clicking that button tells the player chosen in the Load on menu to load the selected track. (The button will also be disabled, with an explanation next to it, if that player is currently playing a track, or the hardware does not support the feature.)
If the chosen player is currently stopped at the Cue point, the Play if Cued button will be enabled; pressing it tells that player to start playing. If the player is currently playing, the button will be labeled Stop and Cue, and clicking it will tell the player to stop and return to the Cue point, so it will be ready to start playing again.
| Limitations in the Fader Start protocol, which is used to start and stop players, make it impossible to start a player that is stopped anywhere other than the current Cue point. |
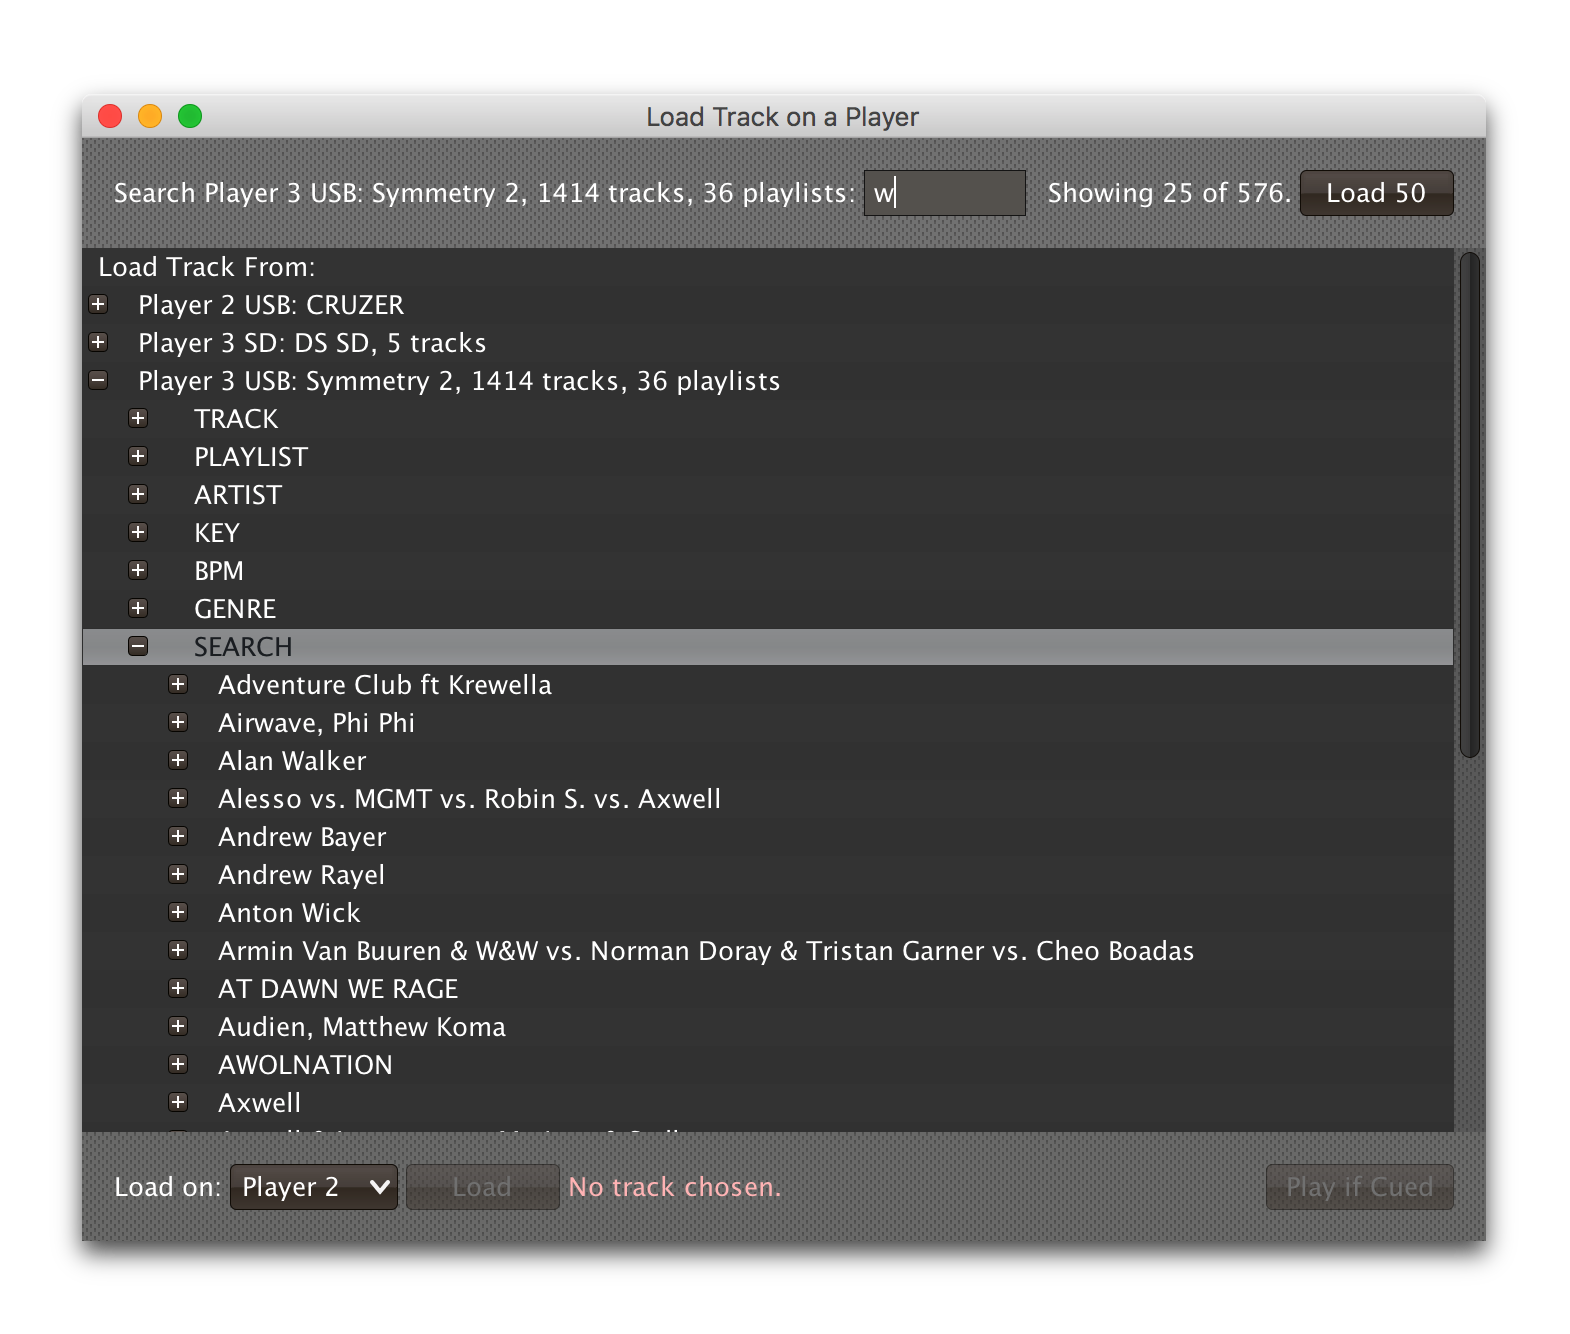
The easiest way to find a track—if you know its title, artist, or album name—is to use the Search interface.
As soon as you click on the SEARCH section of a media entry, the search interface opens at the top of the window, and you can start typing.
As you add to your search string, the results are narrowed down.
Once you can see what you are looking for, you can expand and load it.
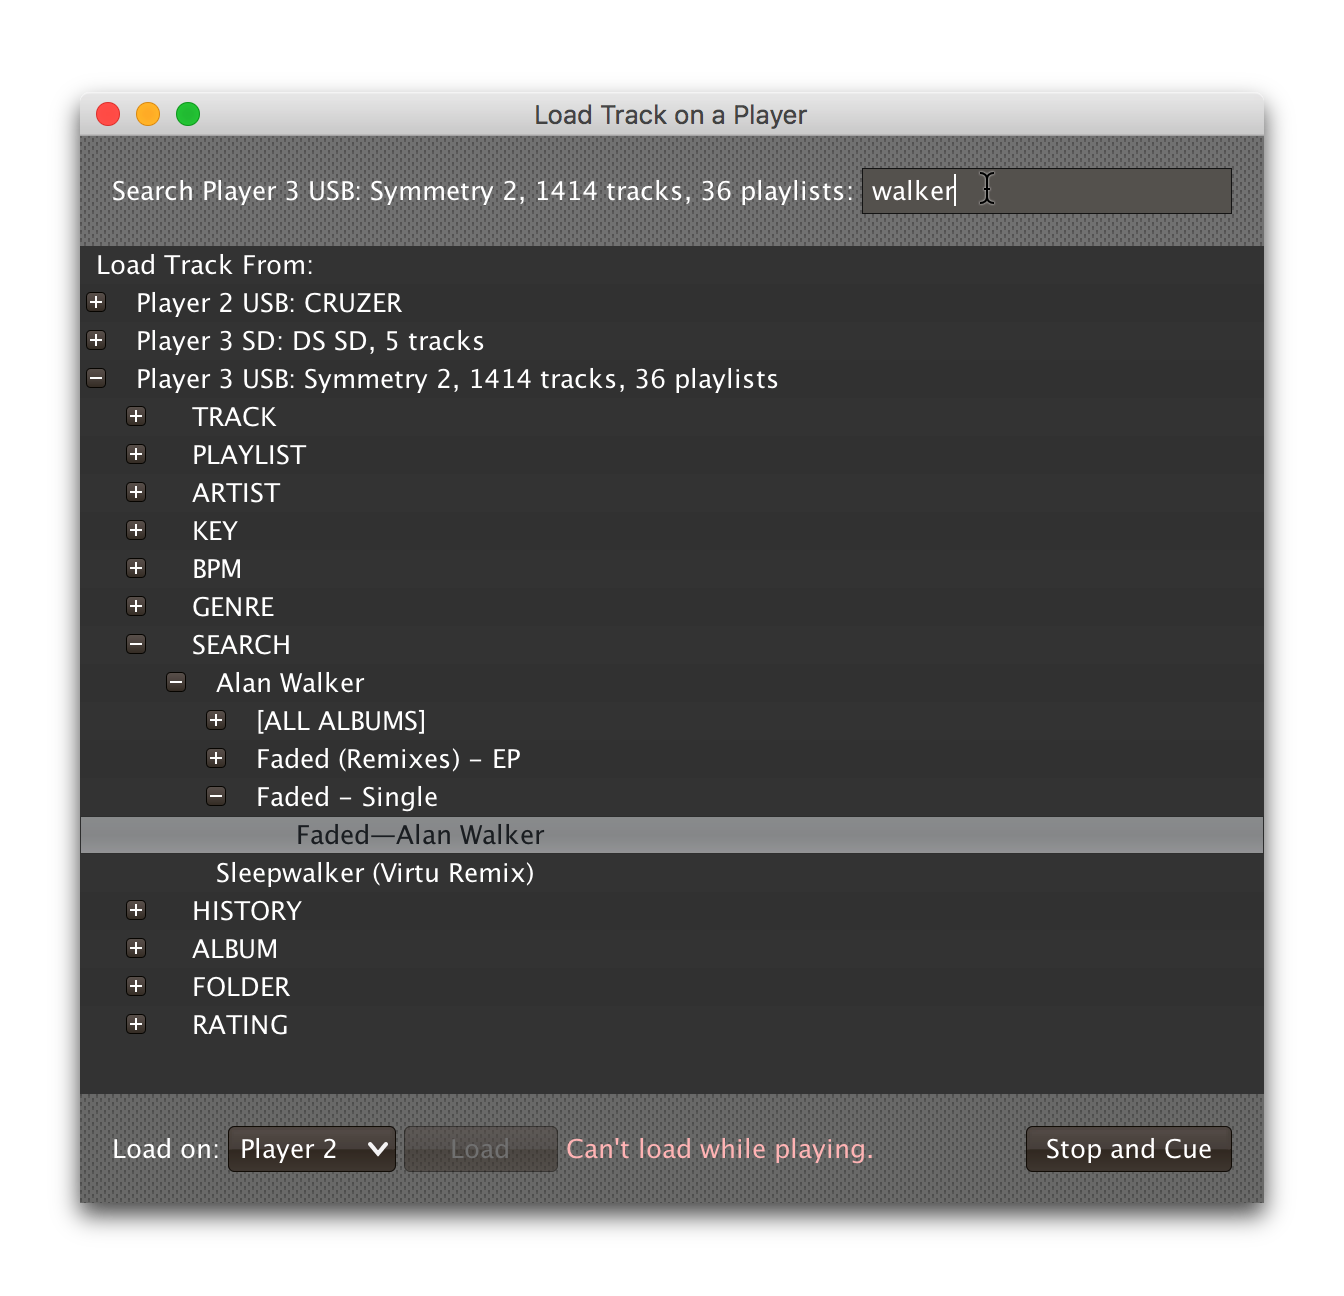
If there are more than 25 results matching your search string, only the first 25 will be loaded and shown to begin with. You can use the Load button to load more, in larger and larger batches, although your best bet is probably to use a longer and more selective search string instead:
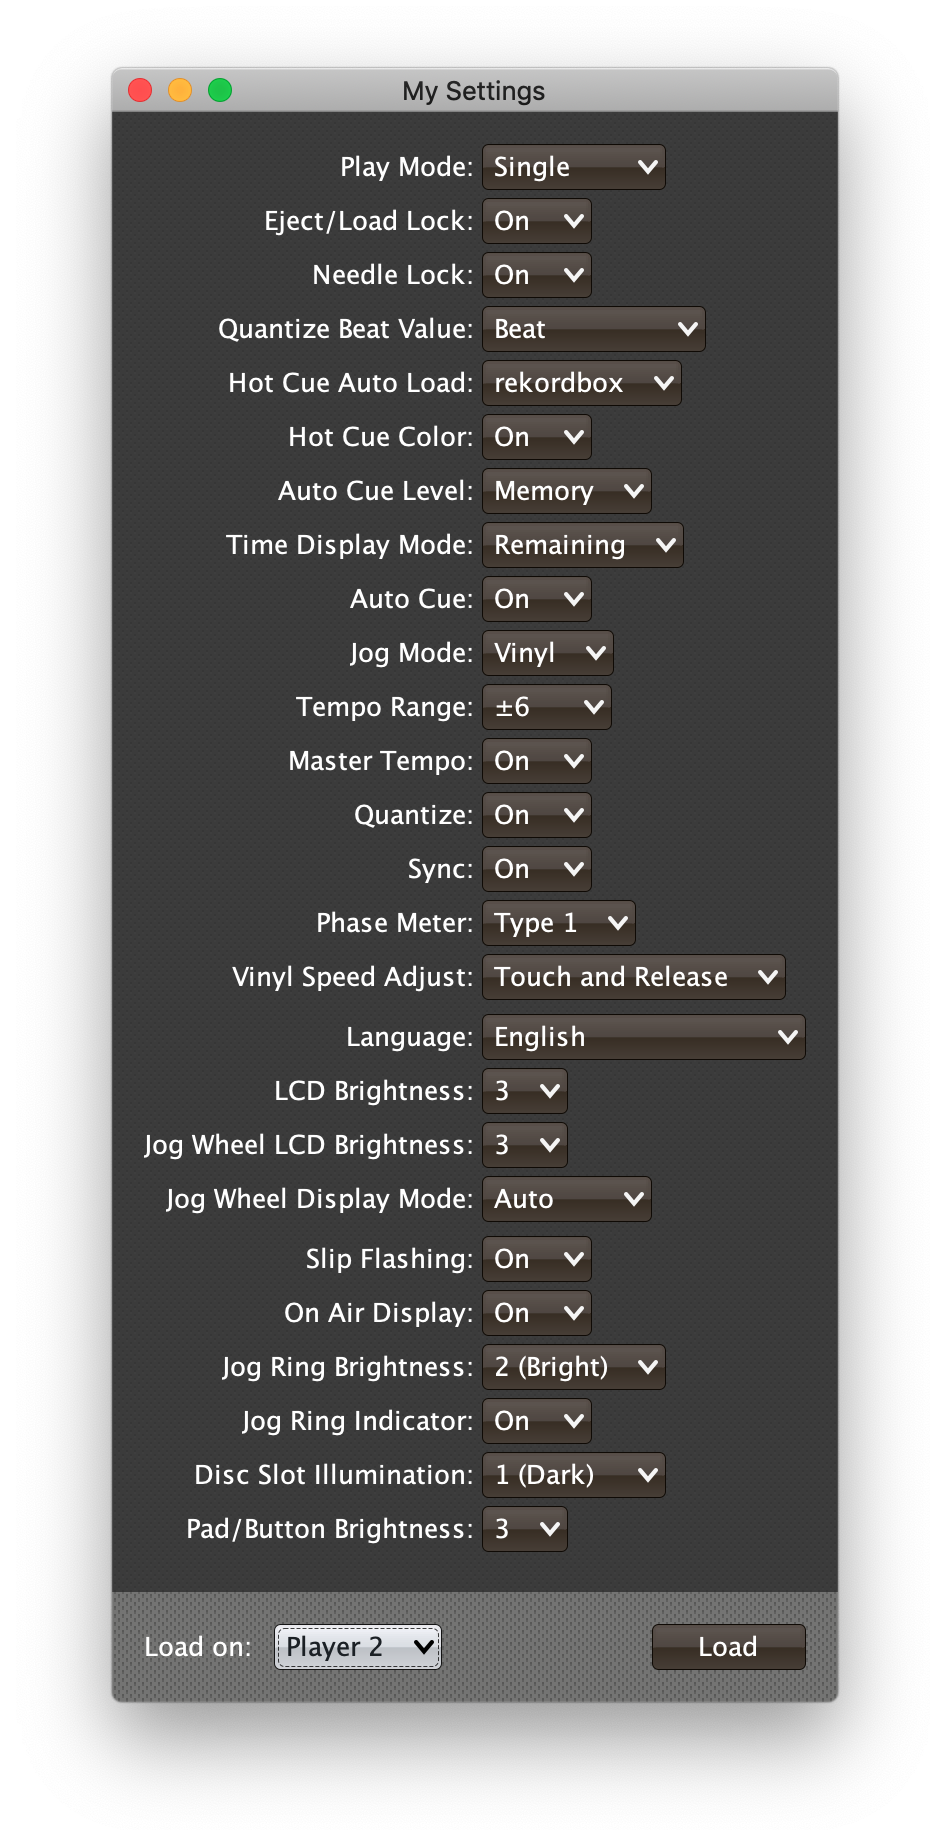
Loading Player Settings
If you would like to apply a standard group of settings to a player, for example you always want to have DJs find your gear in a particular state when they are starting to mix, regardless of what the previous DJ may have adjusted, you can choose to bring up the My Settings window.
This window displays all the DJ preference settings that can be configured on a player over the network. (Not all players will necessarily support all of these features; consult the player and rekordbox manuals for details about them, although to be honest it took some experimenting for me to figure out what some of them meant).
Beat Link Trigger remembers the settings you have chosen as part of the Triggers window configuration, so they will persist between times you run the program.
Once you have the settings configured the way you want them, you can choose a currently-connected player in the Load on: menu, and click the Load button to tell it to load them. The player will instantly apply any of the settings that it understands.
Automatically Opening Player Status
If you always want the Player Status window to open when you launch Beat Link Trigger, you can use the Settings window to configure that.
Prior to version 8 of BLT, to achieve the same thing you had to add the following form to your Came Online Expression:
(triggers/show-player-status)Keeping Player Status Always Visible
Some users have expressed an interest in making the Player Status Window always be visible, no matter what window is active in their operating system.
This can be arranged by creating an entry in the Triggers window globals atom with the key :player-status-always-on-top and the value `true`before showing the Player Status window.
In other words, add the following form to your Global Setup Expression:
(swap! globals assoc :player-status-always-on-top true)| If the window was already open when you set up this entry, you can make it take effect by choosing again. |
Changing the Number of Columns used
Normally Beat Link Trigger tries to keep the Player Status window small, to accommodate the smaller and lower-resolution screens often found in Front-of-House lighting stations. It will use a single column if there are fewer than three players, two columns if there are fewer than five players, and three columns if there are five or six players (a full CDJ-3000 and DJM-V10 setup).
If you would like to change this, you can create an entry in the Triggers window globals atom with the key :player-status-columns before showing the window, which you can do in your Global Setup Expression.
If this value is an integer, the Player Status window will always use that many columns. So to fix the window at two columns wide, add the following form to your Global Setup Expression:
(swap! globals assoc :player-status-columns 2)If you still want the window to adjust its columns based on how many players are found on the network, but want to use your own rules, you can set the value of :player-status-columns to a function.
Beat Link Trigger will then call that function when it is setting up the Player Status window, and will pass it the number of players that are visible on the network.
As long as the function returns an integer, BLT will use the value it returned as the number of columns in the window.
Here is an example of how you would implement the built-in logic that BLT already uses, but you can change it to use whatever logic you prefer:
(swap! globals assoc :player-status-columns
       (fn [num-players]
         (inc (quot (dec num-players) 2))))
This function decrements the number of players it was passed (subtracts one from it), then takes the integer quotient of dividing that by two, and finally increments that (adds one) and returns it as the number of columns to use. So the results are 1 column for 0, 1, or 2 players, 2 columns for 3 or 4 players, and 3 columns for 5 or 6 players.