OBS Overlays for Twitch Streaming
For some time now people have been using Beat Link Trigger to add fun elements to mixes streamed on Twitch by creatively screen-grabbing parts of the Player Status window (and the large waveform windows feature was added to support that). But for even longer, there has been a request to enable custom overlays based on data from Beat Link, and this is finally possible.
By opening you can configure and launch an embedded web server that renders an HTML template that can contain the content of your choice, arranged and styled however you like, to work with the Browser Plugin that is bundled with OBS Studio.
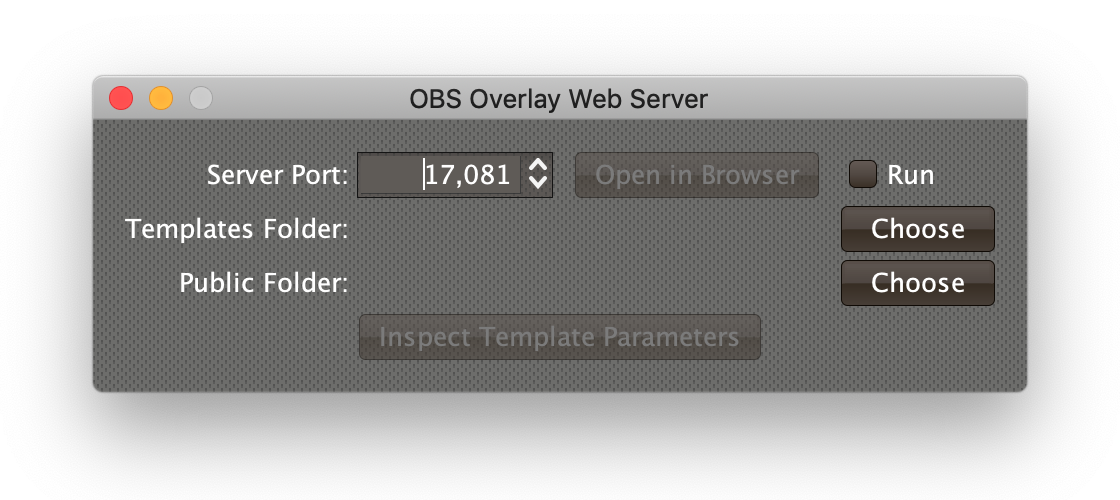
The Server Port spinner allows you to choose the port on which the web server will operate. You can pick any port that is not in use; the default of 17,081 is likely to work just fine. The Run checkbox starts and stops the server. Once it is running you can click Open in Browser to take a look at how the configured template renders the current player state, and to give you an easy way to copy the overlay URL from the browser address bar for pasting into OBS Studio.
Beat Link Trigger ships with a default template that is served unless
you specify your own templates folder, which you can do by clicking
Choose on the Templates Folder row. It will allow you to
navigate to and select any folder your system, as long as there is a
readable overlay.html file in that folder. This file will be used as
the template rendered by the overlay server. It can reference other
templates in that folder using whatever names you give them, either by
extending or including them, as
discussed below.
Once you have chosen a templates folder, that is stored in your
preferences, and it will automatically be used the next time you run
Beat Link Trigger (unless the folder no longer contains a readable
overlay.html, in which case a warning will be displayed when you
open this window, and the default template will be used again).
In designing your template, you are likely to want to use graphics,
fonts, CSS, and possibly scripts and other resources. If these are
already on the Internet, you can reference them using URLs in your
template. But if you want to access them locally, you can gather them
all into any folder, and configure that as a Public Folder for the
overlay server by clicking the Choose button in that row, and
navigating to and selecting that folder. Once you have done that, any
file in that folder can be referenced from your template simply by
using a URL of the format /public/ followed by the filename. So for
example if you have a file logo.png in your public folder, a
template can use it by referencing the URL /public/logo.png.
Just like the templates folder, your chosen public folder is stored in the preferences, and will be used on subsequent runs of Beat Link Trigger until you choose a different folder, or it can no longer be found.
Although you can set the same folder as your Templates Folder
and Public Folder, this is not recommended, because it will expose
your raw templates. In that configuration, accessing
/public/overlay.html will serve the overlay template without
performing any of the variable substitutions that add information
about the tracks currently playing. Beat Link Trigger will let you set
things up this way, but will warn you when you do.
|
Writing Templates
You can find the source for the latest version of the basic template that is built in to Beat Link Trigger on GitHub.
Templates developed or modified by other users can be found on the Wiki, and you can download them to use or modify using your favorite text editor. Overlay templates are HTML files that get processed by Selmer, so you can interpolate all kinds of information about the current tracks being played.
|
Don’t worry too much about the details of the templating language, because it turns out that trying to render the whole page up front doesn’t work well in the OBS browser plugin anyway. Configuring the page to refresh itself periodically, which would re-render the templates, was the original plan for this feature, but the OBS browser plugin does not use double-buffering, so that approach caused the overlay to flicker in a very unpleasant way. To get a nice-looking overlay that updates itself smoothly, write JavaScript code that periodically fetches the current player state as JSON parameters, and then updates any changed elements using DOM manipulation by ID. That is how templates, including the built-in one, are working today. If you still want to have the original page contents render correctly, before the first JavaScript update changes them, you can learn how the Selmer templates work. (Or, if you are rendering the template in a context that does use double-buffering, or some other mechanism where you can refresh the entire page without flicker, using the template syntax directly with no JavaScript DOM updates will be a lot simpler.) Either way, you will want to read the template language variable documentation, because that explains all the values available to you, whether you get them through Selmer or as JSON parameters. While these instructions cover most of the features that will be useful in the context of Beat Link Trigger, you can learn more about the basics of the templating language by looking at the Django documentation, but keep in mind some details are quite different in Selmer and Beat Link Trigger. You can also consult the Selmer documentation for details about how its template language differs from Django, and to learn about filters and tags that didn’t make the cut for explaining here, but that document is aimed at Clojure programmers adding Selmer to their projects, so it might be a little hard to follow. |
Variables
Variables allow you to insert information from the current state of your players into the template.
Template variables look like this: {{ variable }}. When Selmer
encounters a variable like this, it looks up the value of that
variable, and inserts the value into the template in place of the
variable. There are many variables available to you, which are
described just below, and you can also examine their actual values for
the current state of your players by clicking the Inspect Template
Parameters button when the overlay server is running:
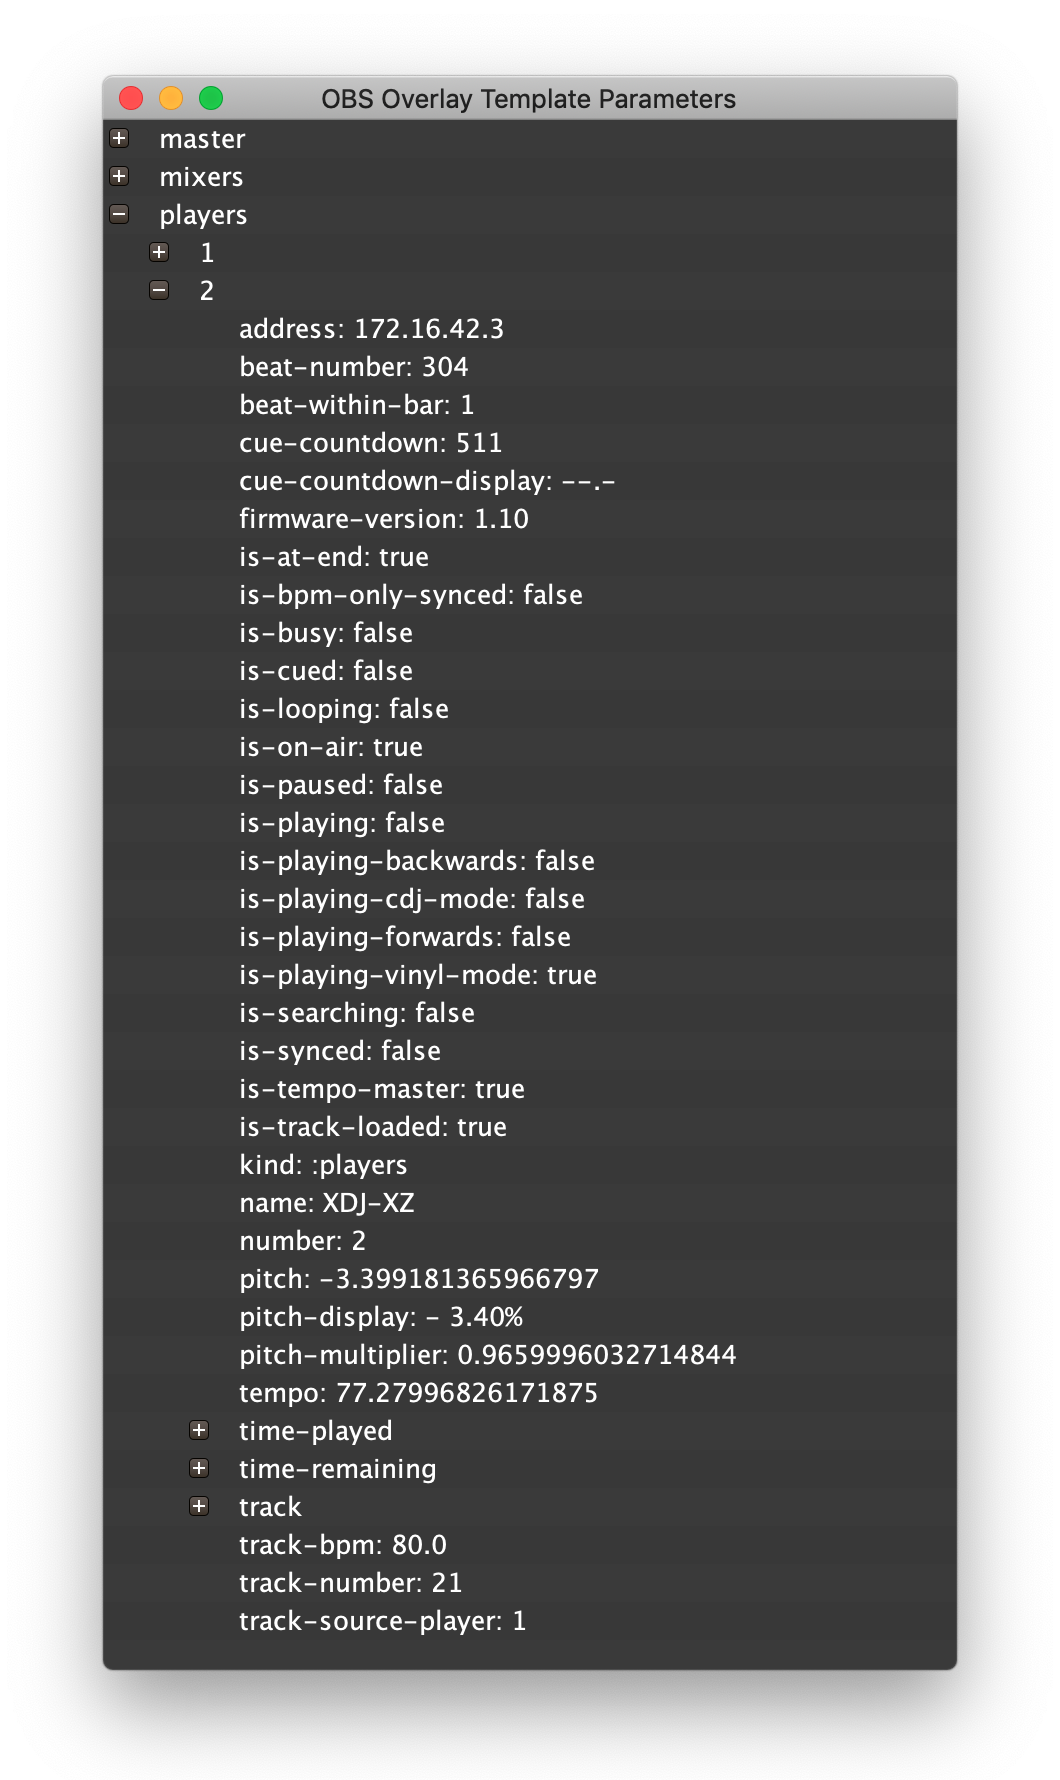
Notice that the variables are grouped into a hierarchy. You specify
the value you want by starting at the outer name, and separating names
at each level with ., so at the moment captured by the above screen
shot, if your template contained {{ players.2.pitch-display }} the
value - 3.40% is what would appear in the overlay, showing the
current pitch value displayed on Player 2.
You can expand sections of the parameter inspector by clicking on the + buttons, and collapse them by clicking on the - buttons, or simply double-click on those rows to toggle the expanded state.
Some variables may not be in the exact format that you want to display them, but you can use Filters to reformat them in flexible ways. And other variables may not be something you want to display at all, but you can use them to control which sections of your template are displayed using Tags.
| You can start the overlay server even if Beat Link Trigger is not currently online with a DJ Link network. When you do that, it will serve simulated data for two players, with Gareth Emery’s Concrete Angel loaded in player 1 and Lindsey Stirling’s Transcendence in player 2, so you can work on your template design even when you don’t have actual player hardware handy. Even though those are the only two simulated tracks available, you can configure them to be in more or different players if your template design requires; ask for help on the Gitter channel if you are interested in doing that. |
| Variable | Value |
|---|---|
collections |
Present when there are any computers or mobile devices running rekordbox on the network, this holds the device numbers assigned to each, and under each device number, the Player State of that rekordbox instance. Values are accessed like |
master |
Present if there is currently a Tempo Mater on the network, this holds the Player State of that player. Values are accessed like |
mixers |
Present if there are any DJM mixers (or an XDJ-XZ) on the network, this holds the device numbers of each mixer, and under each device number, the Player State of that mixer. Values are accessed like |
players |
Holds the device numbers of player on the network, and under each device number, the Player State of that player. Values are accessed like |
| Not all values will always be present. Some devices (like mixers and rekordbox) provide very little information, and even CDJs will only provide full details when a reordbox-analyzed track is loaded. Even then, most DJs do not fill in all details about tracks. When information is not available, an entry may be entirely missing, or it may simply have an empty value. |
Player State
| Element | Value |
|---|---|
address |
The IP address at which the player can be found on the network. |
beat-number |
The beat currently playing, if known. The first beat of the track is beat 1, and they increment steadily from there. |
beat-within-bar |
Tracks progress through measures of the song. The first (down) beat of a measure has the value 1, then it grows to 4 before jumping back to 1 at the start of the next bar. |
cue-countdown |
Tracks how many beats remain until the next hot cue or memory point in the track. If there are no cues left in the track, or if the next one is more than 64 bars from now, this has the value |
cue-countdown-display |
This interprets the value of the |
firmware-version |
Reports the version of the firmware running the player. |
is-at-end |
Indicates whether the player has reached the end of its track and stopped playing. |
is-bpm-only-synced |
Indicates that the player was in Sync mode, but the DJ has nudged the jog wheel to adjust track alignment, so it is now only following the tempo of the master player, and is no longer slaved to the precise beat locations the master is reporting. |
is-busy |
Indicates if the player is currently playing, loading, or searching a track. |
is-cued |
Indicates whether the player is paused at the current Cue point. |
is-looping |
Indicates whether the player is repeating a loop. |
is-on-air |
Indicates that the player is attached to a live mixer channel (one that is currently audible in the mix). This works only with DJM mixers, and when properly configured. |
is-paused |
Indicates that the player is waiting for the DJ to start playback. |
is-playing |
Indicates that the player is currently playing a track. p |
is-playing-backwards |
Indicates that the player is playing a track in Reverse mode. |
is-playing-cdj-mode |
Indicates that the player is currently playing a track and the jog wheel is set to CDJ mode. |
is-playing-forwards |
Indicates that the player is currently playing a track and Reverse mode is not active. |
is-playing-vinyl-mode |
Indicates that the player is currently playing a track and the jog wheel is set to Vinyl mode. |
is-searching |
Indicates that the DJ is currently fast-forwarding or rewinding through a track. |
is-synced |
Indicates that the player is staying aligned to the tempo and beats of the current Tempo Master. |
is-tempo-master |
Indicates that the player has been set as the current tempo master, so any players in Sync (or BPM-Only Sync) are following it. |
is-track-loaded |
Indicates that there is a track loaded in the player. |
kind |
Either |
name |
The name reported by the player, e.g. “CDJ-2000nexus”, “XDJ-XZ”. |
number |
The channel number assigned to the player. |
pitch |
The current playback pitch adjustment. Zero means normal speed, 100 means double speed (100% faster), -100 means slowed to a stop. This is a floating point value, so you will probably want to format it. |
pitch-display |
Reflects the way the current |
pitch-multiplier |
A convenient way to relate the playback pitch to track tempo. Normal speed is 1.0, and multiplying this value by |
tempo |
The current effective tempo of the track: the natural track tempo adjusted by the current playback pitch. Can be calculated by multiplying |
time-played |
How much time of the track has been played. (This reflects distance into the track when played at normal speed; it will move slower or faster than real time if the playback pitch has been adjusted.) This is a Time Value with multiple parts used like |
time-remaining |
How much time of the track is left to play. (This reflects how long it would take when played at normal speed; it will move slower or faster than real time if the playback pitch has been adjusted.) This is a Time Value with multiple parts used like |
track |
Another multi-part value, holding Track Details about the currently loaded rekordbox track. |
track-bpm |
The natural tempo of the current section of the track; this is how many beats per minute would be heard when played at normal speed. |
track-number |
The position of the track within its playlist, or menu category, or CD. |
track-source-player |
The channel number of the player (or rekordbox instance) from which the track was loaded. |
Time Values
| Element | Value |
|---|---|
display |
The full time details as displayed on a player, formatted as mm:ss:ff.f ( |
frame-tenths |
The current half-frame being played. (There are 75 frames played per second, and the players track position by half-frame, so this alternates between the values |
frames |
How many frames have been played (or remain) in the current second, ranges from |
minutes |
How many minutes have been played (or remain). |
raw-milliseconds |
This is the value that is used to compute all the others. It starts at zero at the beginning of the track, and counts up by a thousand for each second played. (For remaining time, it counts down from the length of the track to zero.) |
seconds |
How many seconds have been played (or remain) in the current minute, ranges from |
Track Details
| Element | Value |
|---|---|
added |
When the track was added to the DJ’s collection, a date in the form |
album |
The title of the album to which the track belongs. |
artist |
The name of the performer of the track. |
color |
The CSS color code ( |
color-name |
The name of the color the DJ assigned the track. |
comment |
The comment string the DJ wrote about the track. |
duration |
How long, in seconds, the track will play at normal speed. |
genre |
The musical genre the DJ assigned the track. |
id |
The rekordbox ID that identifies the track in the current database. |
key |
The musical key of the track. |
label |
The recording label that issued the track. |
original-artist |
The artist who first recorded the track. |
rating |
The star rating (0-5) the DJ assigned the track. |
remixer |
The person who remixed this track. |
slot |
The slot from which the track was loaded ( |
starting-tempo |
How many beats per minute are heard at the start of the track, when played at normal speed. |
title |
The name of the track itself. |
type |
The kind of track that was loaded ( |
year |
When the track was recorded. |
Filters
You can change the way variables are displayed by using filters.
Template filters look like this: {{ master.track.title|lower }}. Use
a vertical bar (|) between a value and the filter you want to apply
to it. This example displays the value of the master.track.title
variable modified by the lower filter, which
converts text to lower-case.
Some filters take arguments that adjust their behavior. Use a colon
(:) to introduce a filter argument. The
abbreviate filter makes sure a value fits in a
maximum number of characters. Suppose the master player is playing the
Skrillex track With You, Friends (Long Drive). We can make sure it
fits in twenty characters in our template like so:
{{ master.track.title|abbreviate:20 }}
This would insert With You, Friends… into the template.
Filters can take multiple arguments, in which case you will have multiple colons in between them.
Filters can also be “chained”: you can apply another filter to the
result of the previous one. Just add another | and type the next
filter. So, with the same track playing, we could write:
{{ master.track.title|lower|abbreviate:20 }}
And this would insert with you, friends… into the template.
If your filter argument is a string, and it has any spaces in it,
you need to quote it. See the default filter for
an example.
|
Here are the filters you are most likely fo find useful. The full list can be found in the Selmer documentation.
abbreviate
Abbreviate the input string to given width if it exceeds a maxium width. If only a maximum width is given, abbreviated and maximum width are the same. The first parameter is the maximum width, the optional second parameter the abbreviated width.
You can control where the abbreviation happens by putting an
abbr-left, abbr-middle, or abbr-right filter before the
abbreviate filter. You can also use something other than … as
the abbreviation indicator by putting and abbr-ellipsis filter with
an argument containing the indicator you want to use in front of the
abbreviate filter. These special abbr- filters can only be used
just before an abbreviate filter.
add
Adds the value and all the filter’s arguments together. If they are
all numbers, calculates their sums. If any is a non-numeric string,
concatenates the arguments. There are also multiply and divide
filters which take only a single argument, and perform the
corresponding arithmetic operation on the value (they only work with
numbers).
count, count-is
count counts the letters in a string, or the number of elements in a
collection (such as the players). count-is checks whether that count
matches its argument. You can use it with the if tag to
conditionally display content if there are a certain number of players
on the network, for example:
{% if players|count-is:4 %}
<p>All Players are in use!</p>
{% endif %}
default
Allows you to specify a value to display when a variable is empty or
missing. Normally, in such situations the variable just disappears
from the template (it is replaced by an empty string). If there is no
track loaded on player 2, this expression will result in the string
No track:
{{ players.2.track.title|default:"No track" }}
Notice that we had to quote the filter’s argument because our value had a space in it.
double-format
Rounds a number to a specified number of decimal places. This is useful when working with pitch values, since we usually only want two places after the decimal point:
{{ master.pitch|double-format:2 }}
There is also a round filter which rounds all the way to the nearest
integer, and number-format which lets you use a
Java
format string to get full control of the way you format the number,
even specifying an ISO-639 two-letter locale specifier as its second
argument.
empty?, not-empty
Check whether the specified value is empty or not (both filters return
true or false). These are again useful combined with the
if tag to conditionally render content:
{% if players|empty? %}
<p>No Players Found!</p>
{% endif %}upper
Convert a value to upper-case. (There are also two variants:
capitalize converts only the first character to upper-case, while
title converts the first letter of each word to upper-case.)
replace
Takes two string arguments, and replaces any instances of the first string found in the value with the second string.
sort
Sorts the elements of the value. You will generally want to apply this
filter when you are looping over the values in players
because they are otherwise not going to necessarily be in numerical
order.
Tags
Tags allow you to get fairly sophisticated with your templates,
supporting things like looping and conditionals. There are two
fundamental variants: simple, inline tags like include or extends,
which exist on their own, and more complex tags which affect text in
between them (and may include intermediate tags), like if, else,
and endif.
Here are the tags you are most likely fo find useful. The full list can be found in the Selmer documentation.
if
Conditionally renders the body only if the argument is true.
{% if players.3.is-on-air %}
<img src="/public/on-air.png">
{% else %}
<img src="/public/off-air.png">
{% endif %}
You can reverse the meaning of the conditional argument by preceding
it with the not operator, or combine multiple conditional arguments
with the all or any operators. You can also perform numeric
comparisons using the =, <, >, <=, and >= operators, or
string comparison using =.
{% if players|count < 4 %}Another player can be connected!{% endif %}
(Notice that the above example shows that filters can be applied to the conditions.)
In addition to the if, else and endif tags, you can have as many
elif tags as you need between the else and endif, meaning “else
if”. For more examples, see the
Selmer documentation.
for
Loops over each item in an array or map, making the item available in a variable of your choice inside the loop. Beat Link Trigger uses nested maps rather than arrays for its template parameters, and you can loop over entries in the map assigning the key and value of each entry to separate variables:
{% for number, player in players|sort %}
<p>{{ number }}: {{ player.track.title }}--{{player.track.artist }}</p>
{% endfor %}
The above example loops over all the players that are found on the
network. Each time through the loop, number is set to the channel
number of the player and player is set to the map of parameters
describing the state of that player, so the loop outputs a paragraph
for each player, showing the channel number, a colon, the title of the
track being played on that player, and the artist that recorded it.
Notice that the body of the loop is ended by an endfor tag, and that
we were able to use the sort filter on the players map to make
sure we got them in order of increasing channel number.
After the endfor tag, the number and player variables introduced
by the loop go away.
You can also place an empty tag between for and endfor, and the
content within that section will be rendered if the variable you were
trying to loop over had no values:
{% for number, player in players|sort %}
<p>{{ number }}: {{ player.track.title }}--{{ player.track.artist }}</p>
{% empty %}
<p>No players found!</p>
{% endfor %}
In addition to the variables you requested, the for tag always adds
several others that allow you to respond to or display additional
information about the looping process:
| Variable | Description |
|---|---|
forloop.counter |
Holds the number of this iteration of the loop, starting at 1 the first time through. |
forloop.counter0 |
Holds the number of this iteration of the loop, starting at 0 the first time through. |
forloop.revcounter |
Starts at |
forloop.revcounter0 |
Starts at |
forloop.first |
Is |
forloop.last |
Is |
forloop.length |
Holds the number of times the loop will iterate. |
forloop.parentloop |
If this loop is nested inside another |
cycle
Picks the next value from a list of values each time through a loop.
Here is an example of this tag combined with the for tag
to create a list item for the player number and track title of each
player found on the network, and alternating the CSS classes of each
between blue and white:
<ul>
{% for number, player in players|sort %}
<li class={% cycle "blue" "white" %}>
  {{ number }}: {{ player.track.title }}
</li>
{% endfor %}
</ul>
block
Specifies a block of content that can be overwritten using template inheritance.
{% block track-information %}This will be replaced.{% endblock %}
extends
This tag is used to reference a parent template, which provides the outer structure that gets rendered. The blocks in the parent are recursively overridden by the blocks from child templates, using template inheritance.
JSON Parameters
As noted above, it turns out that using elaborate template expressions to render custom and conditional content doesn’t make a lot of sense in the context of the OBS browser plugin, because of flickering when you try to re-render the whole page to get updated values. So a better approach, as shown by the built-in template, is to simply render the page once using a simple template, and assign IDs to the elements that will change over time, so you can use JavaScript code to periodically poll the BLT overlay server for the current player state, and update the page accordingly.
In order to support this approach, whenever your page requests the URL
/params.json, BLT sends a JSON response containing all the current
template parameters. You can set up a timeout function to retrieve
them at whatever frame rate you would like to update your overlay,
and your code can process the results and render itself as desired.
The content and meaning of the JSON response is detailed in the
Variables section above, but ignore the discussion of
how to use Selmer syntax to navigate the variables; you will be using
normal JavaScript syntax once you have parsed the JSON. You can see
the exact details of the current JSON value being returned by using
the Open in Browser button in the OBS Overlay Server window, and
then adding /params.json at the end of your browser’s URL bar. The
Inspect Template Parameters button also offers a nice hierarchical
way to explore them.
Graphics Resources
In addition to the template itself, there are a variety of URLs you
can use with <img> tags in your template (or from your JavaScript
update code) to display things like the album artwork or track
waveforms associated with a player.
Album Art
You can look up the album art for the track loaded in a particular
player using a URL like /art/1 (replace the 1 with another number
to get the art for the player on a different channel). If there is
artwork, this will return an 80x80 pixel JPEG image. If there is no
art, or no track loaded, it will return an 80x80 transparent PNG
image.
|
If you are using a for loop to display your players, you can use template substitution to set up your URL: <img src="/art/{{ number }}" width="80" height="80">
|
If you would like to display more information about why there is no
artwork, the way Beat Link Trigger does, you can add a query string to
the request: /art/3?icons=true. With icons set to true, when the
art is missing, you will receive a PNG image that describes why. If
there is no track loaded, it will read "No Track". Otherwise, it will
be an icon describing where the track was loaded from: USB, SD, CD
Digital Audio, CD Data, or rekordbox.
| The missing-artwork icons returned are larger than 80x80 pixels so they can be displayed in higher resolution on high-DPI displays, so you should be sure to render your artwork at a fixed width and height of 80 pixels using the HTML or CSS of your template, so the layout doesn’t change depending on whether artwork is present. |
Waveform Previews
You can access the whole-waveform preview (as is displayed at the
bottom of a CDJ screen) for the track loaded on a particular player
using a URL like /wave-preview/2. If you request it that way, it
will be rendered at a default width and height, but you can specify
the size you want using query parameters:
<img src="/wave-preview/{{ number }}?width=500&height=100">
This image will show the current playback position of the player as a bar moving along the image, and will have small triangles marking hot cues and memory points.
If there is no waveform available for the specified player, a transparent image will be returned.
| The lack of waveform data will result in a smaller image being returned, so as with album art you should always make sure your image is rendered at a fixed size using the HTML or CSS of your template, to avoid layout changes when data availability changes. |
Custom Background Colors
If you are creating a lighter interface, you might want the background behind the waveform to be drawn in a color other than black. You can achieve that by adding a line like this to your Global Setup Expression:
(set-overlay-background-color (Color/white))That will set the background color to white, using the constant color
value in the
java.awt.Color
class. You can use any of the other constants defined in that class,
or construct your own color. Here is another way to get white:
(set-overlay-background-color (Color. 255 255 255))That sets the background color by constructing a color whose red, green, and blue components are all 255 (out of 255), so it is white.
You can also use the constructor with four arguments to make your color partly (or completely) transparent by passing an alpha value from 0 (transparent) to 255 (opaque). This would use a fully-transparent background color (so the first three numbers don’t matter):
(set-overlay-background-color (Color. 0 0 0 0))If you change the background from black to white, you will almost
certainly also want to change the color used to draw the playback
position and tick marks (which is normally white, and so they will be
invisible on your new background). You can do that with
set-overlay-indicator-color. A black indicator color works well with
a white background:
(set-overlay-background-color (Color/white))
(set-overlay-indicator-color (Color/black))
You can even change the color used to draw down beats and active
playback position markers (which are normally red) using
set-overlay-emphasis-color.
Scrolling Waveform Details
You can access the scrolling detailed waveform (as is displayed at the
top of a CDJ screen) for the track loaded on a particular player using
a URL like /wave-detail/4. If you request it that way, it will be
rendered at a default width and height, but you can request a specific
width and height using query parameters like with the waveform
preview. You can also control the scale (zoom level) with which the
waveform is rendered. The default scale is 4, meaning each column of
the image is an average of four half-frames of audio. Setting scale to
1 shows the full detail available, while larger values let you see
more of the waveform at once.
<img src="/wave-detail/{{ number }}?width=800&scale=2">
The image will show the current playback position of the player as a bar centered in the image, and the waveform will scroll as playback occurs. Hot cues and memory points will be drawn (including their labels and if they have been assigned), and loops will be visible.
If there is no waveform available for the specified player, a transparent image will be returned.
| The lack of waveform data will result in a smaller image being returned, so as with album art you should always make sure your image is rendered at a fixed size using the HTML or CSS of your template, to avoid layout changes when data availability changes. |
As noted above, if you are creating an overlay with a light background, you might want to change the waveform background color.