Phrase Triggers
Starting in version 7, we gained the ability to take advantage of phrase analysis information in tracks, if the DJ has added that. In addition to adding useful information along the bottom of track waveforms, this enabled the creation of a major new feature for running attractive light shows even for tracks that you have not been able to build custom cues for, using any player hardware that works with Beat Link Trigger, regardless of whether the player itself supports lighting mode.
This is achieved by adding Phrase Triggers to your show, which allow you to arrange cues that look good whenever a particular phrase type is played, timed to the beginning, middle, ending, and fill-in section (if there is one) of the phrase. You can fine tune which of your triggers are used for which types of phrases, and assign weights so that when multiple alternatives exist, one is chosen more or less often than another.
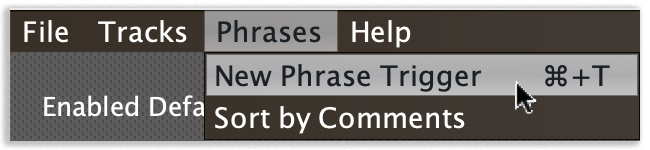
To add a Phrase Trigger to your show, choose .
Phrase Triggers come below all the Tracks in the show. Their rows have a slightly different background color to make them stand out, but they are also structurally so different that are easily recognizable.
New Phrase Triggers are always added at the bottom of the list, but you can sort them by the Comment values you assign them by choosing whenever you like.
The Show’s Filter text field will also filter Phrase Trigger rows (by their comments), and the Loaded Only check box will cause only active Phrase Triggers to be visible in the window.
Exclusivity
Before even looking at the list of phrase triggers, any tracks that are part of the show get to decide whether to allow phrase triggers to run while they are playing. By default, tracks prevent this: in general if a track has been added to the show, its custom cues will be more appropriate than randomly-chosen phrase triggers.
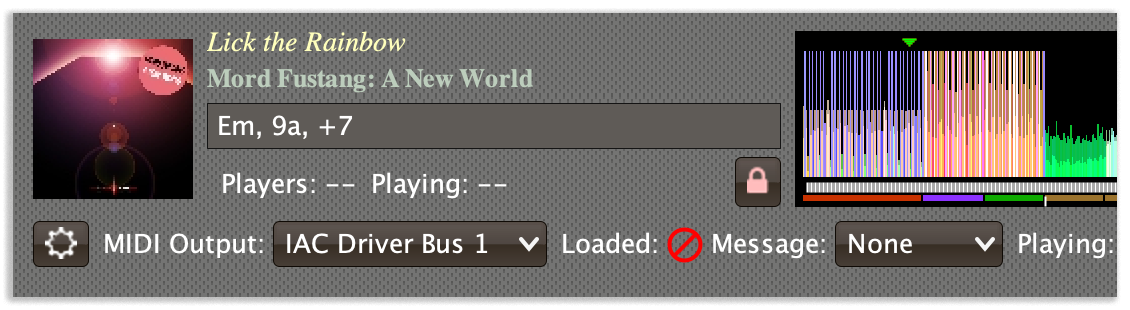
Any track in the show for which phrase information is available will have a small lock button just to the left of the phrase color bars in the waveform preview. When it is locked (and red), that means that phrase triggers are locked out for the track:
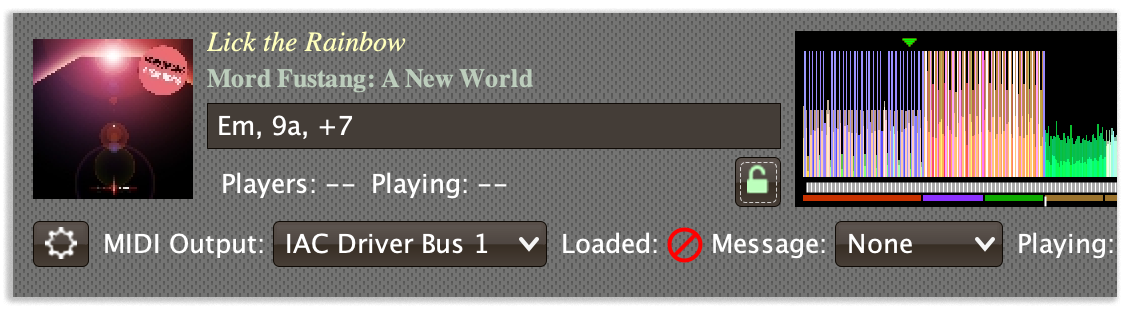
Clicking the button toggles the phrase trigger lock, allowing phrase triggers to run while the track plays:
So, when a new phrase starts playing in a track, and it is time to decide which phrase triggers to run:
-
If the track playing is not present in the show, the phrase triggers are always allowed to run. If the track is part of the show, it gets to decide whether any phrase triggers run or not, as described above.
-
Phrase triggers themselves have different levels of exclusivity. The default is “Solo in show”, but can also be “Solo across all shows”, or “Blend”.
-
When a new phrase starts, all phrase triggers in all open shows are examined to see which are enabled for that trigger (see below for details).
-
Enabled triggers are grouped by exclusivity, and first any “Solo across all shows” triggers are considered. A random one is chosen and activated.
-
Then, for each open show, the “Solo in show” triggers in that show are considered. If there was a “Solo across all shows” trigger activated, and it came from this show, then none of the “Solo in show” triggers will activate, because there is already a trigger from this show running. However, if the active trigger was in another show, it won’t stop these from running. (If you wanted them to be prevented from running in this circumstance, you would have marked them as solo across all shows. In most cases, each show will be used to run triggers for a different purpose, e.g. a show for videos, a show for lights, a show for lasers, and so their triggers will not conflict.) Again, an enabled trigger is chosen at random, taking the weighting into account, and activated.
-
Finally, for each open show, all “Blend” triggers that are enabled for the phrase are activated; they run regardless of other triggers.
Enabling and Weighting
To decide which phrase triggers should be considered when a phrase starts, there are a number of filters that can be applied.

-
You can also set a minimum and/or a maximum phrase length in bars. Phrases which are too long or too short will then not activate this phrase trigger.
-
Similarly, you can set a minimum and/or maximum tempo in BPM, and if the track playing is too slow or too fast when it starts playing the phrase, it will not activate this phrase trigger.
-
And you can assign a weight, from 1 to 1000, that adjusts how likely this trigger is likely to be picked among all the triggers which are enabled.
| A good way to understand how weights work is to think of all the competing Solo phrase triggers that might be activated when a phrase starts playing as entering a raffle to see which one gets chosen, and the weight is the number of raffle tickets each phrase trigger buys. |
Clicking the Phrase Types button brings up a picker window like this:
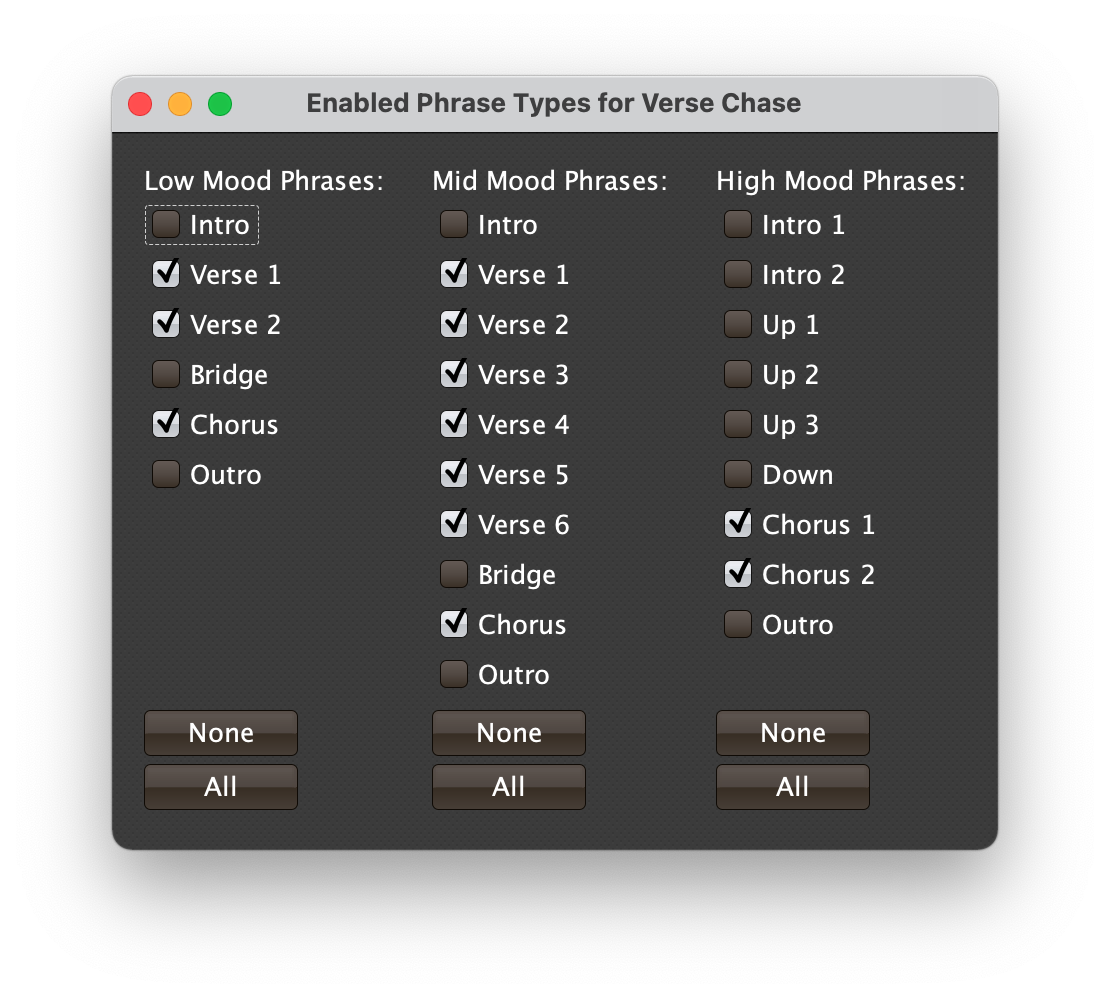
You can individually select which phrase types can activate the phrase trigger, or you can turn entire mood columns off and on using the None and All buttons at the bottom of the corresponding column.
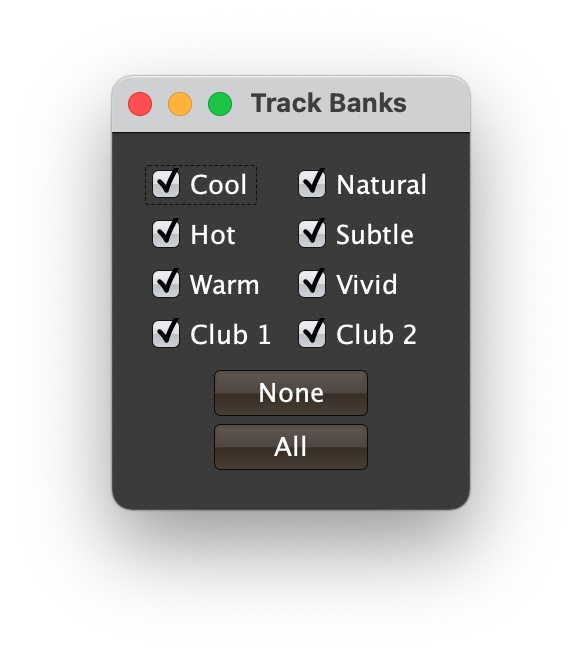
Clicking on the Track Banks button brings up a similar picker:
If you want to do more sophisticated filtering than that, you can swich to “Custom” enabled filtering by choosing . In this configuration BLT will call an expression when a phrase is starting to play, and pass your filter code the phrase and player status, and your code can use any logic you like to decide if the trigger should be enabled.
If your filter returns a number, that will be rounded to the nearest integer, and if it is positive the trigger will be enabled, with a weight corresponding to the number you returned (clipped to 1,000 as an upper bound, again). If your code returns anything other than a number, if it is truthy, the trigger will be enabled, with a weight of 1, and if it is falsy, the trigger will be disabled.
When you are using a Custom Enabled filter, the bottom row of UI elements in the phrase trigger row disappears, because your code is making the decision instead of them. To go back to the simpler approach, choose again, and they will reappear and be used instead of your filter code.
Phrase Trigger Structure
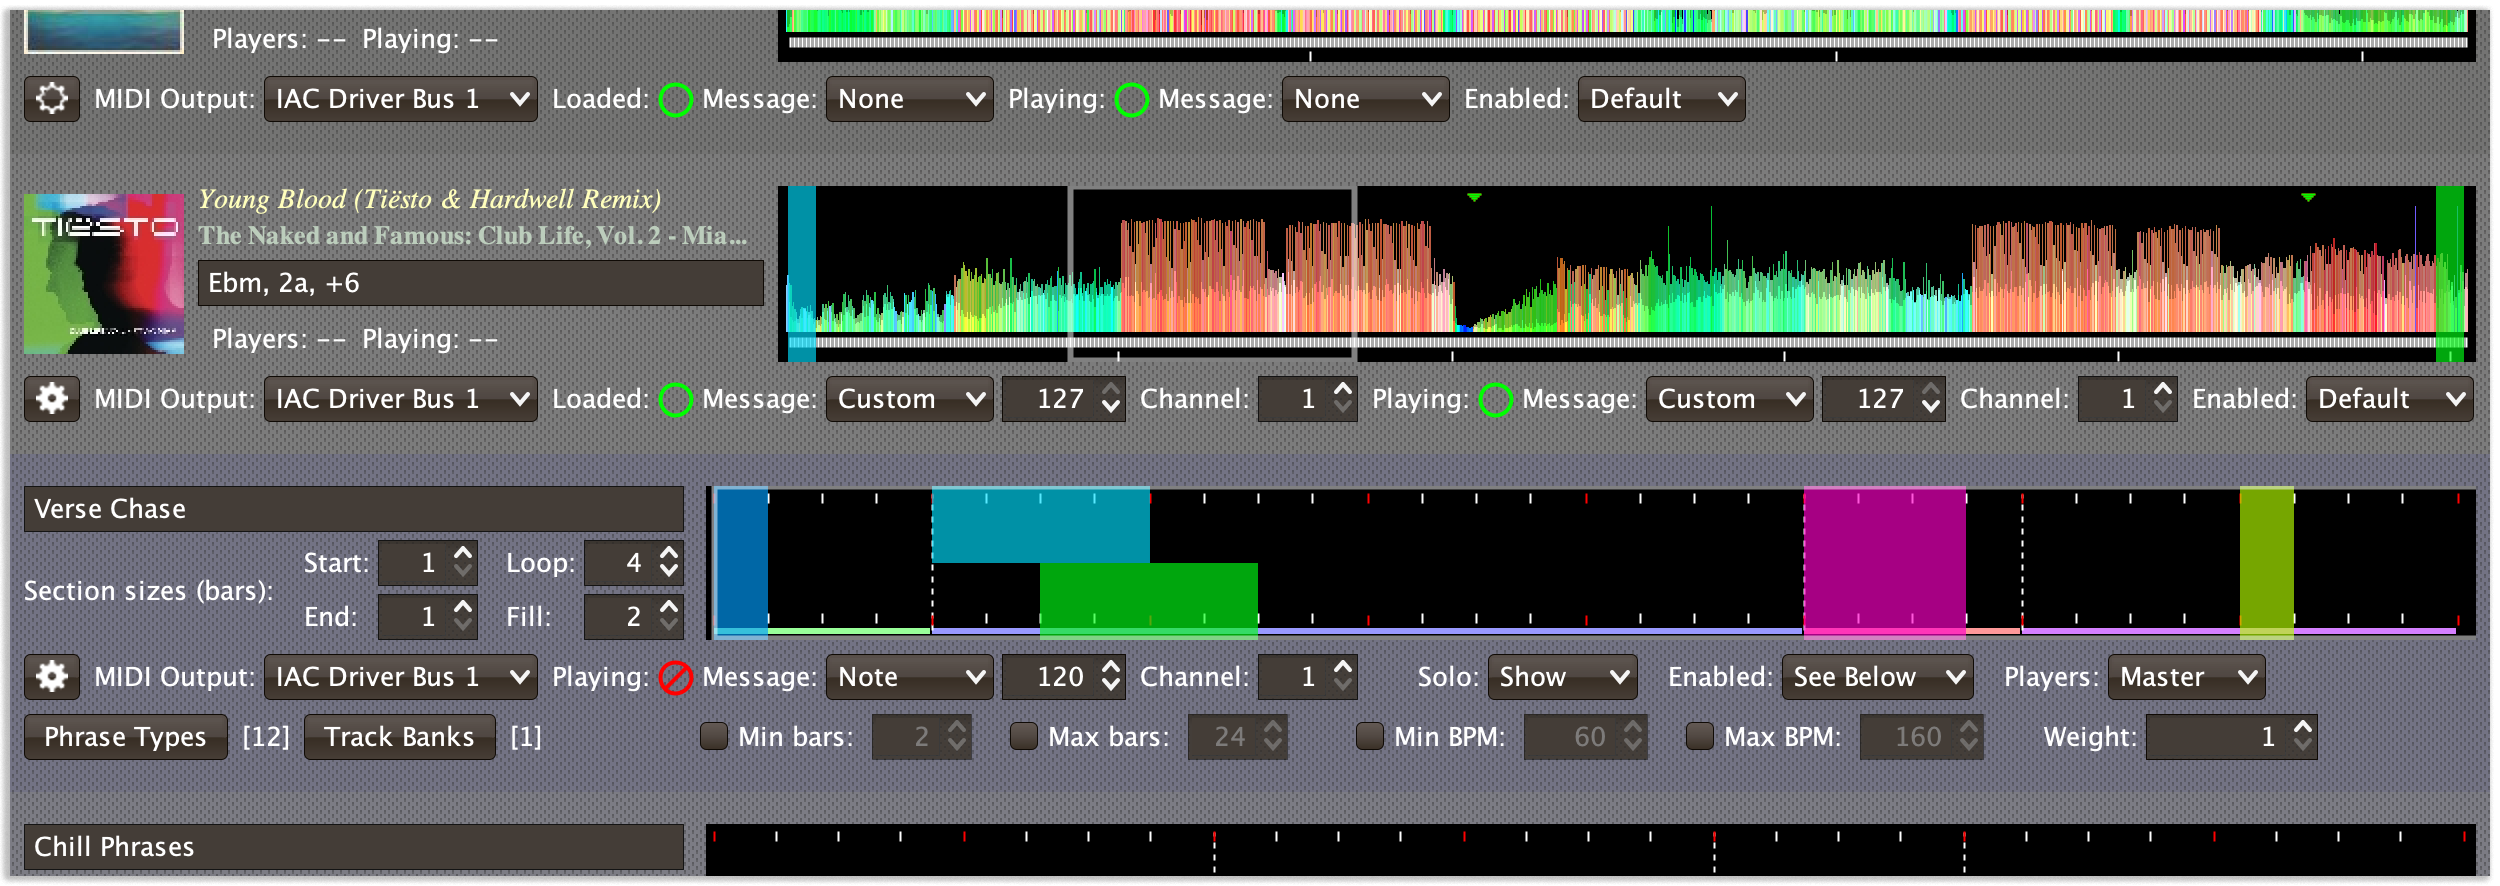
The phrase trigger is divided into four sections, whose sizes you get to choose using the Start, Loop, End, and Fill Spinners shown in the screen shot above. The size you choose will determine the size of the portion of canvas on which you can place cues for each section of the phrase trigger:
-
Start, which gets lined up with the beginning of the phrase in the track, and can contain zero or more bars, identified by a green stripe at the bottom of the cue canvas.
-
Loop, which gets stretched (looped) or shrunk as needed to fill up the middle of the phrase in the track, and can contain one or more bars, identified by a blue stripe at the bottom of the cue canvas.
-
End, which gets lined up with the end of the phrase in the track (before the fill-in section, if there is one), and can contain zero or more bars, identified by a red stripe at the bottom of the cue canvas.
-
Fill-in, which gets stretched (looped) or shrunk as needed to cover the fill-in section of the phrase, if there is one, identified by a purple stripe at the bottom of the cue canvas.
If the actual phrase is smaller than the sizes you have picked for your canvas, first the end of the Loop section is taken out of consideration, until that section is entirely gone. Then, the end of the End section is eaten away, until that entire section is gone, and finally the end of the Start section is eaten away until it fits the actual phrase. (As noted above, if you don’t want this kind of shrinking to occur, you can configure your phrase trigger to only be enabled when the phrase is longer than a certain number of bars.)
| Once you have started placing cues into the sections of your phrase trigger, as described in the next section, you will not be able to shrink those sections any smaller than the number of bars required to fit your cues. So if you do want to shrink or get rid of a section, you will need to delete any affected cues first. |
Messages and Cues
At the level of the entire phrase, the phrase trigger will have a Playing and Stopped message, which can be configured as MIDI or a custom expression. When a trigger is enabled as a phrase begins, and chosen (if it is solo), the Playing message is sent. When the end of the phrase is reached (or the player stops, or the DJ jumps out of the phrase), the Stopped message is sent.
However, the real power of phrases for building creative shows is that they will provide a canvas on which you can draw cues, just like tracks.
Above the enabled configuration (if it is visible, because you have not chosen to use a Custom enabled expression), you find the controls that let you configure how you want the Show to respond to the phrase trigger.
Context Menu Button
This allows you to access the phrase trigger Context Menu with a regular mouse click. The gear inside the button will be filled in if there have been any Cues or Expressions added to the phrase trigger, and hollow otherwise. The contents of the menu itself are described below.
MIDI Output Menu
The MIDI Output Menu lets you choose the MIDI device to which the phrase trigger will send messages when you configure it to send MIDI messages for particular events. It will show all MIDI outputs currently available on your system.
The chosen MIDI output will be used for all messages that the phrase trigger is configured to send, including those belonging to any Cues created in the phrase trigger. But each phrase trigger can have its own MIDI output, in case you have a large show with many cues.
| As with the MIDI Output Menu in the Triggers window, if a MIDI Output is chosen which is no longer available on the system, it will remain in that phrase trigger’s menu, but the Enabled section of the phrase trigger will be replaced with the message “Not found.” Once the output reappears, or a different output is chosen, the phrase trigger will become operational again. |
Playing Status
To the right of the MIDI Output section there is a Playing Status indicator. It has an outer ring which shows whether the phrase trigger is currently enabled (a green circle) or disabled (a red circle with a slash). If any player is currently playing the phrase trigger, there is a filled circle inside the enabled indicator ring:
| State | Indicator |
|---|---|
Disabled, Not Playing |
|
Enabled, Not Playing |
|
Enabled, Playing |
|


Phrase triggers which are Enabled might not play because of exclusivity (they are Solo and a different phrase trigger was chosen). Because only Enabled phrase triggers are considered when a phrase plays, unlike tracks, you will never see a phrase trigger that is Disabled but Playing.
| Because of a limitation of the DJ Link protocol, if a player is positioned right before a beat, and the DJ uses Cue Play (holds down the Cue button to preview the track), Beat Link Trigger might briefly think the track is playing if the player sends a beat packet before any status packets reporting the fact that it is in cue preview mode. As soon as a status packet is received, the track will be recognized as not actually playing, and further beat packets will be ignored. Unfortunately, the first beat packet can cause your Playing message (and Cues' Started messages) to be sent prematurely, followed within a fraction of a second by Stopped messages. |
Message Menu
The Message Menu determines what kind of MIDI message is sent when the phrase trigger is enabled, chosen, and a player starts playing the corresponding phrase, or when the last player that was playing the phrase stops.

- None
-
With this setting, which is the default, nothing is sent when the phrase starts or stops playing.[1] When
Noneis chosen, there are no interface elements visible to configure the event. They will appear once you choose an event type to send, as shown in the screen shot above. - Note
-
With this setting, the Show sends a Note On message, with velocity 127 and the note number shown to the right of the menu, when some player starts playing the phrase trigger, and a Note Off message when the last player playing the phrase stops.
The Channel on which the Started/Stopped messages are sent is configured just to the right of the note selector.
- CC
-
With this setting, the Show sends a Control Change message, with value 127 and the controller number shown to the right of the menu, when the the phrase trigger starts playing, and sends a CC with value 0 when the phrase trigger stops playing.
- Custom
-
When this option is chosen, you can send any kind of message you want when the phrase trigger starts and/or stops, by writing code as described in the Expressions section. This gives you the most flexibility because in addition to MIDI messages, you can send arbitrary UDP packets, HTTP requests, or whatever you might need.
If you choose
Customand have not yet written a Playing expression, the expression editor will be opened to let you do that. You can also open that editor using the context menu.
Note/Controller Spinner
Found immediately to the right of the Message Menu
(unless None is chosen as the Message type), this field lets you set
the MIDI note number used for Note-based started and stopped messages,
or the controller number used for Control Change-based started and
stopped messages. The value is also available to your phrase trigger
expressions if they want to use it.
Context Menu
Each phrase trigger row has a context menu attached to it, which can be accessed by right-clicking (or control-clicking) anywhere on the row’s background, but you can also open the context menu with a regular mouse click on the button with a gear icon in it. Most of the menu is devoted to editing various expressions to customize the phrase trigger, as described in the Expressions section. The gear icon next to an expression will be filled in if that expression has a value, and the gear in the button will be filled in if any expression associated with the Track has a value, or if there are any Cues in the phrase trigger.
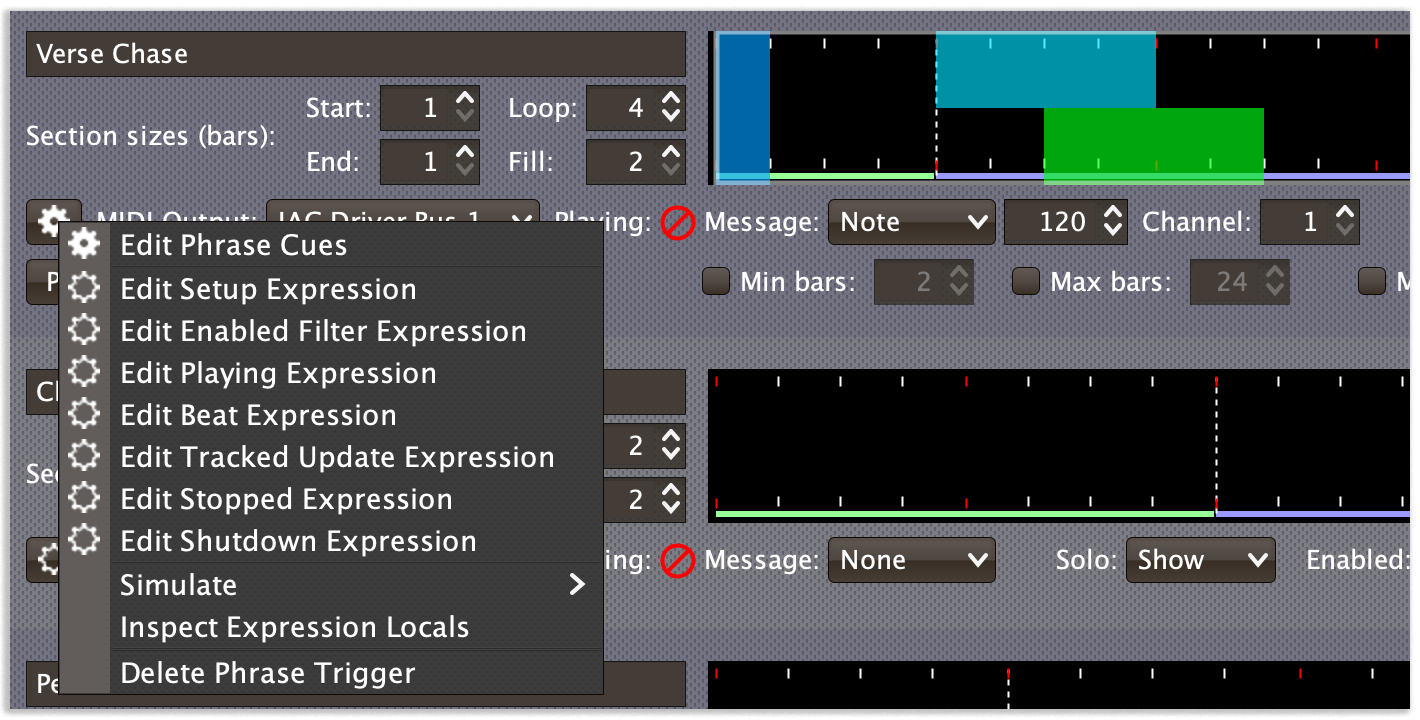
The first option in the menu, Edit Phrase Cues, opens the Cues window for the Phrase Trigger, which is how you can create Cues that respond to particular beat ranges within it, as discussed in that section.
Below that come the expression-related options, allowing you to open editors to create or edit Clojure code that runs at well-defined moments to customize the behavior of the Phrase Trigger. These are followed by the Simulate submenu, which allows you to test your MIDI mappings and custom expressions as described in the next section.
The Inspect Expression Locals option allows you to explore any values that have been set up by expressions in the Phrase Trigger to re-use or share with each other. See Inspecting Locals and Globals for more details.
Finally, the Delete Phrase Trigger option does just what it sounds like, after confirming that you want to discard any expressions and Cues you have set up for that Phrase Trigger.
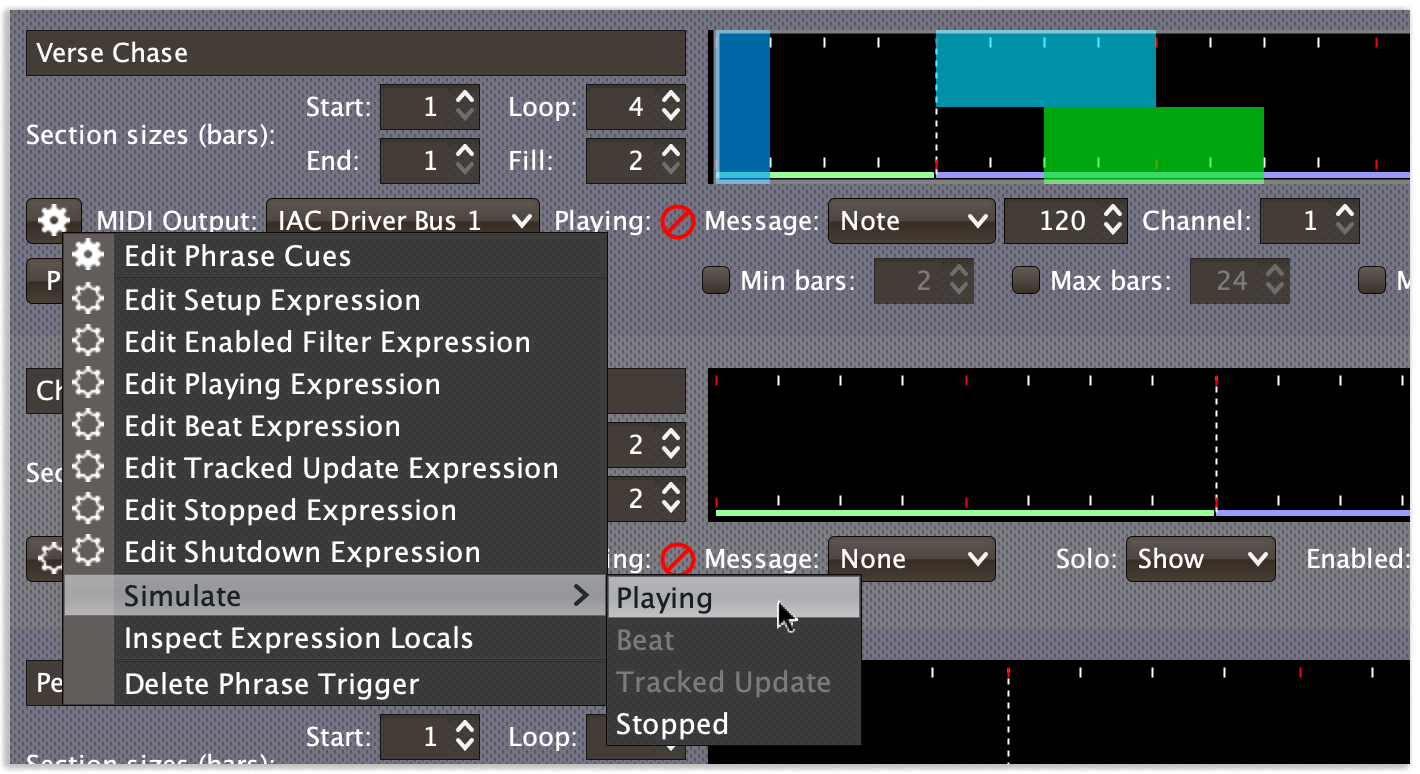
Simulating Phrase Trigger Events
The Simulate submenu allows you to pretend that a Playing, Stopped, Beat or Tracked Update event has occurred, and send the corresponding MIDI messages and/or run the custom Expressions you have configured for those situations.
|
This can allow you to set up MIDI mappings in other software, like Ableton Live, that requires actual MIDI messages in order to learn them, even when you are working in offline mode because you don’t currently have access to your CDJs. |
The corresponding option will be disabled if there is no MIDI message or Expression configured for that event.
Editing Cues
Just like with tracks, you can open a cues editor window for each phrase trigger, to see the four sections of the trigger, with the sizes you have chosen for them (although if you set the Start or End sections to zero bars, those will not be visible). The window looks like this:
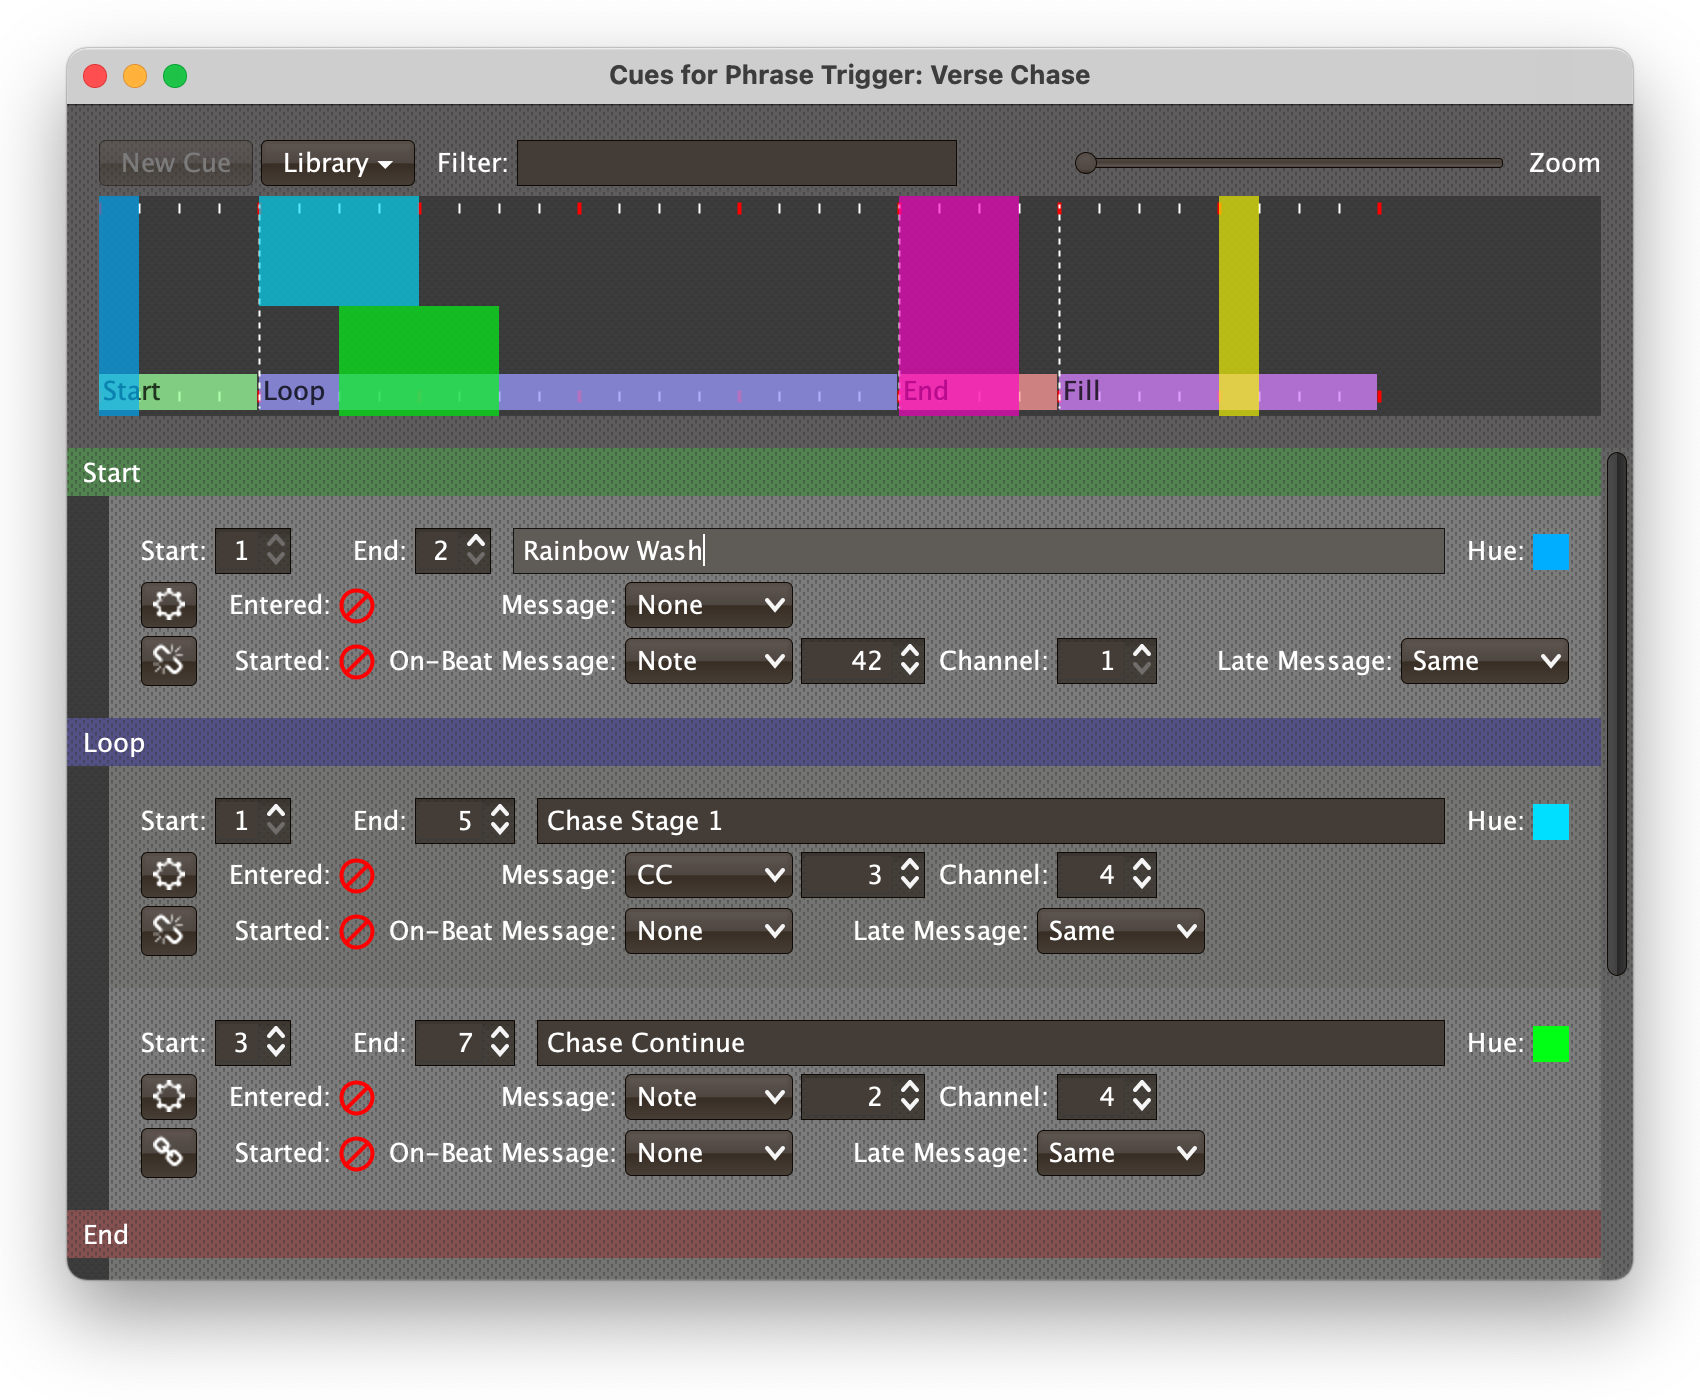
It provides a canvas on which you can drag to paint cues, like you can on the track waveform in a track cues editor window, but there is no waveform here because the trigger could activate for phrases in different places in one or many tracks. The canvas represents an entire phrase for which the trigger has activated.
As explained above, the phrase will be divided into sections which play different roles in aligning your phrase trigger with a phrase that it has matched, and whose sizes you get to choose. The sizes you choose will determine the size of the portion of canvas on which you can place cues for each section of the phrase trigger.
Unlike in a track cues editor window, the New Cue button (and the library menu options for adding new cues) will only be enabled once you have painted a location for the cue on the canvas, because otherwise there is no way to tell in which section the cue should be created. Each cue can exist in a single section only, and its start and end beats are measured from the start of that section.
Much like you can see where the playheads of the players are in the cue editor, you will be able to watch them move through the cue canvas of your phrase trigger. If the phrase is long, and so the loop section is looping, you will see this happen, until the end is reached, at which point the playhead will jump to that section.
Cues have all the same properties and expressions as they do in tracks, and share the same cue library, but their positions are computed relative to the start of the phrase which activated them, and taking into account any looping or shrinking needed to make the trigger fit the actual phrase.
To help identify the sections in which each cue exists, their rows are grouped by sections, each of which is preceded by a header identifying that section. (If there are no cues in a section, even if that is because you have filtered them out using the Filter field or Entered Only checkbox, there will be no header for that section.)
The process of editing the cues themselves is the same as for editing track cues, apart from the following phrase-trigger specific details, described earlier:
-
There is no waveform in the area in which you draw cues.
-
You need to set up a beat range selection before creating a cue, in order to identify the section in which the cue will exist.
-
Beat selections and cues cannot cross section boundaries.
| You may have also noticed there is no Auto Scroll check box. Since phrase triggers are much shorter than tracks, this is less likely to be needed, and it would be more complicated to implement. If you really want a feature like this, please say so in the Deep Symmetry Zulip stream. |
One difference when compared with cues in a track is that, as noted in Playing Status, phrase triggers are always enabled when they are playing (otherwise they would not have been chosen to play along with a phrase). This means whenever a phrase trigger cue’s Entered message is sent it will always immediately be followed by a Started message, and whenever an Ended message is sent it will immediately be followed by an Exited.
When drawing playback position markers in phrase trigger cue canvases, rather than the red color used in track waveforms, the color of the current phrase trigger section is used, to make it easier at a glance to tell what part of the phrase trigger is being played. When playing the final beat of that section, you can tell whether the position is about to loop back to the start of the section if the playback indicator gradually fades into transparency. Otherwise, if it is continuing on to a new section, it will instead fade to the color of the section that is about to begin.