Expressions
Customize and extend Beat Link Trigger by writing code in Clojure, the language used to implement the program itself.
Overview
A great deal of the power of Beat Link Trigger is in what you can do with custom expressions. The user interface lets you configure triggers to send simple MIDI messages in response to basic state changes, but with expressions you can write your own logic to determine when the trigger should be enabled, using all of the information provided by the DJ Link protocol, and you can even send other kinds of messages locally or over the network to integrate with systems that do not respond to MIDI.
| Expressions are written in Clojure, the same language that was used to write Beat Link Trigger. When you write one, it gets compiled to Java byte-code and loaded, essentially becoming part of Beat Link Trigger as if it had been there all along. So you have access to the full power of the language and Java environment, and can do anything you need to. But you will need to learn a little Clojure to do it. The official Learn Clojure page is a good starting point, and there are many Resources and Books if you decide you want to go deep. Maria is a fun, interactive online workbook that progressively introduces the language through exercises with instant feedback—and better support and guidance when errors happen than the language itself provides. It’s worth checking out. |
If you are working with the new Show interface, rather than low-level Triggers, then the expressions you’ll be using are at the end of this section, but you should at least skim the Triggers expression explanations too, because they introduce some important concepts that are useful everywhere.
With Great Power comes Great Responsibility
| The code you write in expressions gets compiled into Beat Link Trigger in the same way as the program itself was written. This gives you great power, but it also means you can completely lock up the program if you change the wrong things or get stuck in an infinite loop. It’s important to start simple, and to keep in mind that your expressions run as part of processing network updates from players and mixers, so they need to finish fast. |
Beat Link Trigger tries to protect against many kinds of things that can go wrong in your expressions. If one throws an exception, it will be logged so you can view it in the log file, and that instance of calling your expression will be abruptly cancelled, but the next expression or activity will get a chance to run.
The real problem is when your code does something that takes a long time, or even worse, gets stuck in an infinite loop. If that happens, nothing else that is supposed to respond to the event that caused your expression to run will get a chance to, and events can pile up behind your stuck expression, freezing user interface updates, and blocking the MIDI or other messages you are supposed to be sending. So watch for that, and remember which expressions you have changed recently if things go badly wrong.
If you legitimately need to do something in an expression that could
take a long time, such as an HTTP request, or any other sort of
round-trip network communication, you need to make it asynchronous by
wrapping the potentially-slow operation in a Clojure (future …)
block. This will run in a separate thread, so it will not slow down
the expression, or the delivery of events to other triggers, shows,
cues, or the user interface.
The tricky part about using future to run your code asynchronously
is when you need to do something with whatever answer you got back
from your long-running operation. You can’t just return it, like you
would in a simple, direct expression, because the expression has
already moved on, it did not wait for the answer. The easiest solution
is to have your asynchronous code inside the future block record the
answer into an expression local or global, and then other expressions
(or even future invocations of this expression) can check the local or
global to see if the answer is ready, and use it when it is. That is a
quick operation. So as long as your code works (even if it doesn’t yet
do anything) while the answer is still missing, it can use it without
blocking other activity as soon as it becomes available in the
expression local or global.
| There aren’t any examples of this kind of asynchronous code in the user guide yet, but if you have a situation where you need one, ask in the Gitter chat, and perhaps we can turn your needs into a new example for future releases. |
Also, note that it is only sending two-way network communications that you need to worry about. Sending MIDI messages and short one-way UDP messages (like OSC and some lighting controllers use) should be no problem without resorting to asynchronous code, and you will find examples of doing just that throughout this guide.
Editing Expressions
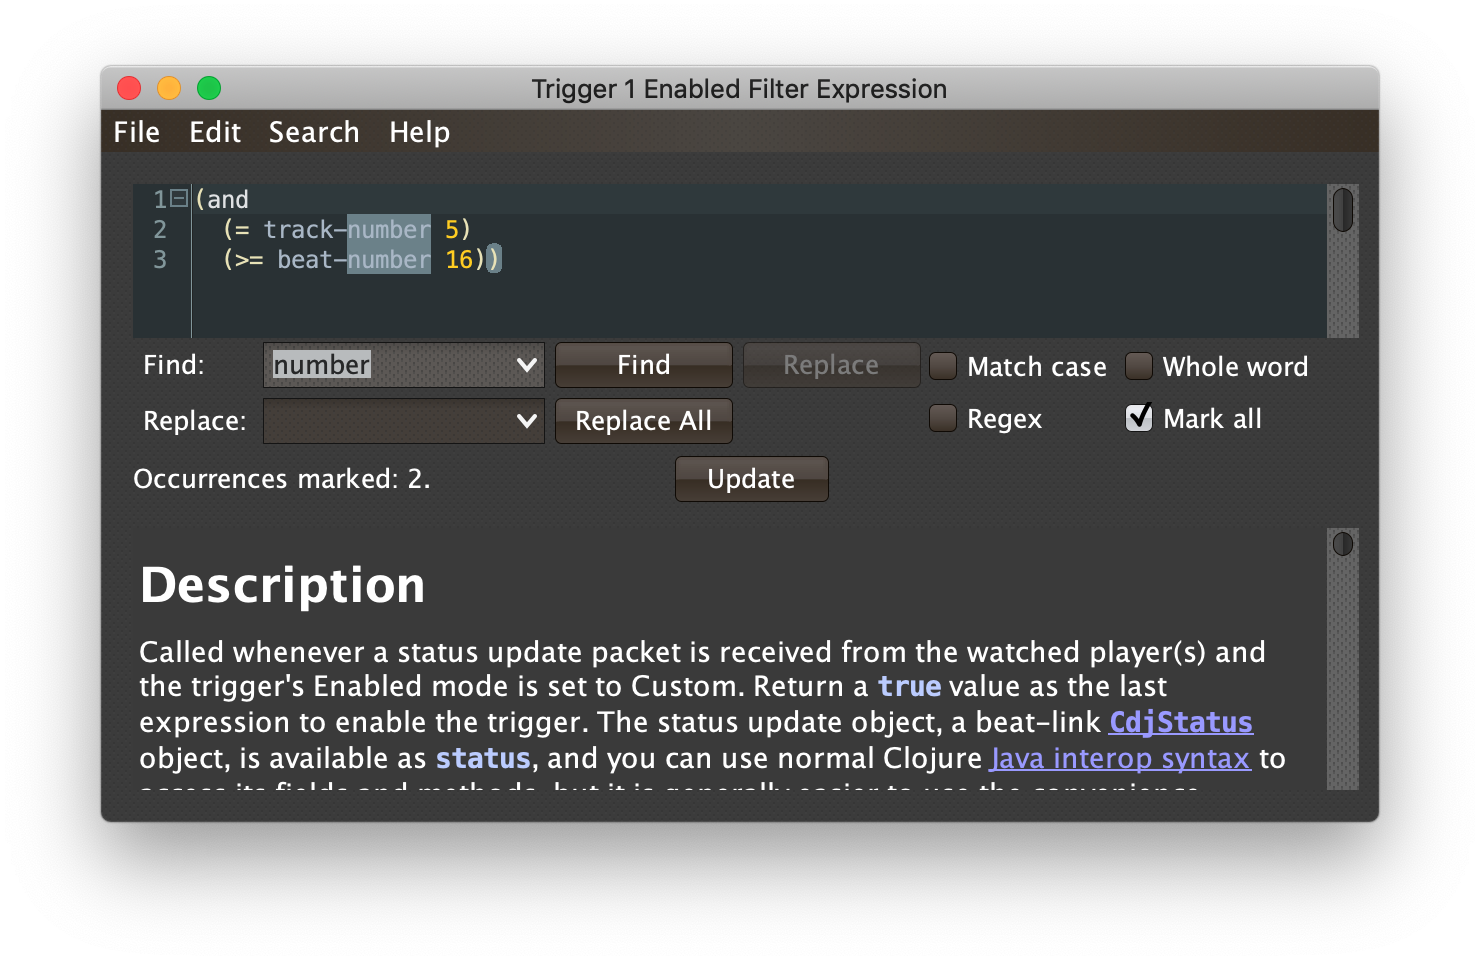
The expression you are first likely to want to use with low-level Triggers is the Enabled Filter, which is found in each trigger’s context menu. In fact, as soon as you set a trigger’s Enabled menu to Custom, Beat Link Trigger will pop open the editor for that expression for you, if you have not yet created it:
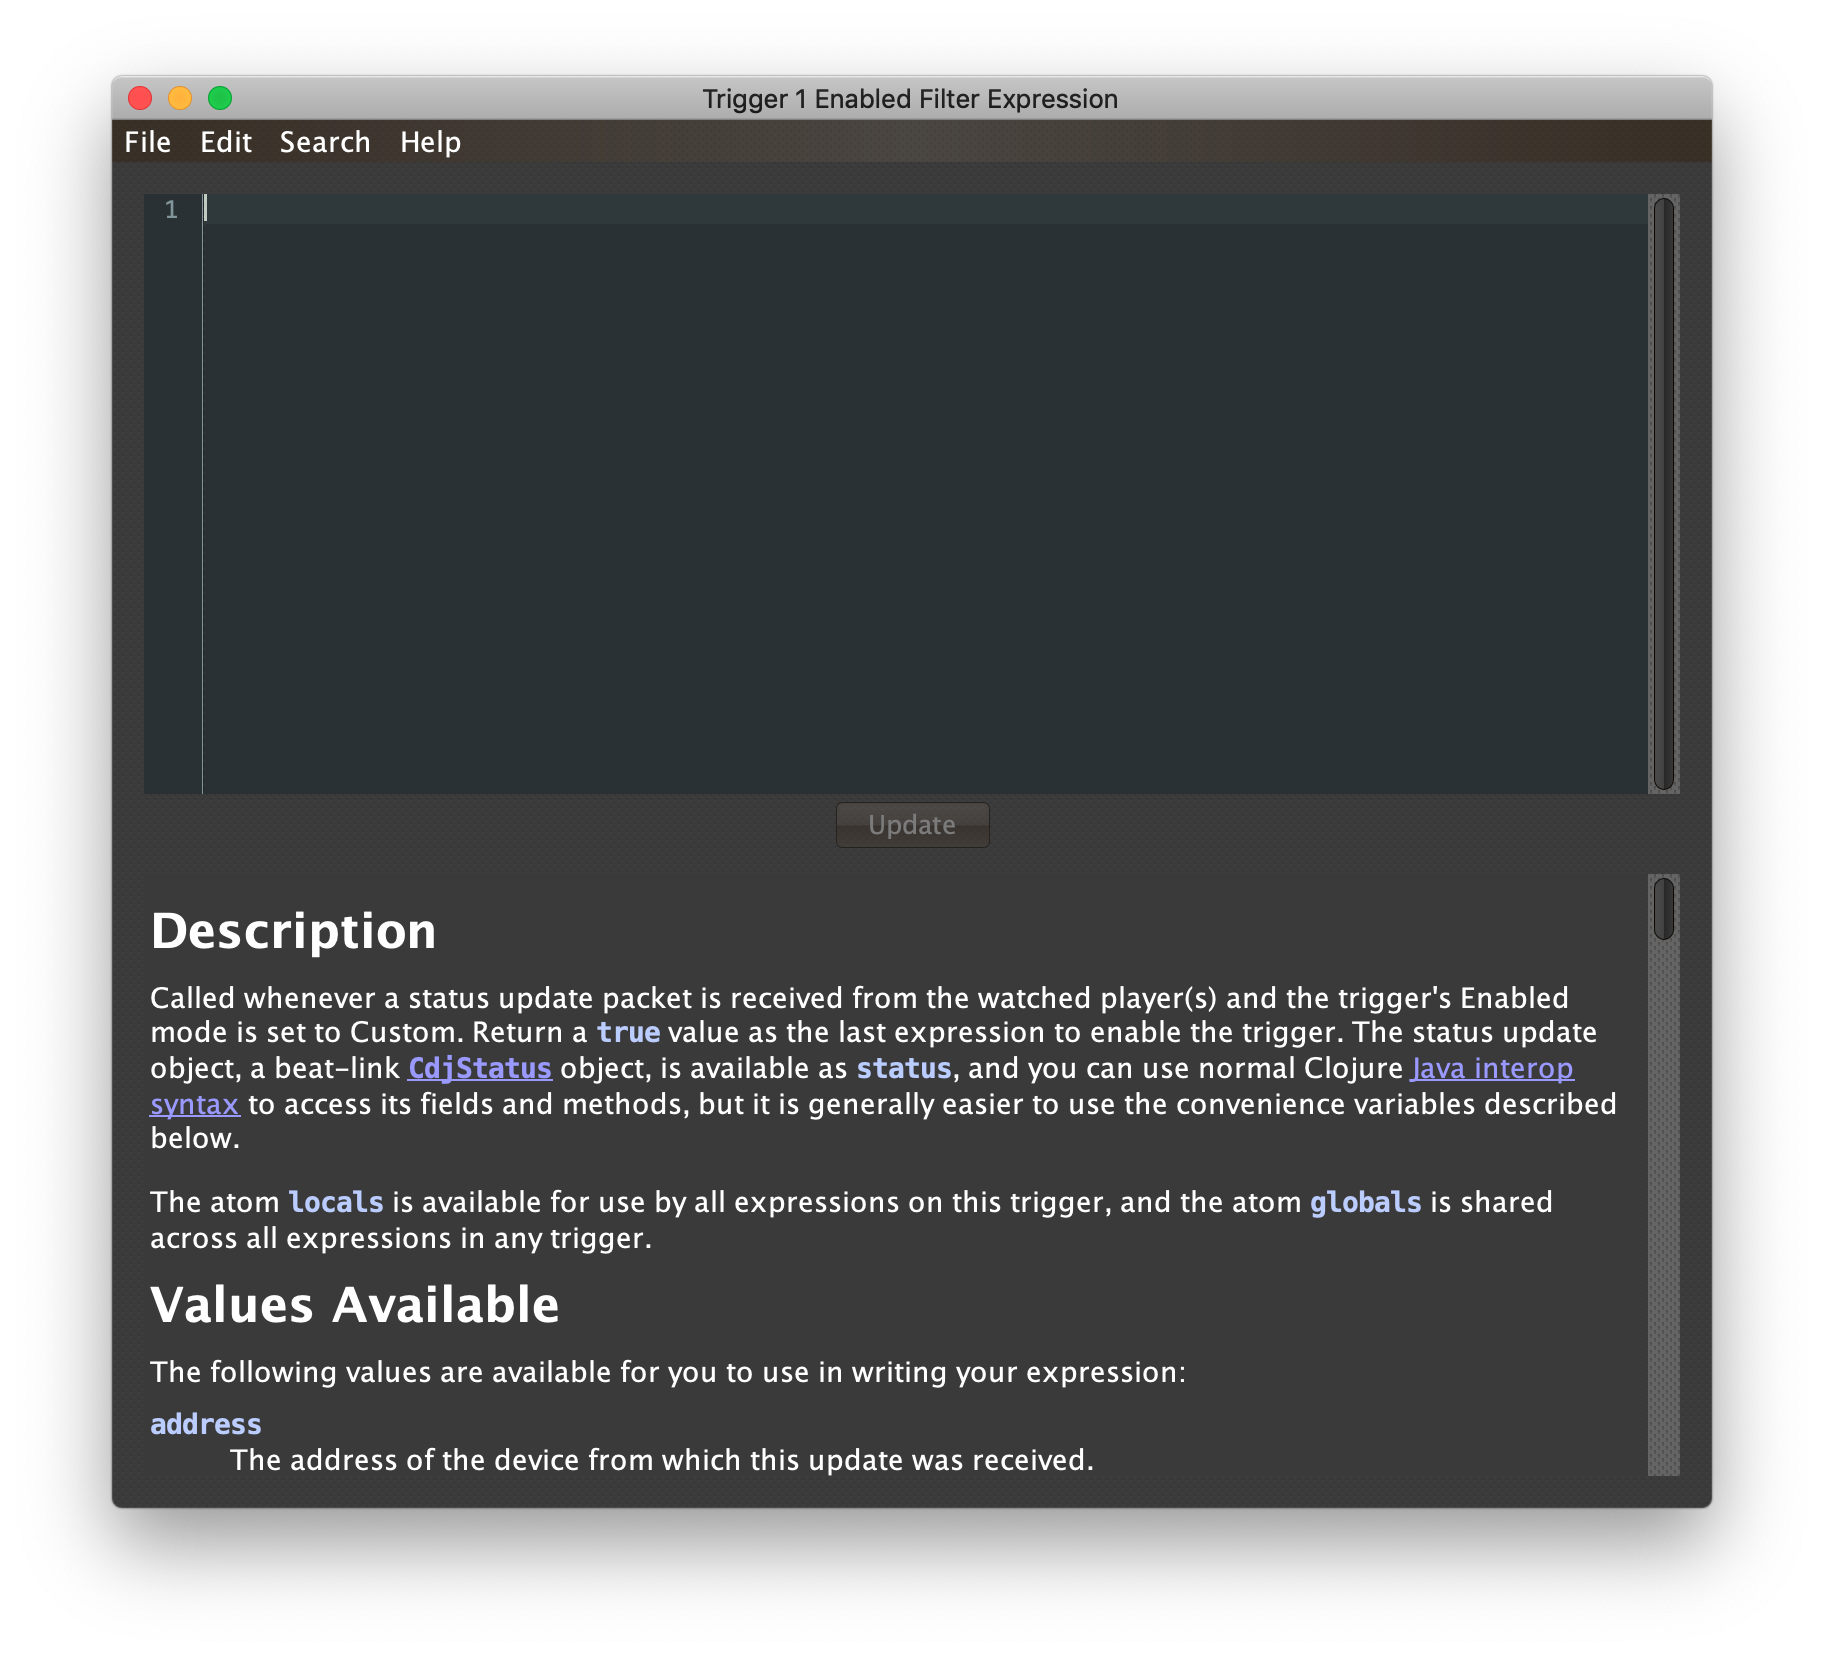
The editor window for each type of expression provides documentation about the purpose of the expression and guidance on how to write it. Most expression types have a variety of values that are available to help you in writing the expression, and those are described and explained in the help section as well.
Reading through the documentation, we see that the Enabled filter
should return a true value to enable the filter, and has access to a
lot of information about the watched player that it can use to decide.
Suppose we want the trigger to be enabled when the player has track
number 5 of a playlist or disc loaded, and has reached the fourth bar
of music (which starts on beat 17, since there are four beats per bar,
and the track starts with beat 1). With the help of
Learn Clojure and the help
text in the editor window, we come up with the following expression:
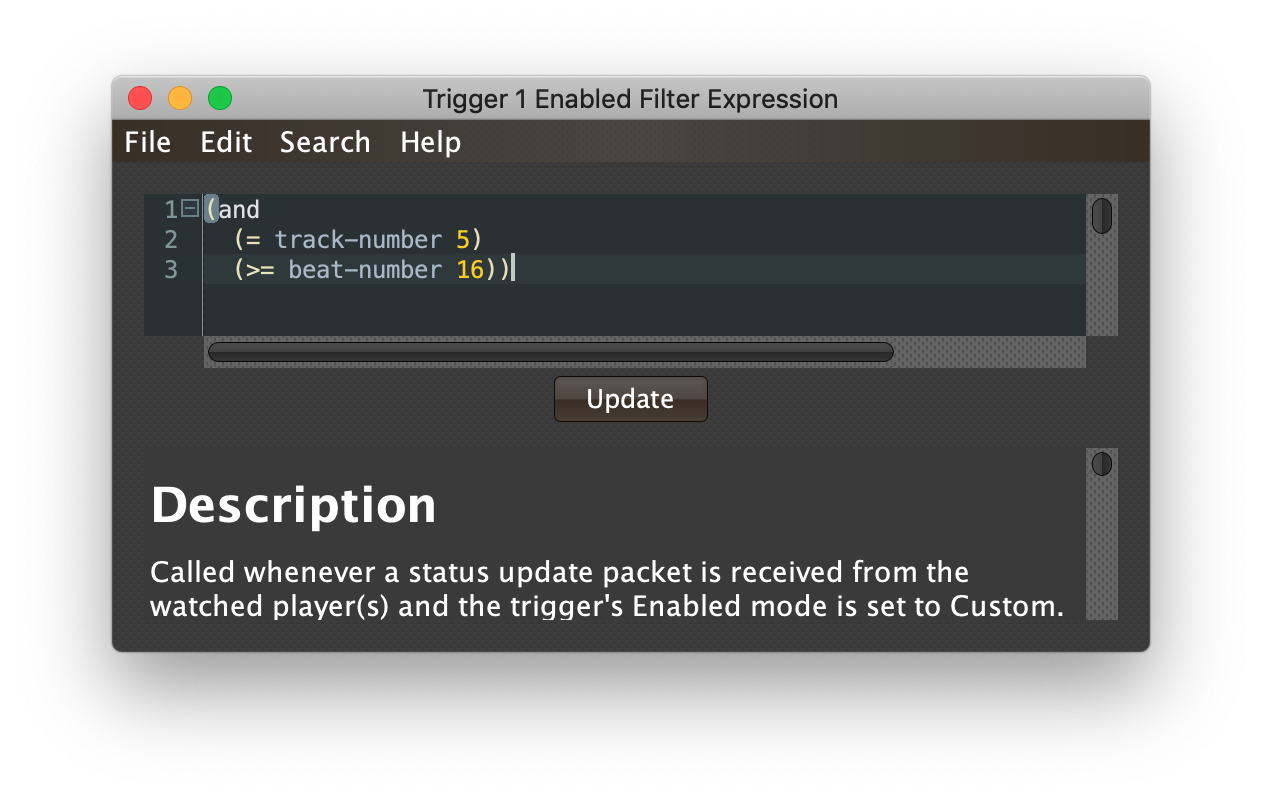
Try entering that as the Enabled Filter expression for your filter, set the Enabled menu to Custom, and watch the Trigger Status indicator as you load and play different tracks to confirm that it works!
Of course, as noted above, if you want something to happen when a particular track reaches a particular beat, the Show interface is now a much easier and more powerful way to arrange that. Still, read on for more basic expression editing concepts.
|
As you use the editor, you will notice that it provides syntax coloring and parenthesis-matching help. But if you end up making a mistake in your expression, Beat Link Trigger will likely report an compilation error when you click Update, and you can check the log for a more detailed stack trace. You can try searching the web for information about the error, or looking in the Clojure documentation, but you can also ask for help in the Beat Link Trigger Gitter chat room. If you are working with large expressions, you can focus on the part you are interested in by using the little - box that appears next to the line number of the first line of a multi-line expression. This allows you to collapse the entire expression, letting you see what comes on either side of it. Clicking the box again (which will show as a + sign now) will expand it again. If you hover the mouse over the + without clicking on it, you can also peek at the collapsed content as a tooltip. This feature can also be activated using the Folding submenu of the context menu, which appears when you right-click or control-click in the editor text area. And if you want to really get serious about learning Clojure and editing it in a powerful way, consider connecting an IDE. |
The Editor Menus
Beat Link Trigger now offers a menu bar inside the expression editor to access more powerful editing features. The File menu makes it easier to use a favorite (or more full-featured) external editor by letting you save your expression to a text file for that editor to work with, and load the results when you are done, or insert another file at the current insertion point.
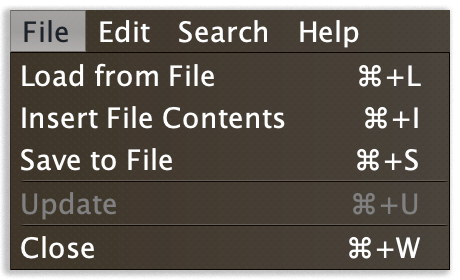
It also lets you update the expression when you have changed it, compiling and loading the new version, or close the editor without saving your changes.
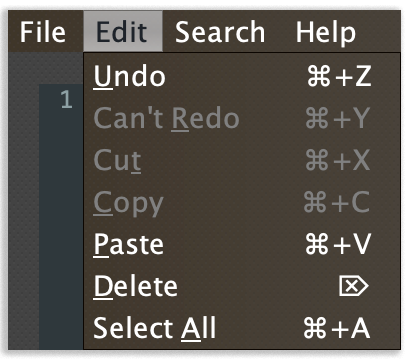
The Edit menu gives you access to the standard editing capabilities that were formerly available in the context menu (which you can bring up by right-clicking or control-clicking anywhere inside the editor text area), and shows you their keyboard equivalents. You might not even have known these features were available, although you were probably already reflexively using the platform-standard editing keys:
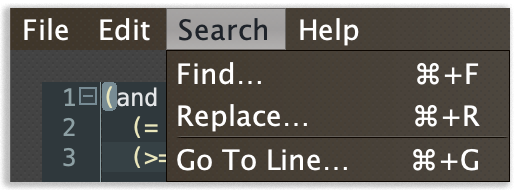
The Search menu opens up special panes below the editor text area that allow you to find and replace text, with control over case sensitivity, whole-word matching, and the option to use regular expressions. It also allows you to jump to a particular line by number.
Finally, the Help menu is the same one available in most other windows, giving you access to this guide along with other helpful tools and information.
Shared Functions
Once you start writing more complex expressions, you may find yourself
repeating common pieces of code over and over again in multiple
expressions. The best way to deal with that is to pull out the
repetetive part and write it as a function, which can then be called
from any expression that wants to use it. In Clojure, you use defn
to define a function, and choosing brings up an editor window that is where you should
organize all of the shared functions you want your Triggers
expressions to use.
The Shared Functions will be loaded before any of your expressions are compiled.
If you are going to be using the functions in Show expressions,
define them using in the Show
window instead. Even though they get compiled into the same
beat-link-triggers.expressions namespace, putting them in the Show
means they will be saved as part of the Show, so if you share the Show
with someone else, the expressions will still work. If you need them
in both your Show and Triggers expressions, put them in both places so
the Triggers expressions will work even if the Show isn’t open.
Redefining a function is harmless, although make sure you have exactly
the same definition in both places or you will confuse yourself!
|
For a detailed (and amusing) look at defining and using shared functions in a show, check out the Break Buddy integration example.
Importing Libraries
Although Beat Link Trigger includes many useful libraries for things like working with MIDI and Open Sound Control, there are going to be situations where you would like to use something that isn’t already built in. To support that, there is now a mechanism that lets you dynamically load any Java (or Clojure, or other JVM language) library that you have locally on your machine (in the form of a Jar file or directory of classes), or that exists in a Maven repository on the Internet.
| You need to be connected to the Internet the first time you try to load a library from a repository, but from then on it will be in your local Maven cache, so you will be able to access it even when offline. |
For example, suppose you are building an integration where you want to
be able to write out JSON files. BLT doesn’t include that ability out
of the box, but there is a nice Clojure library,
data.json, that offers it.
Looking at the project page, we can see that it has a Leiningen
dependency “coordinate” of [org.clojure/data.json "0.2.6"].
Leiningen is a very common tool for managing library dependencies in
Clojure projects, and that format is what the BLT library loader uses
as well. To make this library available, add this to the Shared
Functions:
(add-library '[org.clojure/data.json "0.2.6"])
(require '[clojure.data.json :as json])
(The Leiningen coordinate needs to be preceded by a single quote mark for Clojure to parse it properly.) Assuming you are connected to the Internet, the first line will download the data.json library, and any libraries that it needs for its own use, and add them to the class path so your expressions can access them.
The second line loads the main namespace of the data.json library, and
aliases it under the name json to make it more convenient for your
expressions to call its functions.
At this point, your expressions can do things like:
(json/write-str {:a 1 :b 2})Which returns a string holding the JSON representation of the Clojure map. See the library’s API documentation for more details.
If you want to add multiple libraries, you can call call add-library
multiple times, or in a slightly more compact and efficient variation,
call add-libraries instead and pass a vector of all the coordinates
(put another set of square brackets around them), like so:
(add-libraries '[[org.clojure/data.json "0.2.6"]
                 [incanter "1.9.3"]])
(require '[clojure.data.json :as json])
(require '[incanter/incanter-core :as incanter])
Notice that you still need individual require statements for all the
Clojure libraries you want to actually load and/or give short aliases
to. Java libraries don’t need require statements but you might want
to import some of their classes to save typing.
Adding libraries like this, while very powerful, is also
fraught with peril. Beyond vetting that the library seems to be
well-written and safe, and that your network connection is good the
first time you try it, there are a number of scenarios in which
add-library will not work, or will not work as you’d expect, because
of the nature of JVM classloaders. If any of the jars you add provide
conflicting versions of an existing Beat Link Trigger dependency, this
will lead to very bad results. So when this works, it can let you add
new features quickly, but if it doesn’t, ask for help from the
Gitter Chat community
to see if there might be another library that would work better, or if
the functionality you need can be safely incorporated in a future
release.
|
If you need to load a dependency from a repository other than Clojars
or Maven Central, you can tell add-library where to look by merging
the description of your repository with the default repositories, like
this:
(add-library '[com.mycompany/cool "0.0.1"]
             :repositories (merge default-repositories
                                  {"my repo name" "https://repo.mycompany.com"}))
Of course you would replace the example repository name and URL with the actual name and URL of the repository you want to add.
Local Libraries
If you have a library already downloaded as a standalone Jar file (or directory hierarchy of class files and resources), you can use it by adding it to the Beat Link Trigger class path, like in this example:
(extend-classpath "/Users/james/git/wayang/wayang-0.1.7.jar")
In addition to the caveats described above about adding
libraries in general, the low-level extend-classpath function
doesn’t give you any feedback if the path you entered for the file or
directory is incorrect; you will simply not find the library classes
you were hoping would be available when your code tries to use them.
|
Triggers Global Expressions
The Triggers menu at the top of the window lets you define two expressions that can manage values you want to make available to all your other Trigger expressions.
To support that, all Trigger expressions have access to a Clojure
atom named globals that is
shared with all other Trigger expressions, so that’s a great place to
put things for them to find. The atom starts out holding an empty
map, which allows
you to add key/value pairs to organize the information you want to
share across expressions.
Global Setup Expression
This is run when Beat Link Trigger starts up, or when you open a new Trigger file, so it runs before any of your individual trigger expressions. As a simple example of what you might want to do, here is an expression opens the Player Status window:
(beat-link-trigger.triggers/show-player-status)Setting this as your Global Setup Expression will automatically open
the Player Status window whenever Beat Link Trigger launches. (This
also makes sure subsystems like the TimeFinder are running, which
can be helpful if you are writing other expressions that depend on
knowing the playback position of tracks.)
If you ever start up BLT in offline mode with this Global Setup Expression in place, however, you will be presented with an error dialog, complaining “Must be Online to show Player Status window.” To avoid being inconvenienced by that, we can make the expression smarter, so it only tries to open Player Status when already Online:
(when (.isRunning (VirtualCdj/getInstance))  (1)
(beat-link-trigger.triggers/show-player-status)) (2)| 1 | A when clause in Clojure only executes its body if a test
expression returns a true value. In this case we ask the Beat Link
VirtualCdj object if it is running, which is only true when Beat
Link Trigger is online. |
| 2 | This means the expression body, which is the same as our first attempt at opening Player Status, is only run when it is safe to do so. |
But there is an even better way to do this, now that version 0.5.4 has added the Came Online Expression which runs once Beat Link Trigger has successfully connected to a DJ Link network. Using that expression to show the Player Status window means it will always be safe to try, and — even better — the window will be reopened every time you go back online, not just when initially starting the program.
Here is an even more sophisticated example that creates a
DatagramSocket
for sending a remote trigger command to the ChamSys MagicQ lighting
control software using its
remote
protocol:
(let [chamsys-address (InetSocketAddress.  (1)
                       (InetAddress/getByName "172.16.42.255") 6553)
      trigger-on (byte-array (map int "71,1H"))  (2)
      trigger-off (byte-array (map int "71,0H"))]
  (swap! globals assoc  (3)
         :chamsys-socket (DatagramSocket.)  (4)
         :chamsys-on (DatagramPacket. trigger-on (count trigger-on)  (5)
                                      chamsys-address)
         :chamsys-off (DatagramPacket. trigger-off (count trigger-off)
                                      chamsys-address)))
This begins with a let binding which sets up some values that will
be used later in the expression.
| 1 | chamsys-address gets set to a
SocketAddress
representing port 6553 (the default port used by MagicQ) on the
broadcast address for the Deep Symmetry show network (you will need to
use the value appropriate for your own network). |
| 2 | trigger-on and trigger-off are arrays of bytes containing the
characters that make up the commands for turning a MagicQ remote
programming trigger on and off. |
| 3 | Those values are then used in the
swap!
call, which is the way you modify a Clojure atom. In this case we are
modifying the map in globals by using
assoc
to add some new key-value pairs to it: |
| 4 | :chamsys-socket gets associated with a newly-allocated
DatagramSocket
that triggers will be able to use for sending UDP messages to MagicQ, |
| 5 | and the actual command packets are created as
DatagramPacket
objects preconfigured with the correct command bytes and destination
address and port, in :chamsys-on and :chamsys-off. |
The Beat Expression below shows how these globals are actually used.
Came Online Expression
This is run whenever Beat Link Trigger has successfully connected to a DJ Link network, either at initial startup or when you have told it manually to go online. At initial startup, or whenever you open a new Triggers file, it will run after the Global Setup expression as long as you are online. It runs by itself when you choose to successfully transition from an offline to an online state.
You have access to the expression globals if you need to use anything in them.
This is the perfect place to take actions that can only succeed when Beat Link Trigger is online, such as opening the Player Status window. The simplest approach described above is safe to use in this expression, unlike in the Global Setup expression:
(beat-link-trigger.triggers/show-player-status)With this in place, every time you successfully go online, either at startup or using , the Player Status window will open for you.
Another example came up in the community chat room, from a user who wanted to set up a turn-key lighting system that automatically started Beat Link Trigger and Carabiner. If you are in a situation like that, and can be sure that Carabiner has already been started by the time Beat Link Triger launches, you can set up a Came Online Expression to automatically open the Carabiner window and connect to it:
(beat-link-trigger.carabiner/show-window nil)  (1)
(beat-link-trigger.carabiner/connect)  (2)
(beat-link-trigger.carabiner/sync-mode :passive)  (3)
(beat-link-trigger.carabiner/sync-link true)  (4)
(beat-link-trigger.carabiner/align-bars true) (5)| 1 | Opens the Carabiner window. |
| 2 | Tries to connect to the Carabiner daemon. |
| 3 | Allows the DJ Link network to become Tempo
Master for Ableton Link. Other choices are :off,
:triggers, and :full. |
| 4 | Causes Ableton Link to actually follow the DJ Link Tempo Master. |
| 5 | Aligns Ableton Link and the DJ Link network at the level of entire four-beat measures, rather than simple beat alignment. |
| If you are using the above Carabiner configuration functions in an expression, you need to perform the first three steps in the order they are shown, because each will only work when the preceding step has been succesfully accomplished. Functions 4 and 5 can be called in any order. |
Going Offline Expression
This is run whenever Beat Link Trigger is online and you manually take it offline by choosing , exit the program, open a new Trigger file, or choose to delete all triggers. In any of the situations where you are doing more than just going offline, it runs right before the Global Shutdown expression. It gives you a chance to gracefully close any connections and release any system resources you allocated in your Came Online Expression.
You have access to the expression globals if you need to use anything in them.
Global Shutdown Expression
This is run when Beat Link Trigger is exiting, or before it opens a new Trigger file (or when you choose to delete all triggers). It gives you a chance to close any connections and release any system resources that you allocated in your Global Setup Expression. Here is how we would do that for the ChamSys MagicQ example we started above:
(.close (:chamsys-socket @globals))This simply looks up the
DatagramSocket
that was created in the setup expression, and closes it. There is no
need to remove the key/value pairs themselves from the globals atom
because Beat Link Trigger will reset it to hold an empty map once the
shutdown expression finishes.
Trigger Expressions
Each trigger has its own set of expressions which can be accessed from
its context menu. In addition to the
globals atom described above, these have access to a very similar
locals atom which can be used to share values across expressions
within the trigger itself (but not other triggers; each gets its own
locals map), and individual kinds of expressions will automatically
have other values available to them which make sense in the context in
which the expression is used.
| The help text below the expression editor will list and explain the values that are automatically available for use in that kind of expression. |
Setup Expression
This is like the Global Setup Expression described
above, but it is used to set up the
locals atom, which is shared only with other expressions on the same
trigger. It is called when the trigger is loaded, and when Beat Link
Trigger starts up, after the Global Setup Expression.
To illustrate how different expressions in a trigger can work together
using locals, suppose you have a single trigger that wants to send
pitch information to Resolume Arena 5 so that a
clip you are triggering runs at the same speed as the track playing on
the CDJ. Beat Link Trigger embeds Project Overtone’s
osc-clj library and aliases it to
osc within the context of expressions to make it easy to send Open
Sound Control messages. Assuming your copy of Arena 5 is running on
the same machine, and listening for OSC messages on port 9801, here is
how you could set things up so your other expressions on this trigger
can communicate with it:
(swap! locals assoc :resolume (osc/osc-client "localhost" 9801))This uses
swap!
to modify the map in locals by using
assoc
to add the key :resolume, which will hold an OSC client that can be
used to send Open Sound Control messages to Arena 5 on the local
machine. See the Enabled Filter Expression below for
how we use it. And keep this setup in mind, because it will be
built on throughout the rest of this section.
| Even though we use speed control in Resolume as a running example, and these examples still provide a useful context for understanding how expressions work in Beat Link Trigger, there is a better way to synchronize Resolume with your tracks today. It now supports Ableton Link, and so does BLT, so you can use that for easier, even more stable synchronization. |
Shutdown Expression
This is used to release any system resources (open connections or files) that were allocated by the Setup Expression. It is called when the trigger is deleted, and when Beat Link Trigger is exiting, before the Global Shutdown Expression.
Continuing our example, here is how we would clean up the OSC client we created to talk to Resolume when the trigger is going away:
(osc/osc-close (:resolume @locals))Enabled Filter Expression
As described in the introduction to this section, this is used when you set a trigger’s Enabled menu to Custom. It is called whenever a status update packet is received from a watched player, and tells Beat Link Trigger if the trigger should be enabled or not. Often you will want a trigger to be enabled when a DJ has loaded a particular track, and a variety of strategies for achieving that are described in their own section below, see that for lots of great ideas. Following some of its suggestions, our Resolume example could enable its trigger with a custom Enabled Filter along the lines of:
(= track-title "Language")| Since this expression is called every time we get a status update from a watched player, you might think it could be useful even when you don’t need a custom Enabled state for the trigger, to relay ongoing state information to other systems like Resolume. But because it is called to decide which player to track when your trigger is set to watch Any Player, it will be called more times than you might expect, so there is a better expression to use for that kind of integration: the Tracked Update Expression, discussed next. |
Tracked Update Expression
This is similar to the Enabled Filter Expression, but even when a trigger is configured to potentially watch multiple players, it is called only for the player that is currently being tracked, which will be the one that is considered “best” as described in the Watch Menu section above. Players which enable the trigger are better than ones that don’t; within that group, it is better to be playing, and as a tie-breaker the lowest numbered player is chosen.
The Tracked Update expression is the ideal place to adjust the
track description displayed in the Player Status section of the
trigger by storing values in the :track-description and/or
:metadata-summary keys of the trigger locals.
|
Continuing our example, we can use a Tracked Update Expression to
update the playback speed within Arena 5 to stay synced with the
current tempo of the CDJ. We want to send messages to Resolume only
when the trigger is active—which means it is enabled and the player
it is watching is currently playing—so we wrap our expression in a
when clause like this:
(when trigger-active?  (1)
  (let [pitch (/ (- pitch-multiplier 0.05) 2)]  (2)
(osc/osc-send (:resolume @locals) "/activeclip/audio/pitch/values" pitch)))) (3)| 1 | Skip this whole expression if the trigger isn’t active. |
| 2 | We need to do a little bit of silly math because Beat Link Trigger represents the current pitch multiplier in a fairly straightforward way (a range where 0.0 means stopped, 1.0 means normal speed, and 2.0 means double time), while Resolume squashes that whole range into 0.0 to 1.0, slightly off-center. |
| 3 | With that calculation accomplished, we can simply send the appropriate OSC message to tell it the speed at which it should be playing. (The OSC path was found by Editing the OSC Applicaton Map within Arena 5 and clicking on the parameter I wanted to control, as described in the manual.) |
There is one more improvement we can make, though. Our code as it
stands sends an OSC message to Resolume for every status packet from
the watched player, even when the pitch is not changing. That’s
inefficient; it puts needless traffic on the network, and makes
Resolume waste time processing messages that don’t change anything. By
adding a little more sophistication to our Tracked Update Expression,
we can keep track of the last value we sent to Resolume, and only send
a new one when it is different. We will use a local named
:resolume-pitch to keep track of the last value we sent:
(when trigger-active?  (1)
  (let [pitch (/ (- pitch-multiplier 0.05) 2)]  (2)
    (swap! locals update-in [:resolume-pitch]
           (fn [old-pitch]
             (when (not= pitch old-pitch)  (3)
               (osc/osc-send (:resolume @locals) "/layer3/clip3/audio/pitch/values" pitch))  (4)
pitch)))) (5)| 1 | Once again we are only doing anything when the trigger is active; the rest of the expression will be ignored otherwise. |
| 2 | Using the math described above, we calculate the current pitch value in the way Resolume thinks about it. |
| 3 | We compare the current calculated pitch value with the value that
was found in the locals map under :resolume-pitch (this is the
value, if any, we most recently sent to Resolume; see step 5). |
| 4 | Only if they are different does osc-send get called to notify
Resolume of the new value. |
| 5 | Finally we store the calculated value at :resolume-pitch so that
it is available for comparison when we get the next status update. The
first time this runs, there will be no comparison value found in
locals, so we will always send an initial pitch message to Resolume
when the right track loads for the first time. |
If you want to watch this happening, you can add a log statement that will report the new pitch value each time it is sent, like this:
(when trigger-active?
  (let [pitch (/ (- pitch-multiplier 0.05) 2)]
    (swap! locals update-in [:resolume-pitch]
           (fn [old-pitch]
             (when (not= pitch old-pitch)
               (timbre/info "New pitch:" pitch)  (1)
               (osc/osc-send (:resolume @locals) "/layer3/clip3/audio/pitch/values" pitch))
pitch))))| 1 | Here is the log statement we are adding. |
With this expression in place, when the trigger is active and you fiddle with the Pitch fader on the CDJ that is playing the track, you will see entries like this in the log file:
2016-Jul-24 23:21:31 INFO [beat-link-trigger.expressions:?] - New pitch: 0.475
2016-Jul-24 23:22:18 INFO [beat-link-trigger.expressions:?] - New pitch: 0.4782496452331543
2016-Jul-24 23:22:18 INFO [beat-link-trigger.expressions:?] - New pitch: 0.4802499771118164
Activation Expression
This is called when the trigger trips (in other words, when it would send a MIDI message reporting that its watched player has started to play). You can send additional MIDI messages here, or use the Clojure and Java networking infrastructure to send a different kind of message entirely. If this is all you want the trigger to do, you can set its Message menu to Custom, to suppress the default MIDI messages that it would otherwise send.
Continuing our Resolume example, here is an Activation expression that would use OSC to trigger the clip that our Tracked Update expression was adjusting the pitch for:
(osc/osc-send (:resolume @locals) "/layer3/clip3/connect/" (int 1))You can also use the Activation expression to send MIDI messages that
differ from the ones available through the graphical interface. Beat
Link Trigger embeds Project Overtone’s
midi-clj library and aliases it to
midi within the context of expressions to make it easy to send MIDI
messages. The trigger’s chosen MIDI output is available as
trigger-output (but may be nil if the device is currently not
available). So as an example of how you could send a Note On message
with velocity 42 on the note and channel chosen in the trigger window:
(when trigger-output
  (midi/midi-note-on trigger-output trigger-note 42 (dec trigger-channel)))
Note that the user-oriented channel number displayed in the Trigger’s
Channel menu is actually one larger than the value you actually need
to send in the MIDI protocol (Channel 1 is represented in protocol by
the number 0, and Channel 16 by the number 15, so that the channel can
fit into four bits). So you need to decrement the value of
trigger-channel before passing it to the midi library, as shown
above.
Deactivation Expression
This is called when the player that the trigger is watching stops playing, or when the trigger becomes disabled if it had been active. (This is when a Note Off message, or Control Change with value zero, is sent.) You can send your own custom messages here, much like the Activation Expression.
Beat Expression
This is called when any of the watched players reports the start of a new beat. Continuing the example started in the Global Setup Expression, here is how you could synchronize the BPM of your ChamSys MagicQ console to the beats coming from your CDJs. Set the trigger to watch Any Player, and then within the Beat expression, we will react only to beat packets from the mixer, since it will always track the master player.
| You may have realized we could also just set the trigger to watch the Master Player, but this shows an example of how to filter beat packets by the player number of the device sending them, and that you get beat packets from the mixer itself too, if it is a DJM. |
(when (= device-number 33)  (1)
  (.send (:chamsys-socket @locals) (:chamsys-on @locals))  (2)
  (future  (3)
    (Thread/sleep (long (/ 30000 effective-tempo)))  (4)
(.send (:chamsys-socket @locals) (:chamsys-off @locals)))) (5)| 1 | After checking that the packet came from the mixer (both the DJM 900 nexus and the DJM 2000 nexus identify themselves as player number 33), |
| 2 | we immediately send the UDP packet that tells MagicQ that the remote trigger is on. |
| 3 | We want to later tell it that it is off, but it is
critical that Beat Link Trigger expressions finish and return
promptly, or they will back up the whole event distribution system,
and cause other events to be delayed or lost. So we use Clojure’s
future to send a block
of code to be executed in the background on another thread. |
| 4 | The expression will return immediately, but in the background our inner block of code sleeps for half a beat (we calculate that by dividing 30,000 milliseconds, or half a minute, by the number of beats per minute that the mixer reported it is running at). |
| 5 | When we wake up, halfway through the beat, we send the other UDP message that tells MagicQ the remote trigger is off again. So, by cycling those messages once per beat, the lighting console can be driven at the same BPM as the CDJs. |
Show Shared Functions
Just like in the Triggers window, if you start writing complex
expressions in your Show, you will find yourself repeating common
pieces of code over and over again in multiple expressions. The best
way to deal with that is to pull out the repetetive part and write it
as a function, which can then be called from any expression that wants
to use it. In Clojure, you use defn to define a function, and
choosing brings up an editor window
that is where you should organize all of the shared functions you want
your Show expressions to use.
The Shared Functions will be loaded before any of your expressions are compiled.
If you are going to be using the functions only in Triggers
expressions, define them using in
the Triggers window instead. Even though they get compiled into the
same beat-link-triggers.expressions namespace, putting them in the
Triggers window means they will be saved independently of the Show,
and will work even if the Show was never opened, or if you share the
Triggers with someone else. If you need them in both your Show and
Triggers expressions, put them in both places. Redefining a function
is harmless, although make sure you have exactly the same definition
in both places or you will confuse yourself!
|
For a detailed (and amusing) look at defining and using shared functions in a show, check out the Break Buddy integration example.
Also see the discussion of how you can import libraries for use in your expressions.
Show Global Expressions
Starting with version 0.5 you can use Show files to more conveniently perform actions when specific sections of particular tracks are played. Shows have their own sets of expressions, which we cover next.
The Tracks menu at the top of a Show window lets you define three expressions that can manage values you want to make available to all your other expressions within the Show.
To support that, all Show expressions have access to a Clojure
atom named globals that is
shared with all other Show expressions, so that’s a great place to put
things for them to find. The atom starts out holding an empty
map, which allows
you to add key/value pairs to organize the information you want to
share across expressions. Show expressions also all have access to the
Triggers window globals atom, under the name trigger-globals.
Global Setup Expression
This is run when the Show file is opened, either because you explicitly opened it using the Triggers window File menu, or because Beat Link Trigger automatically reopened it at launch because you had it open the last time you used the program. You can use it to open network connections or set up other values for your Track and Cue expressions to use.
Came Online Expression
This is run whenever the show is opened when Beat Link Trigger is already connected to a DJ Link network, or if you have told it manually to go online with the show already open. When opening the show it will run after the Global Setup expression as long as you are online. It runs by itself when you choose to successfully transition from an offline to an online state.
You have access to the show and triggers globals if you need to use anything in them.
Default Enabled Filter Expression
The basic concept of an Enabled Filter is described in the
introduction to this section; shows use them in a similar
way. Each Track that you are watching in the Show can be enabled
separately. If the track’s Enabled menu is set to Default, that
track will look to the show itself to decide whether it should be
enabled. There is an Enabled Default menu at the top of the Show
window that is used by all tracks whose Enabled mode is Default. If
the Show’s Enabled Default is set to Custom, it will run your Default
Enabled Filter Expression to decide what to do. If your expression
returns a true value, all these tracks will be enabled; otherwise
they will be disabled.
Disabled Tracks do not respond to being played, and all of their configured cues are disabled.
Going Offline Expression
This is run whenever the show is open, Beat Link Trigger was online, and you manually take it offline by choosing , when you close the Show file, or exit the program. In any of the situations where you are doing more than just going offline, it runs right before the Global Shutdown expression. It gives you a chance to gracefully close any connections and release any system resources you allocated in your Came Online Expression.
You have access to the show and triggers globals if you need to use anything in them.
Global Shutdown Expression
This is run when the Show file is closed, either because you closed the window, or because Beat Link Trigger is shutting down. You can use it to close any network connections or clean up any other resources your Global Setup Expression allocated.
Show Track Expressions
Each track you add to a show can have its own set of expressions which apply to that track, allowing you to take actions when the track is loaded on a player, starts or stops playing, and so on. To react to more specific regions of the track, see the Cue Expressions, below.
The track expressions can be accessed from the track’s
context menu. In addition to the
globals atom described above, these have access to a very similar
locals atom which can be used to share values across expressions
within the track itself (but not other tracks; each gets its own
locals map), and individual kinds of expressions will automatically
have other values available to them which make sense in the context in
which the expression is used.
| The help text below the expression editor will list and explain the values that are automatically available for use in that kind of expression. |
Setup Expression
This is run when the Show file is opened, either because you explicitly opened it using the Triggers window File menu, or because Beat Link Trigger automatically reopened it at launch because you had it open the last time you used the program. You can use it to open network connections or set up other values for this Track and its Cue expressions to use.
Enabled Filter Expression
The basic concept of an Enabled Filter is described in the
introduction to this section; tracks use them in a
similar way. If the track’s Enabled menu is set to Custom, it
will run its Enabled Filter Expression to decide what to do. If your
expression returns a true value, this tracks will be enabled;
otherwise it will be disabled.
Disabled Tracks do not respond to being played, and all of their configured cues are disabled.
Note that you can also set the Enabled menu to Default in order to run the Show-level Default Enabled Filter as described above.
Loaded Expression
This is called when the track is first loaded into any player. (The same track might be loaded into multiple players at the same time; this expression is called only when the first player loads it. The track will continue to be considered loaded until the final player unloads it.)
If you want this expression to run, make sure the track’s
Loaded Message menu is set to Custom.
|
This expression is only called when the track is enabled (disabled tracks are not considered loaded).
Playing Expression
This is called when some player begins to play the track. (The same track might be playing on multiple players at the same time; this expression is called only when the first player starts playing it. The track will continue to be considered playing until the final player stops playing it.)
If you want this expression to run, make sure the track’s
Playing Message menu is set to Custom.
|
This expression is only called when the track is enabled (disabled tracks are not considered to be playing).
As an example, here is a Playing Expression that would do the exact
same thing as setting the Playing Message menu to Note:
(when midi-output
  (midi/midi-note-on midi-output playing-note 127
                     (dec playing-channel)))
The (when midi-output …) clause that wraps the midi-note-on call
just protects against the situation where the chosen output can’t be
found because it isn’t plugged in at the moment. Without this, the
attempt to send the note will throw an exception that gets written at
length to the log file. In the context of this Expression, the
midi-output variable is set to the MIDI output device chosen for the
Track, and will be nil if that device is not currently connected.
This uses the embedded MIDI library to send a Note On message to the
Track’s chosen output device. The variable playing-note is set to
the note number chosen for the Track’s Playing Message, 127 is the
maximum MIDI note velocity, and playing-channel is set to the
channel chosen for the Track, but since the user interface displays
MIDI channel numbers in the traditional user-centric range from 1 to
16, and the actual protocol requires them to be sent in the 4-bit
range 0-15, we need to subtract 1 from the variable value before
sending it, which is what the dec (decrement) function does.
You can tweak this to send different notes (by substituting your own
value or variable for playing-note) at different velocities (by
replacing the 127) on different channels, or of course do something
else completely. The Track Stopped discussion
below shows what you would need to set up
to emulate the other half of the Note mode using your own
expressions.
Beat Expression
Called whenever a beat packet is received from a player that is playing this track, as long as the track is enabled.
Tracked Update Expression
Called whenever a status update packet is received from a player that has this track loaded, after the Enabled Filter Expression, if any, has had a chance to decide if the track is enabled, and after the Loaded, Playing, Stopped, or Unloaded expression, if appropriate.
If the track is not enabled, this expression is not called.
Stopped Expression
This is called when the last player that had been playing the track stops. (The same track might be playing on multiple players at the same time; this expression is called only when the final player stops playing it, so it is no longer playing on any player.)
If you want this expression to run, make sure the track’s Playing
Message menu is set to Custom.
|
A track will also report stopping if it becomes disabled while it was playing.
To complete the example introduced in the Playing Expression
above, here is an expression that sends
the same MIDI event when a track stops that you get by setting the
Playing Message menu to Note:
(when midi-output
  (midi/midi-note-off midi-output playing-note
                     (dec playing-channel)))
As described in the initial example above, this checks to be sure the MIDI output device that has been selected for the track is currently connected before sending it a Note Off message for the configured note and channel. Again, you can tweak this to send different messages. For example, you might actually want to send a different Note On message when the track stops playing; for that, you would use the same code shown in the Playing Expression section.
Unloaded Expression
This is called when the track is unloaded from the last player that had loaded it. (The same track might be loaded into multiple players at the same time; this expression is called only when the final player unloads it, so it is no longer loaded in any player.)
If you want this expression to run, make sure the track’s
Loaded Message menu is set to Custom.
|
A track will also report unloading if it becomes disabled while it was loaded.
Show Cue Expressions
Each Cue you add to a show track can have its own set of expressions which apply to that cue, allowing you to take actions when some player moves into or out of that cue, if the cue starts playing on its first beat or from some point later within the cue, or if it stops playing.
The cue expressions can be accessed from the cue’s context menu. Cues
have access to the same globals and locals atoms that track
expressions in the cue’s track do, and individual kinds of expressions
will automatically have other values available to them which make
sense in the context in which the expression is used.
| The help text below the expression editor will list and explain the values that are automatically available for use in that kind of expression. |
Entered Expression
Called when the cue’s track is enabled, and the first player moves inside the cue (in other words, the playback position of at least one player that has the cue’s track loaded is within the beat range that defines the cue).
If you want this expression to run, make sure the cue’s
Entered Message menu is set to Custom.
|
There can be multiple players inside the cue at any given moment, but this expression will be called only when the first one enters it.
If the track is disabled, no players will be considered to be inside any of its cues.
Started On-Beat Expression
Called when the first player that is playing the track moves into the cue, as long as it does so right at the beginning of the cue, and hits the start of the first beat that defines the cue.
If you want this expression to run, make sure the cue’s
On-Beat Message menu is set to Custom.
|
There can be multiple players playing the cue at any given moment, but this expression will be called only when the first one enters it.
If the track is disabled, no players will be considered to be playing any of its cues.
Started Late Expression
Called when the first player that is playing the track moves into the cue, but misses the beginning of the cue, either because the DJ jumped into the middle of the cue, or because the player was paused somewhere in the middle of cue and then started playing, or because the Track was disabled when the cue was entered from the beginning and became enabled somewhere in the middle of the cue.
If you want this expression to run, make sure the cue’s
Late Message menu is set to Custom.
|
There can be multiple players playing the cue at any given moment, but this expression will be called only when the first one enters it.
If the track is disabled, no players will be considered to be playing any of its cues.
Beat Expression
Called whenever a beat packet is received from a player that is playing inside this cue, as long as the track is enabled. (This is not called for the first beat of the cue; when that is played, the Started on-Beat expression is called instead.)
Tracked Update Expression
Called whenever a status update packet is received from a player whose playback position is inside this cue (as long as the track is enabled), after the Entered or Started expression, if appropriate.
Ended Expression
Called when the last player that was playing the cue either leaves it or stops playing. There can be multiple players playing the cue at any given moment, and this expression will be called as soon as there are none left.
For this expression to run for cues that started on time, the
On-Beat Message menu needs to be set to Custom. Similarly, if
you want it to run for cues that started late, the Late Message menu
must be set to Custom. If you are using custom messages for both
situations and you need to be able to tell them apart, have the
Started On-Beat and Started Late expressions each set a different
value in an expression local to let you know which ran.
|
If the track becomes disabled while it was playing this cue, this expression will be called at that point as well.
Exited Expression
Called when the last player that was inside the cue leaves it. There can be multiple players positioned in the cue at any given moment, and this expression will be called as soon as there are none left.
If you want this expression to run, make sure the cue’s
Entered Message menu is set to Custom.
|
If the track becomes disabled while there were players positioned inside this cue, this expression will be called at that point as well.
License
![]() Copyright © 2016–2019 Deep Symmetry, LLC
Copyright © 2016–2019 Deep Symmetry, LLC
Distributed under the Eclipse Public License 1.0, the same as Clojure. By using this software in any fashion, you are agreeing to be bound by the terms of this license. You must not remove this notice, or any other, from this software. A copy of the license can be found in LICENSE within this project.