Shows
Watch for beat ranges of specific tracks to be played, and send things like MIDI or OSC messages in response.
- Overview
- Creating a Show
- Track Row Elements
- Editing Track Cues
- Cue Row Elements
- Navigating Cues
- The Cue Library
- Learning More
- License
Overview
Version 0.5 of Beat Link Trigger introduced a major new set of user interface features called the Show interface, which make it far easier to match tracks, and cause things to happen when particular beat ranges in those tracks are played.
All of these things could be done before the Show interface (and several people put together quite sophisticated shows) using basic Triggers, but they involved writing a great many custom Expressions to match the tracks and watch for the right beats, and were very tedious to figure out, requiring lots of time hooked up to CDJs during the design process.
Also, there is a practical limit to how many Triggers you can have in your file, because each one gets considered in sequence whenever a packet is received from a player. The limit may be a few dozen, or many more, but eventually your CPU will be get busy just evaluating triggers. The Show interface doesn’t have this limitation—it uses a sophisticated and efficient mechanism for recognizing tracks, and allows you to add thousands of tracks to your Shows. Tracks in a Show will not put any load on your CPU until they are actually loaded in a player.
Finally, because tracks can be added to a Show either from players on the network, or by reading them directly from your rekordbox USB or SD media, you can set up your Shows, draw cues on the tracks’ beat grids, with reference to their waveforms, and configure the messages you want the cues to send, even in situations where you don’t have access to CDJs. Almost all of the Show interface features are fully functional when Beat Link Trigger is operating in Offline mode, and the ones that don’t make sense are simply hidden from view. This supports a flexible and convenient workflow.
Creating a Show
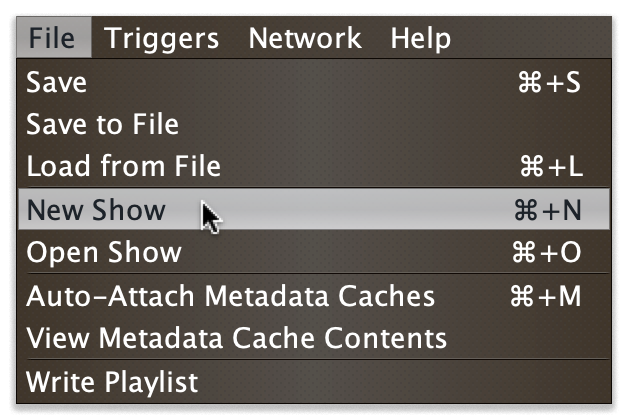
To use the Show interface, you start by choosing in the Beat Link Triggers window.
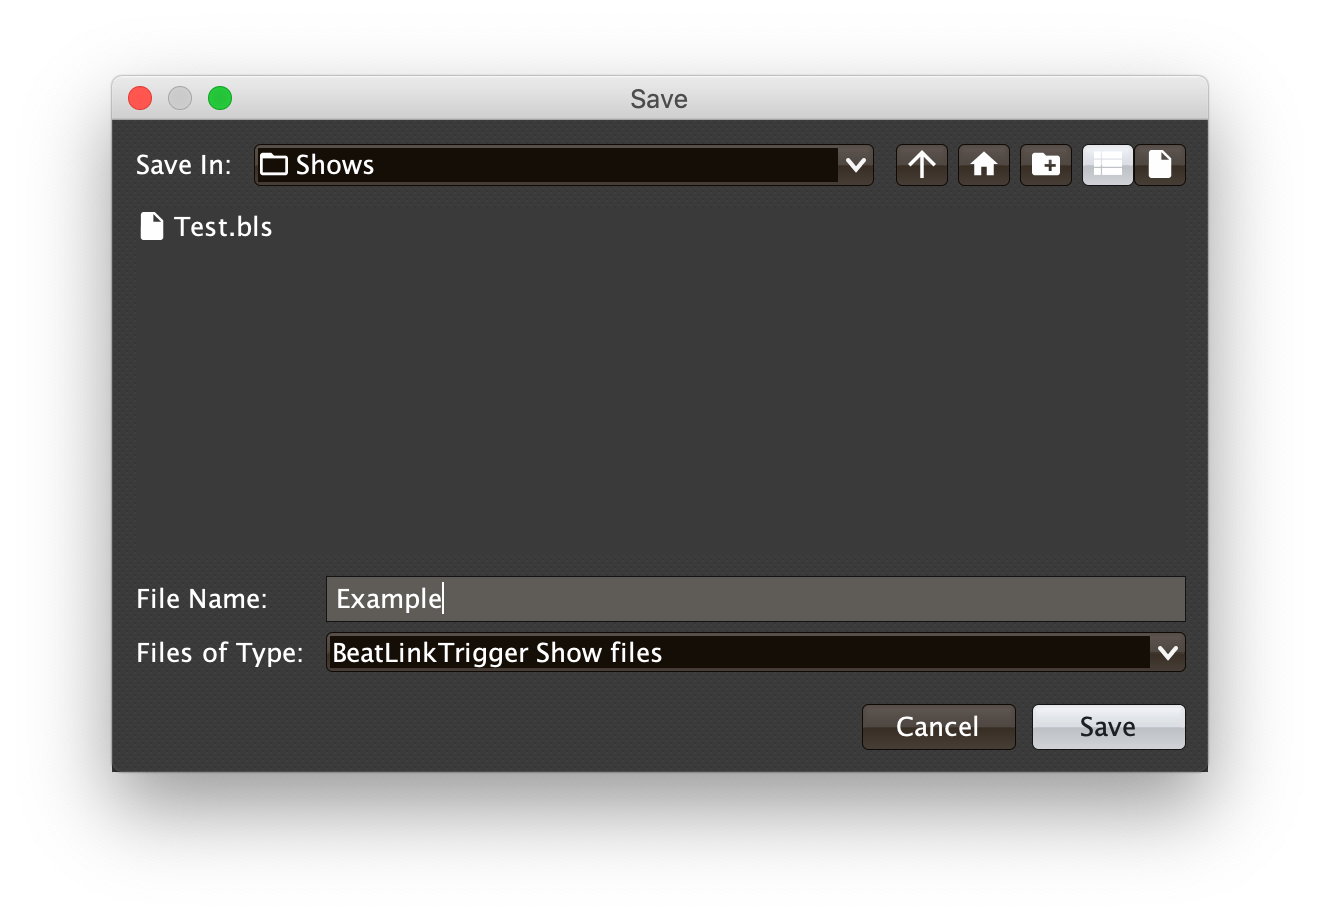
This opens a Save dialog where you choose the location and name of your new Show file. Navigate to where you would like to keep it, type a name, and click Save.
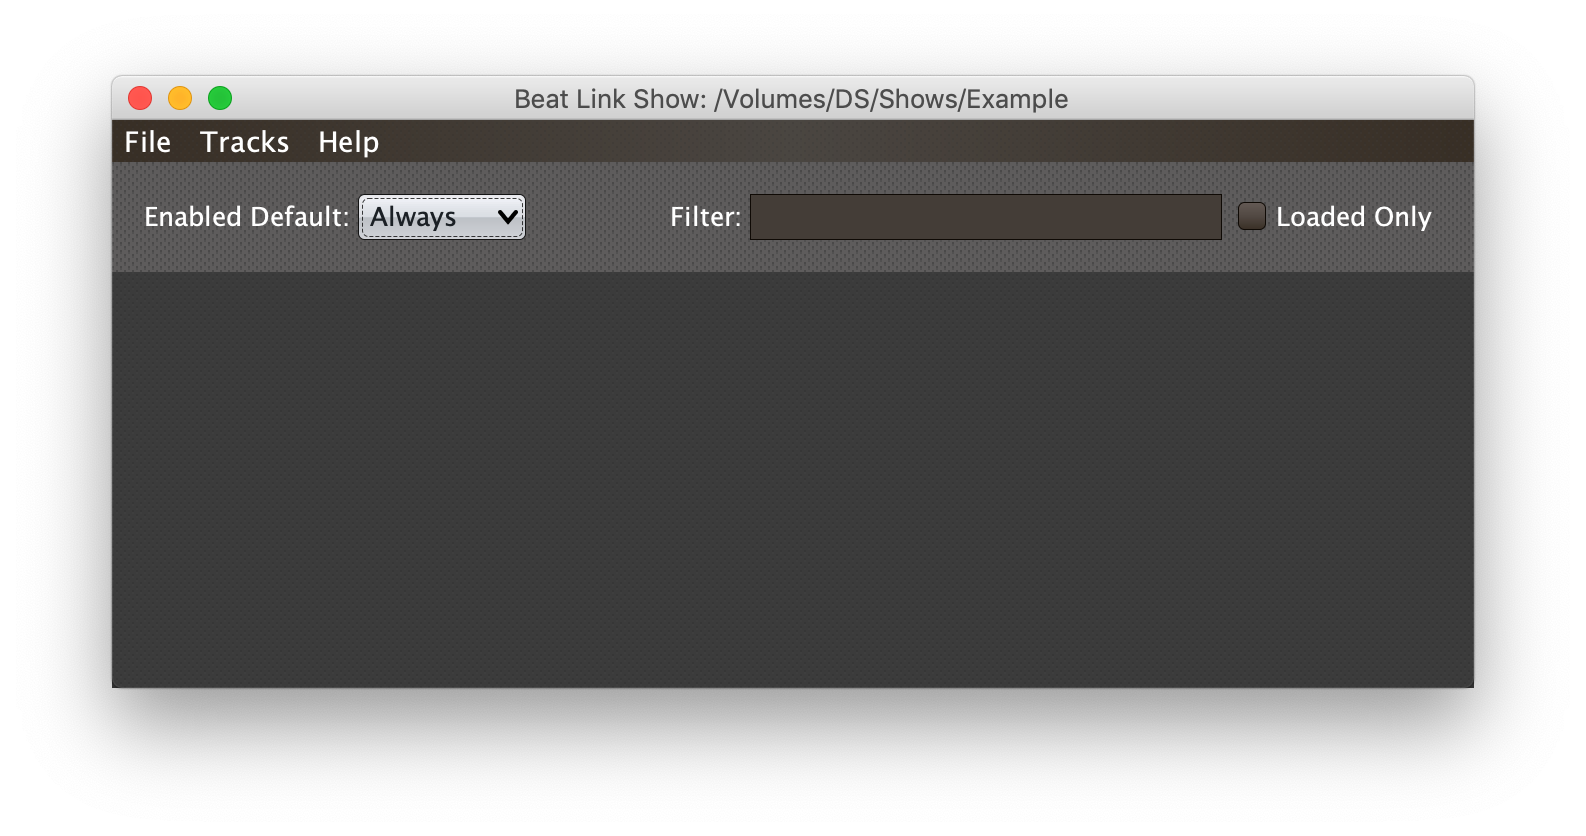
Beat Link Trigger will create a new, empty Show file for you with your chosen name, and open its window. If you quit with a Show window open, it will automatically be reopened the next time you start the program. You can have multiple Show windows open at the same time, in case you want to organize your cues into separate groups for controlling different kinds of integrations (such as perhaps laser cues in one Show, and video cues in another) and each one will be reopened automatically and run independently. You can tailor which Shows you open based on which hardware is being used for a given performance.
Show Window Header Elements
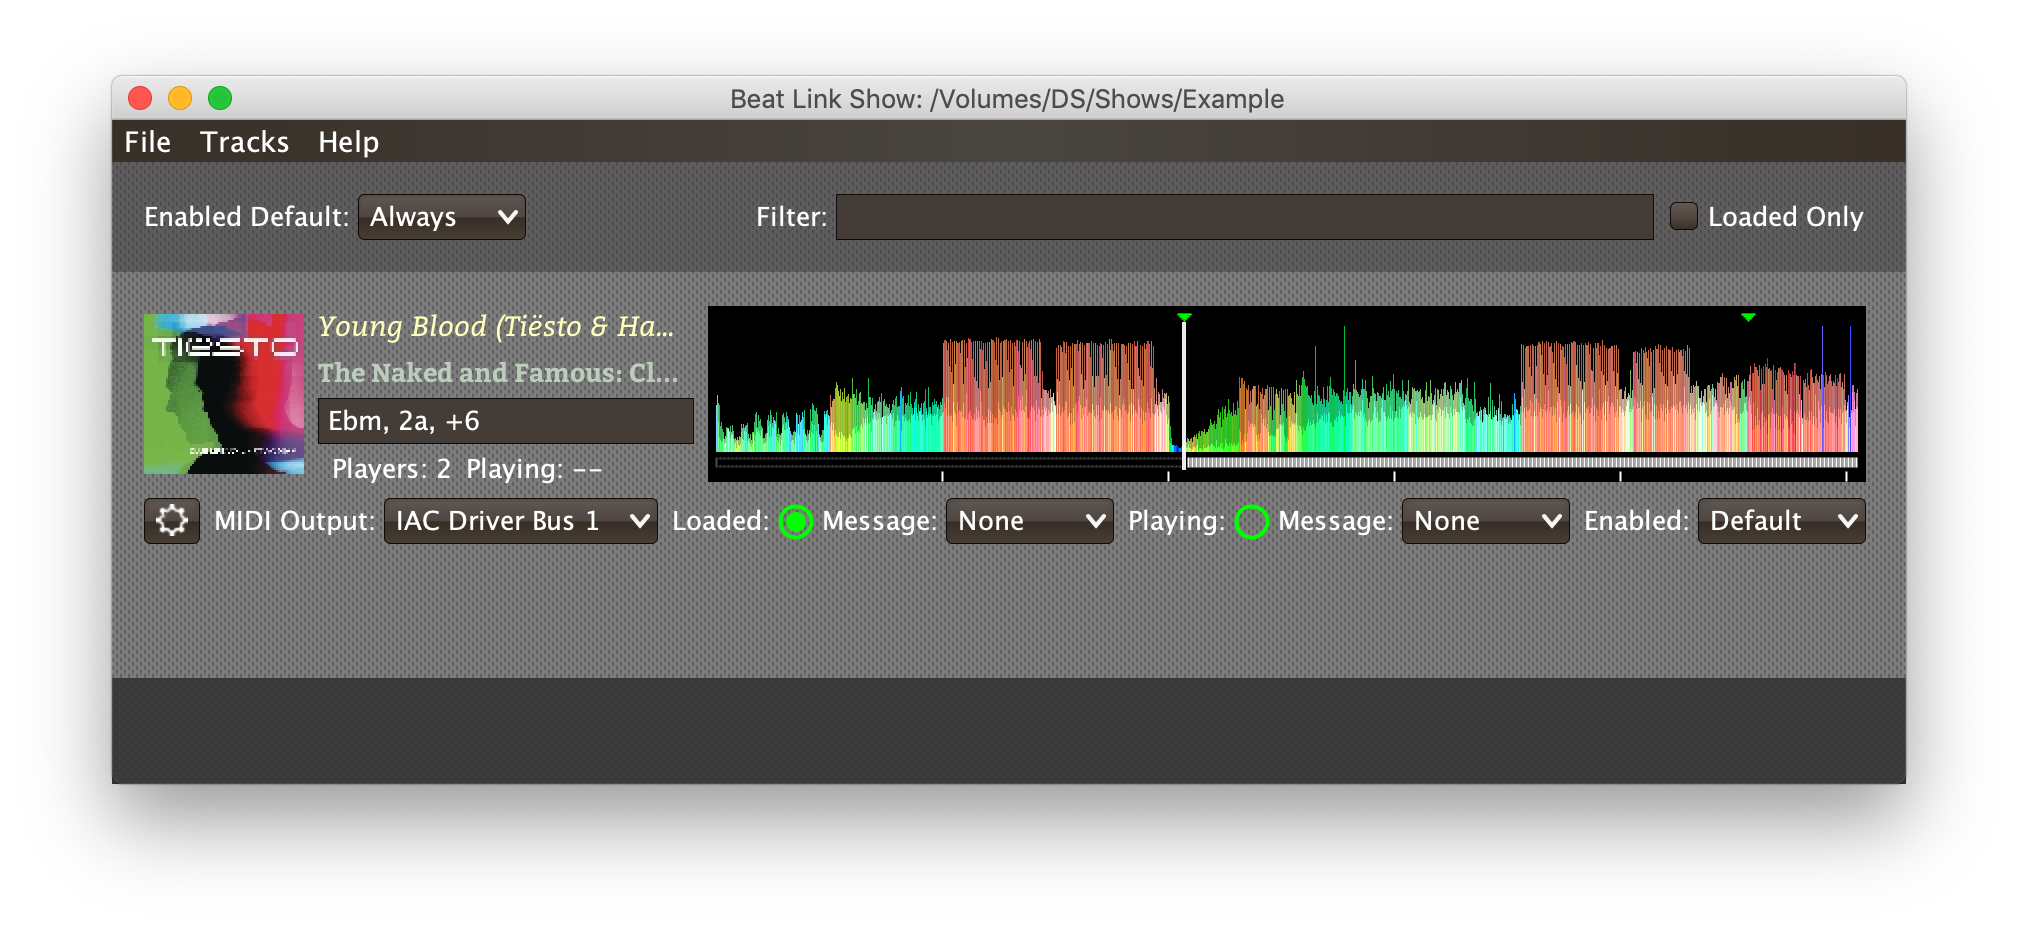
At the top of the Show window, above any Tracks that you have added to it, is a header that allows you to configure the default Enabled filter (explained below), and to filter which Tracks are currently visible, which is helpful when you have added a lot of them to the Show.
If you type any text in the Filter box, only tracks that match that
text will be visible. Similarly, if you check the Loaded Only
checkbox, only tracks that are currently loaded on a player on the
network will be visible. This is a great way to narrow down your focus
to watch what is going on with tracks the DJ is currently playing.
The Loaded Only checkbox is only visible when Beat Link Trigger
is Online, because otherwise there is no way tracks could be
identified as loaded.
|
Show Menu Bar
The Show window has its own menu bar with commands that apply to the Show as a whole.
Beat Link Trigger automatically saves the Show when you exit normally, but if you are concerned that your computer might crash and want to avoid the risk of losing data, you can manually save it by choosing . You can also save a copy to a different file at any time using .
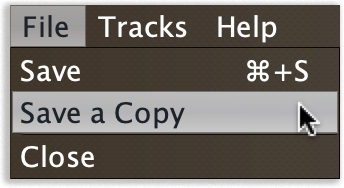
If you want to stop working with a show, and don’t want Beat Link Trigger to automatically open it the next time you launch the program, choose .
The Tracks Menu allows you to add tracks to the show, as discussed in the next section, and to edit expressions that customize the show as a whole, as described in the Expressions section.
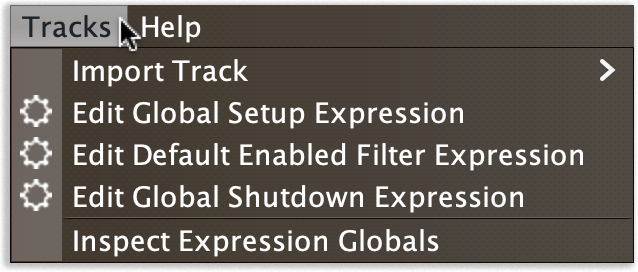
The Inspect Expression Locals option allows you to explore any values that have been set up by expressions to share across the entire Show. See Inspecting Locals and Globals for more details.
The Help Menu is the same as in the Triggers window, providing a variety of helpful information and shortcuts for getting support.
Adding Tracks to a Show
Shows don’t do anything until they include at least one Track. There are a number of different ways you can add Tracks to your Show. Most of them can be found by choosing in the Show window menu bar:
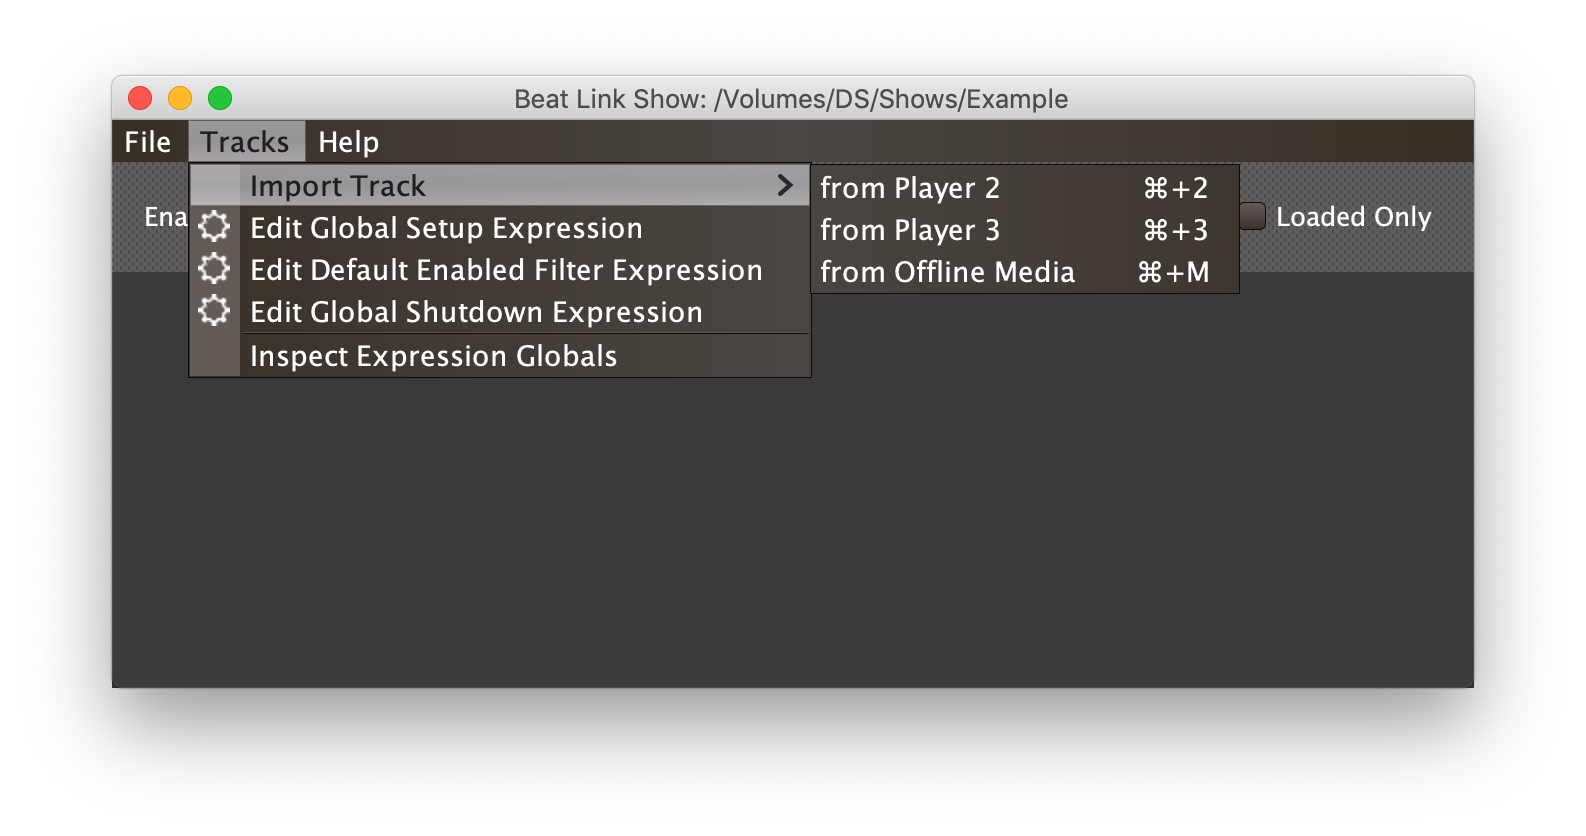
If you are currently Online, and there are any players on the network that have rekordbox tracks loaded that are not already part of the Show, you will see them as options in the menu. Choosing (for example) will download that track from the player, and add everthing needed to work with the it to the Show file (the elements of a Track row are explained below, after the other ways of adding them to a Show).
To help avoid confusion, rather than simply having the player disappear from the list of import choices if the track it has loaded is already part of the Show, the menu option is disabled and an explanation is added:

To make it possible to set up your Show even when you don’t have access to your player network, you can also import Tracks directly from rekordbod USB or SD media. To do that, mount the media on your computer, and choose . An Choose Media dialog will appear, from which you can navigate to the media:
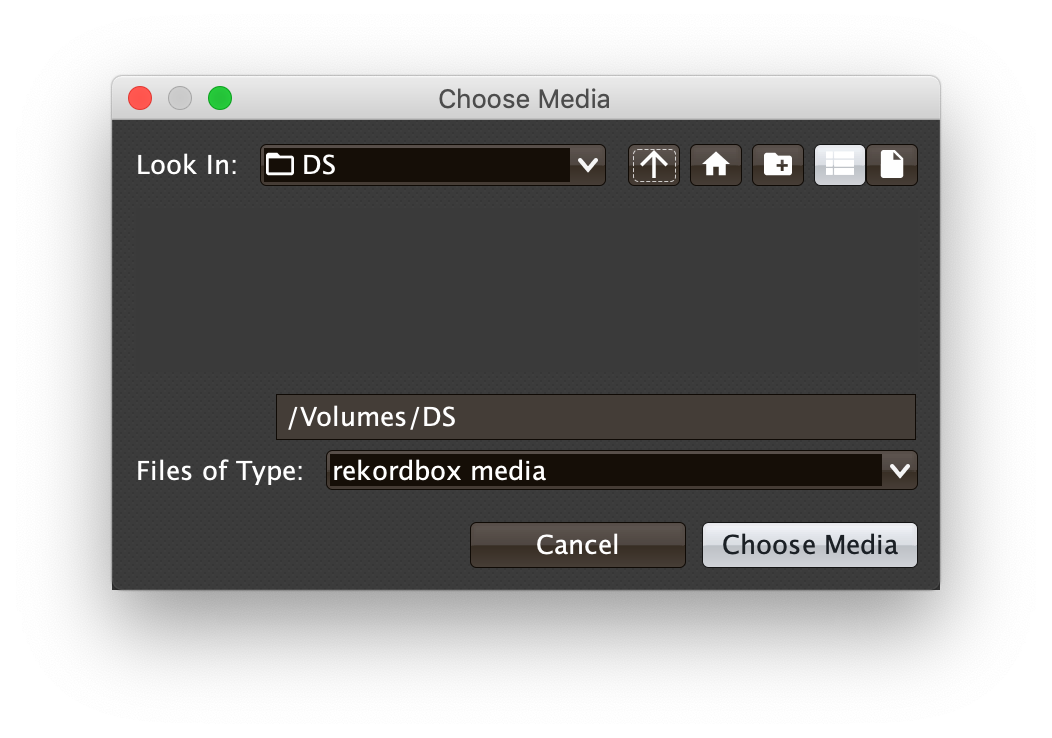
Once you click Choose Media, the exported database is parsed, and a Choose Track window is presented, which is very similar to the Loading and Playing Tracks interface offered by the Player Status window (see that section for details about how to navigate the interface and use the Search feature):
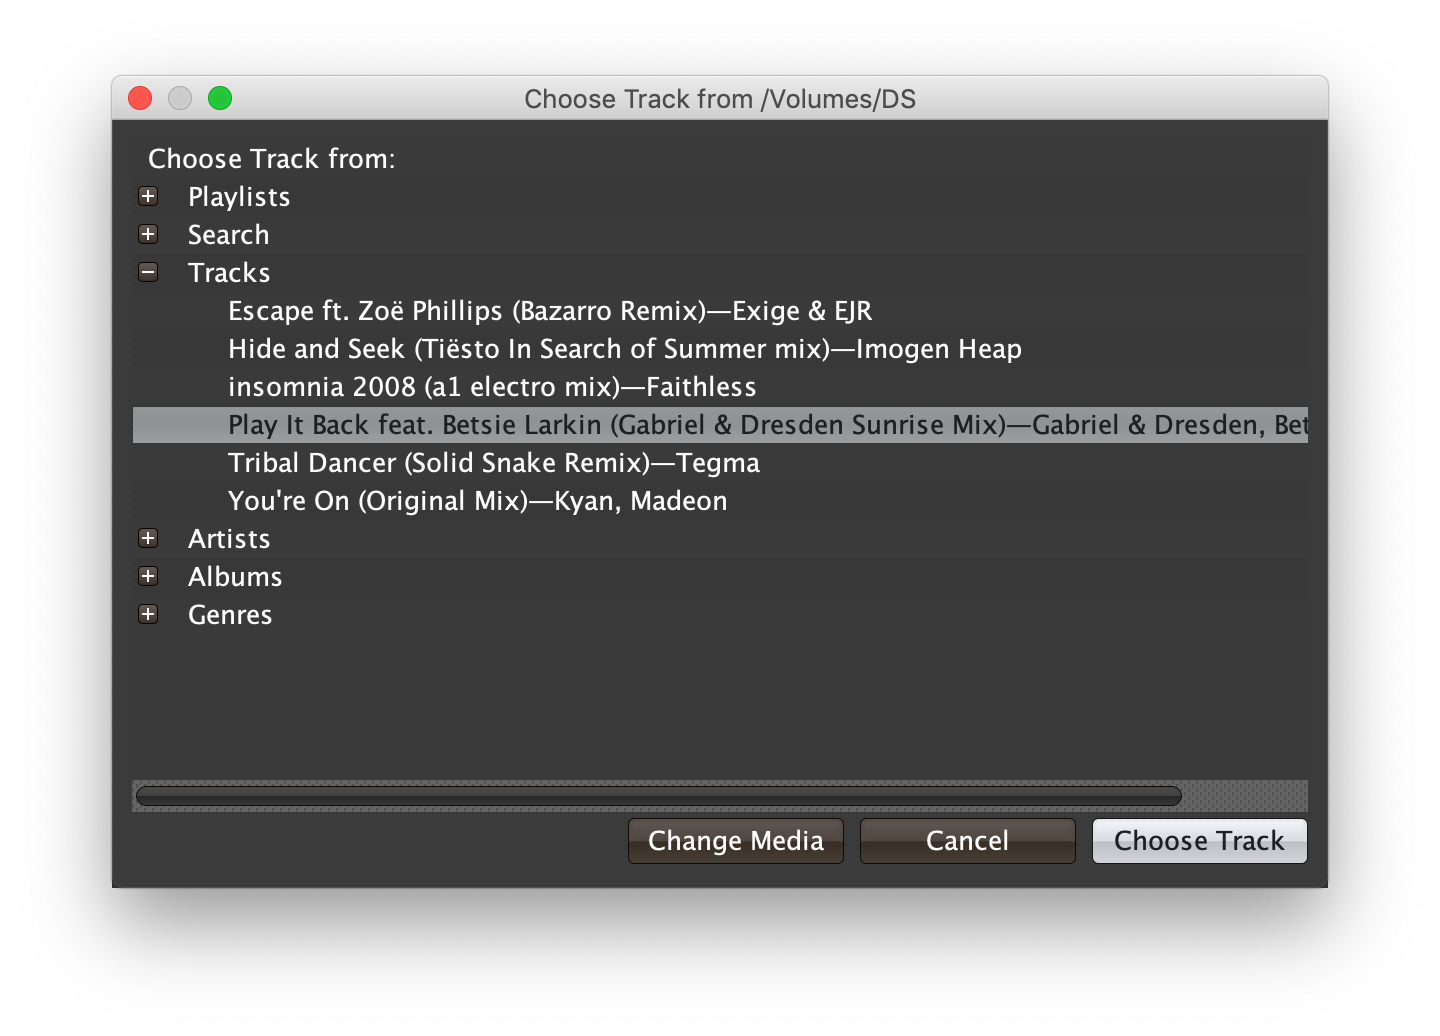
Once you have found the Track you are looking for, click Choose Track to add it to the Show.
| To save time, once you have chosen media to load tracks from during a Beat Link Trigger session, your media choice is remembered (and the parsed database export is kept open), so the next time you choose to import from offline media, the media selection window is skipped and you are taken right to the track selection window. If you want to import from different media, click the Change Media button at the bottom of the window. This also means you will not be able to eject the media on most operating systems because BLT has it open; if you do need to eject it without quitting BLT, choose , click Change Media, and it will be closed so you can eject it. At that point you can click Cancel if you did not actually want to import a Track. |
The final way to add a Track to a Show is to copy it from another Show. When you have multiple Show windows open, you can copy Tracks from one to another by finding the Track in the open Show that already contains it, then choosing Copy to Show “<name>” in the Track’s context menu:
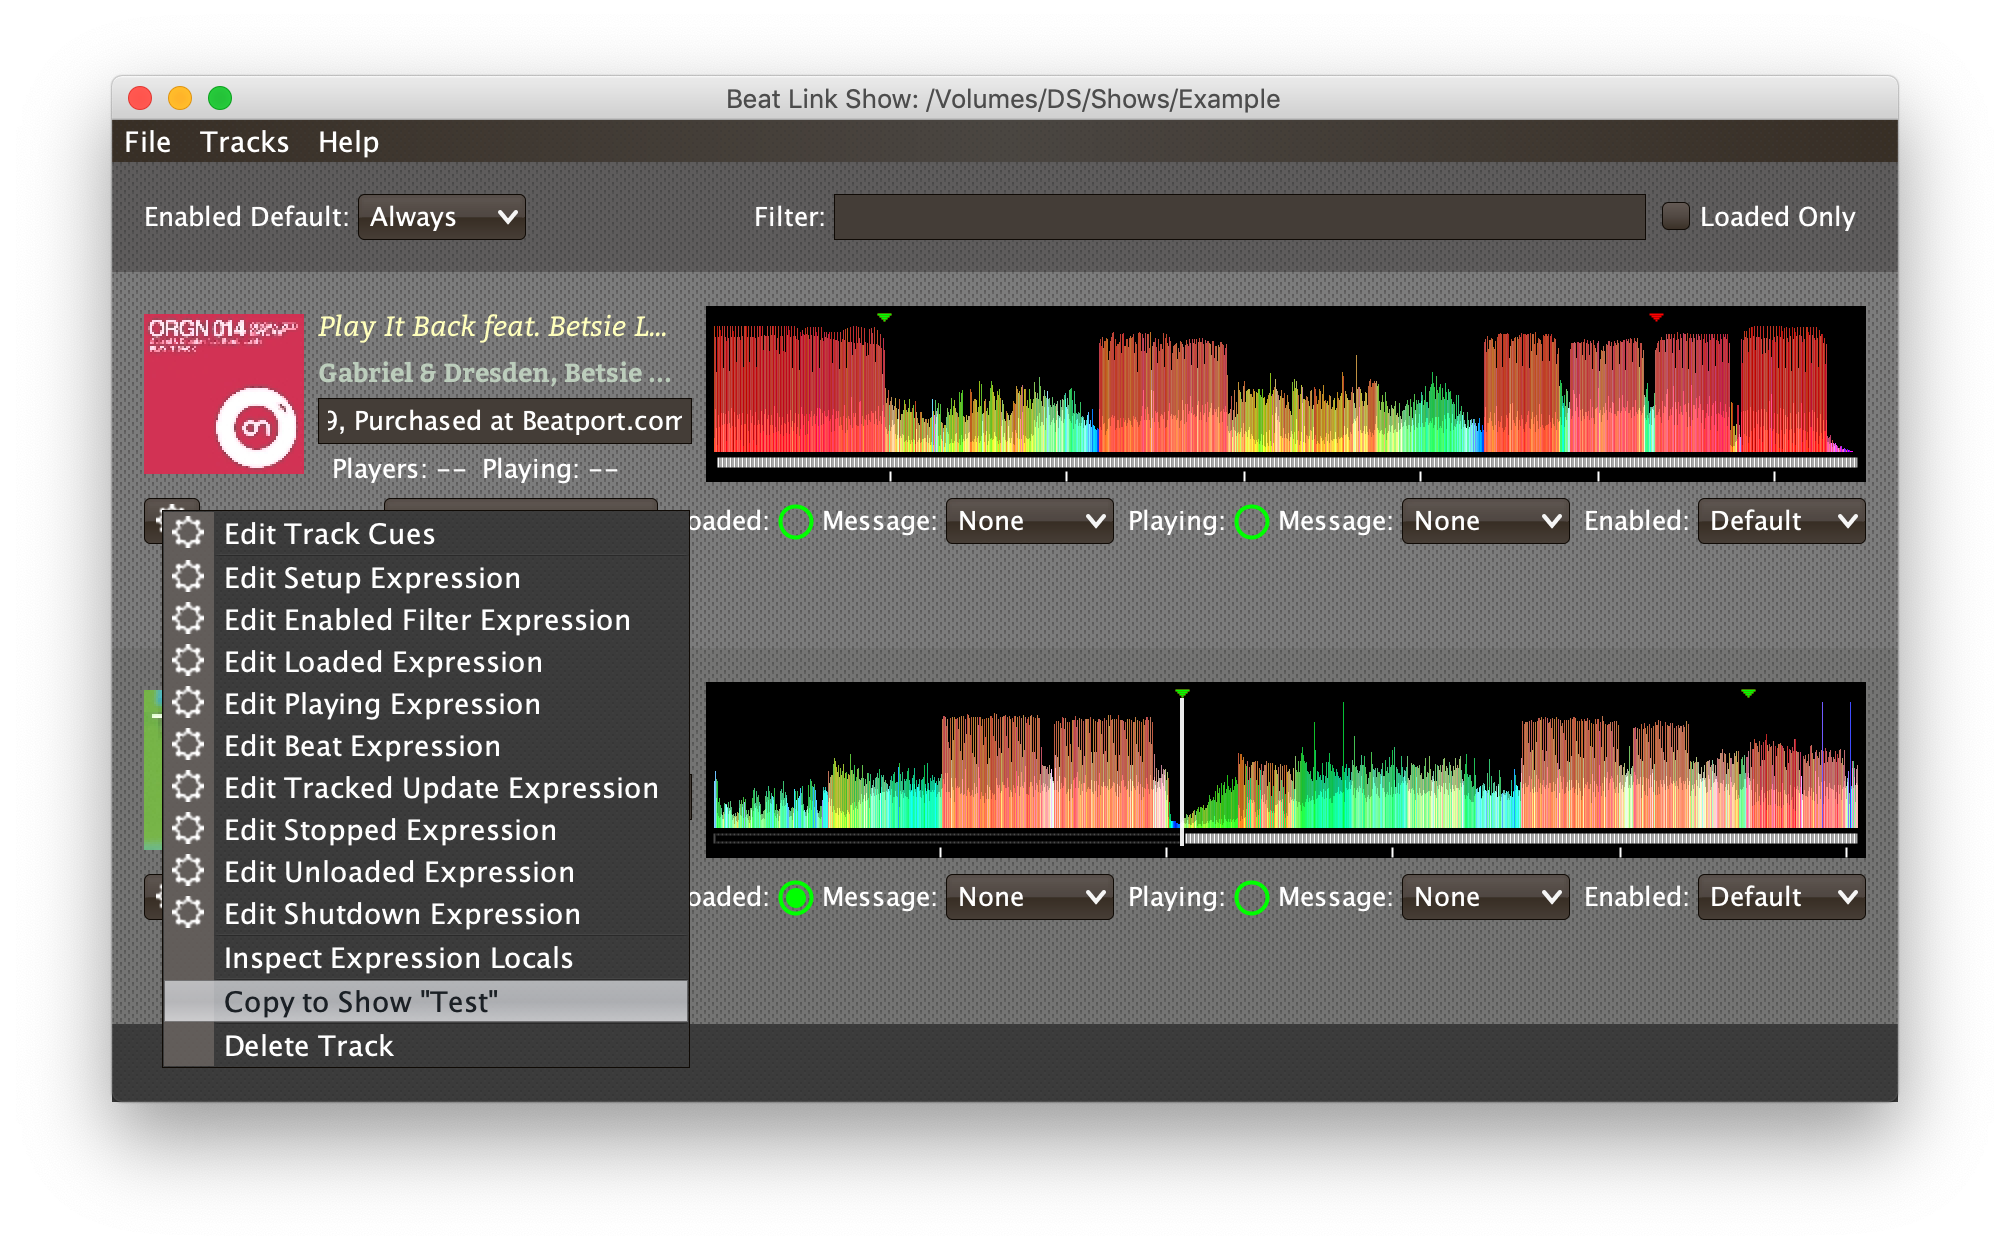
If you don’t see an open Show in the Copy to list, that means
the Track is already present in the other Show.
|
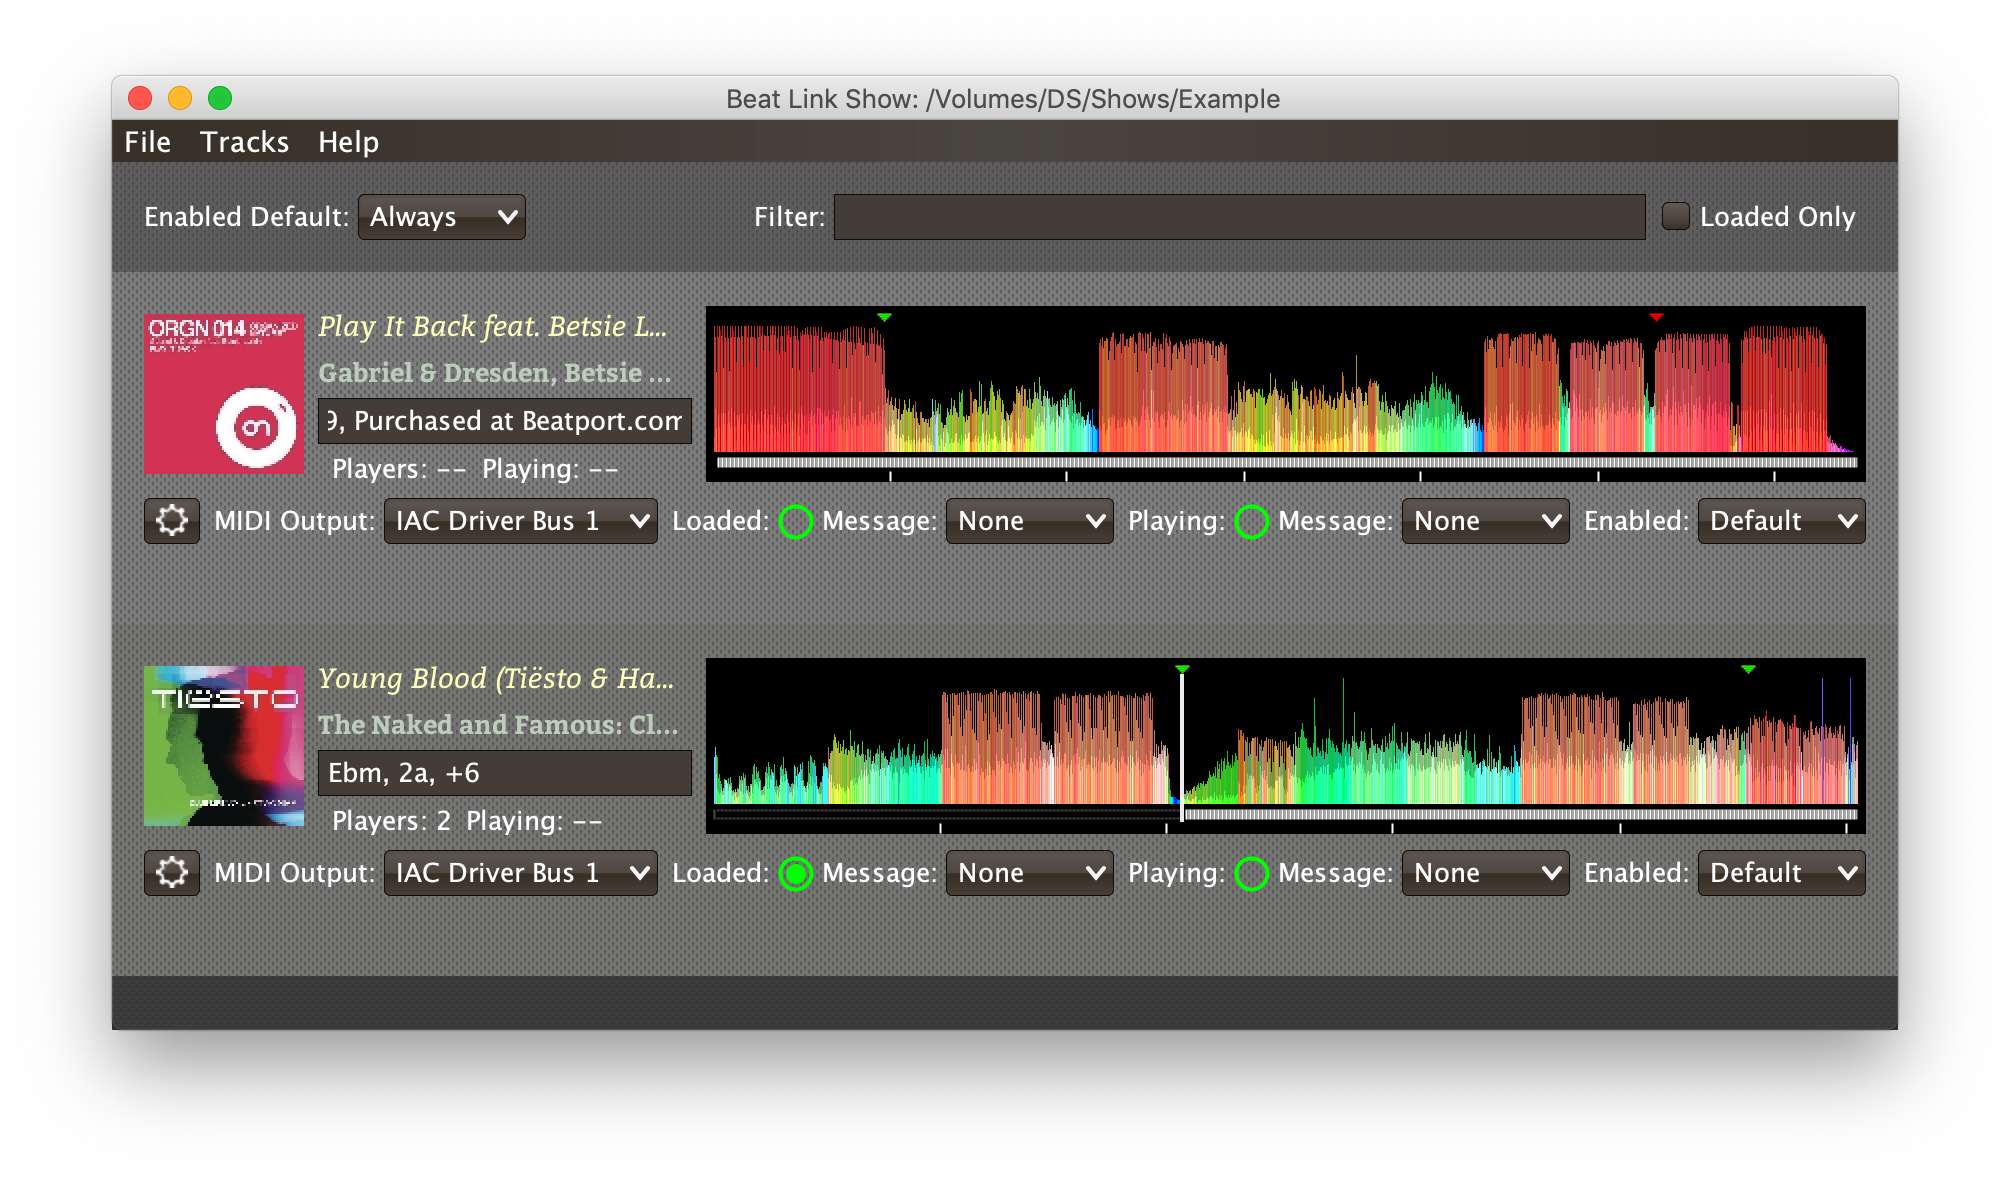
Track Row Elements
Tracks are kept sorted alpahabetically by title and artist in the Show
window (and remember that you can narrow the display to include only
those matching a string you type in the Filter field). If there is
album art available, it is shown at the top left. To the right of that
is a column that shows the track title, artist, a comment field, and
information about which players have the track loaded, and which are
currently playing it.

Comment Field
The comment field starts out holding whatever comment the DJ entered
about the track in rekordbox, but you are free to edit it however you
like, to help you remember things about the track or to make it easy
to find using the Filter field.
Waveform Preview
The waveform preview section shows the overall intensity and dominant frequencies of the track from beginning to end. As in the Player Status window, you can see the locations of hot cues and memory points in the waveform preview, and if any players have the track loaded, you can see their playback position markers. (Unlike in the Player Status window, you may see more than one player position on a single track, because the same track might be loaded in more than one player.) The tick marks along the bottom each represent one minute of playback time.
Along the bottom of the track row you find the controls that let you configure how you want the Show to respond to the track.
Context Menu Button
This allows you to access the track Context Menu with a regular mouse click. The gear inside the button will be filled in if there have been any Cues or Expressions added to the Track, and hollow otherwise. The contents of the menu itself are described below.
MIDI Output Menu
The MIDI Output Menu lets you choose the MIDI device to which the trigger will send messages when you configure it to send MIDI messages for particular events. It will show all MIDI outputs currently available on your system.
The chosen MIDI output will be used for all messages that the Track is configured to send, including those belonging to any Cues created in the Track. But each Track can have its own MIDI output, in case you have a large show with many cues.
| As with the MIDI Output Menu in the Triggers window, if a MIDI Output is chosen which is no longer available on the system, it will remain in that Track’s menu, but the Enabled section of the Track will be replaced with the message “Not found.” Once the output reappears, or a different output is chosen, the Track will become operational again. |
Loaded Status
To the right of the MIDI Output menu there is a Loaded Status indicator which has two parts. The outer ring indicates whether the Track is currently enabled (a green circle) or disabled (a red circle with a slash). If any player currently has the Track loaded, there is a filled circle inside the enabled indicator ring:
| State | Indicator |
|---|---|
Disabled, Not Loaded |
|
Enabled, Not Loaded |
|
Disabled, Loaded |
|
Enabled, Loaded |
|


Tracks are recognized by their signature, a cryptographic hash
calculated from their title, artist, duration, waveform, and beat
grid. This is taken care of by the SignatureFinder class in Beat
Link, which allows them to be efficiently detected and indexed within
the Show, and means that even if you have a variety of remixes of the
same track, they should all be recognized correctly.
|
Loaded Message Menu
The Loaded Message Menu determines what kind of MIDI message is sent when the Track first becomes loaded by any player (as long as the Track is Enabled, as described below), or when the track is unloaded by the last player that had loaded it.
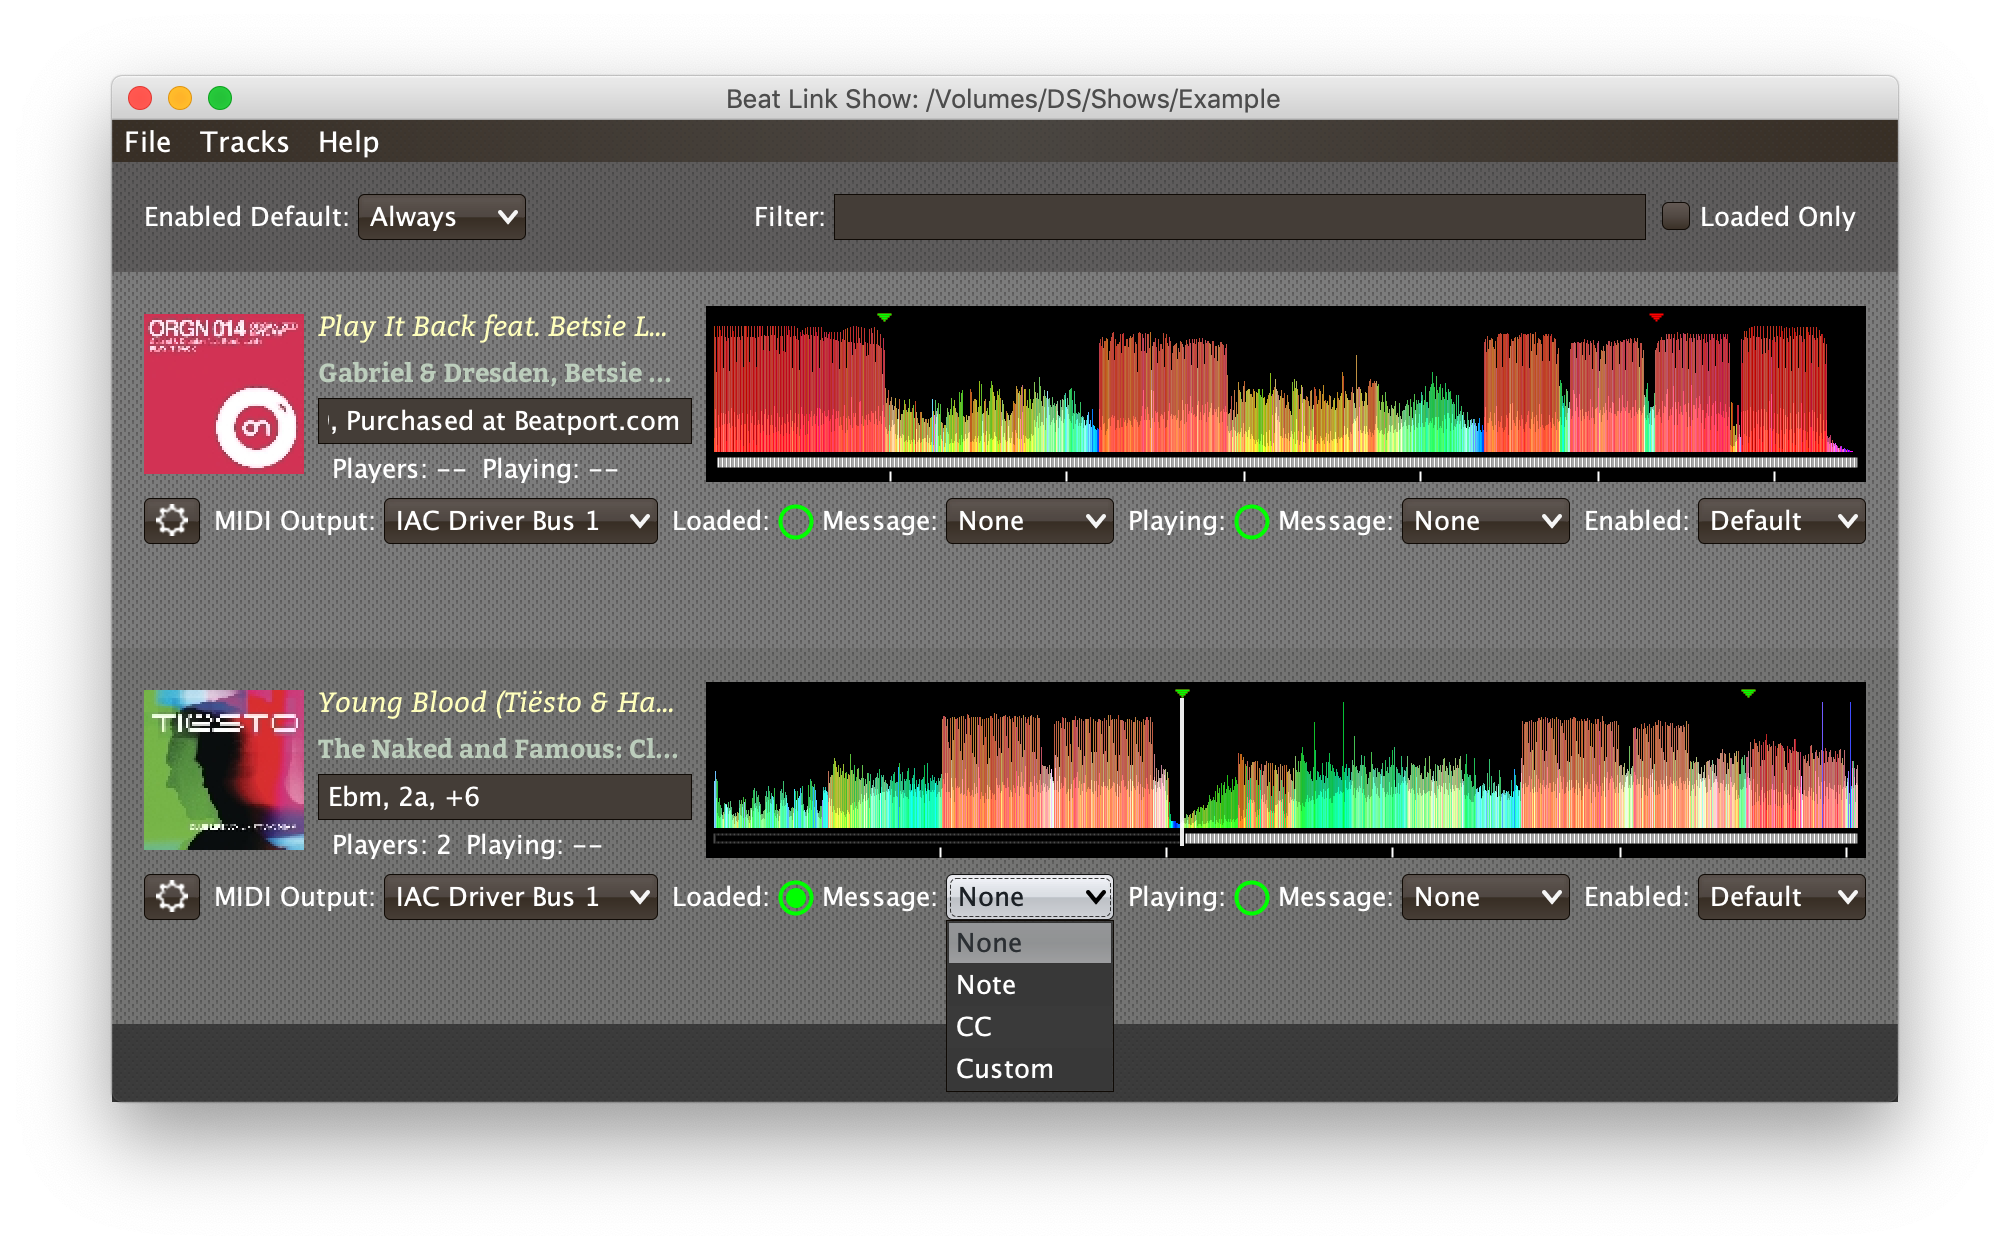
- None
-
With this setting, which is the default, nothing is sent when the Track loads or unloads.[1] When
Noneis chosen, there are no interface elements visible to configure the event. They will appear once you choose an event type to send. - Note
-
With this setting, the Show sends a Note On message, with velocity 127 and the note number shown to the right of the menu, when the Track gets loaded onto the first player (as long as the Track is enabled), and a Note Off message when the last player unloads the Track, or the Track is disabled.

The Channel on which the Loaded/Unloaded messages are sent is configured just to the right of the note selector.
- CC
-
With this setting, the Show sends a Control Change message, with value 127 and the controller number shown to the right of the menu, when the the Track is loaded (as long as it is enabled), and sends a CC with value 0 when the Track is unloaded or becomes disabled.
- Custom
-
When this option is chosen, you can send any kind of message you want when the Track loads and/or unloads, by writing code as described in the Expressions section. This gives you the most flexibility because in addition to MIDI messages, you can send arbitrary UDP packets, HTTP requests, or whatever you might need. The expression editors for the Loaded Expression and Unloaded Expression are accessed through the track context menu.
If you choose
Customand have not yet written a Loaded expression, the expression editor will be opened to let you do that. You can also open that editor using the track context menu.
Loaded Note/Controller Spinner
Found immediately to the right of the Loaded Message Menu (unless
None is chosen as the Message type), this field lets you set the MIDI
note number used for Note-based loaded and unloaded messages, or the
controller number used for Control Change-based loaded and unloaded
messages. The value is also available to your Track expressions if they
want to use it.
Playing Status
To the right of the Loaded Message section there is a Playing Status indicator. As with the Loaded Status indicator, it has an outer ring which shows whether the Track is currently enabled (a green circle) or disabled (a red circle with a slash). If any player is currently playing the Track, there is a filled circle inside the enabled indicator ring:
| State | Indicator |
|---|---|
Disabled, Not Playing |
|
Enabled, Not Playing |
|
Disabled, Playing |
|
Enabled, Playing |
|
| Because of a limitation of the DJ Link protocol, if a player is positioned right before a beat, and the DJ uses Cue Play (holds down the Cue button to preview the track), Beat Link Trigger might briefly think the track is playing if the player sends a beat packet before any status packets reporting the fact that it is in cue preview mode. As soon as a status packet is received, the track will be recognized as not actually playing, and further beat packets will be ignored. Unfortunately, the first beat packet can cause your Playing message (and Cues' Started messages) to be sent prematurely, followed within a fraction of a second by Stopped messages. |
Playing Message Menu
The Playing Message Menu determines what kind of MIDI message is sent when the first player starts playing the Track (as long as the Track is Enabled, as described below), or when the last player that was playing the track stops.

- None
-
With this setting, which is the default, nothing is sent when the Track starts or stops playing.[1] When
Noneis chosen, there are no interface elements visible to configure the event. They will appear once you choose an event type to send, as shown in the screen shot above. - Note
-
With this setting, the Show sends a Note On message, with velocity 127 and the note number shown to the right of the menu, when some player starts playing the Track (as long as the Track is enabled), and a Note Off message when the last player playing it stops, or the Track is disabled.
The Channel on which the Started/Stopped messages are sent is configured just to the right of the note selector.
- CC
-
With this setting, the Show sends a Control Change message, with value 127 and the controller number shown to the right of the menu, when the the Track starts playing (as long as it is enabled), and sends a CC with value 0 when the Track is stopped or becomes disabled.
- Custom
-
When this option is chosen, you can send any kind of message you want when the Track starts and/or stops, by writing code as described in the Expressions section. This gives you the most flexibility because in addition to MIDI messages, you can send arbitrary UDP packets, HTTP requests, or whatever you might need.
If you choose
Customand have not yet written a Playing expression, the expression editor will be opened to let you do that. You can also open that editor using the track context menu.
Playing Note/Controller Spinner
Found immediately to the right of the Playing Message Menu (unless
None is chosen as the Message type), this field lets you set the MIDI
note number used for Note-based started and stopped messages, or the
controller number used for Control Change-based started and stopped
messages. The value is also available to your Track expressions if they
want to use it.
Enabled Menu
The Enabled menu controls whether the Show will react to players doing things with the Track.

- Default
-
With this setting, which will be used by most Tracks, the Show’s shared Enabled Default menu (at the top of the window) is used. This allows you to enable and disable most or all tracks using a common set of rules, while special tracks that need to be different can still use their own settings. All of the options in this list (except for
Defaultitself) are available in the Enabled Default menu, and have the same meaning there, being used by any Tracks whose own Enabled menu is set toDefault. - Never
-
With this setting, the Track is disabled until you re-enable it.
- On-Air
-
With this setting, the Track is enabled whenever it is loaded by at least one player that reports that it is On the Air. (For that to work, the player must be connected to a Nexus mixer, and must have the feature turned on.)
- Master
-
With this setting, the Track is enabled whenever it is loaded by the player that is the current Tempo Master.
- Custom
-
With this setting, the Track is controlled by an Enabled Filter, Clojure code that you write yourself. Whenever a status update is received from any player, your expressions are evaluated. If the last expression in your filter returns a
truevalue, the Track will be enabled. This lets you apply sophisticated logic, like enabling the Track when another track is loaded into a different player, or only during particular times of day. Expressions are further explained in the Expressions section. If you chooseCustomand have not yet written an Enabled Filter expression, the expression editor will be opened to let you do that. You can always open that editor using the Track Context Menu, described in the next section. - Always
-
With this setting, the Track is enabled until you disable it.
Track Context Menu
Each Track row has a context menu attached to it, which can be accessed by right-clicking (or control-clicking) anywhere on the row’s background, but you can also open the context menu with a regular mouse click on the button with a gear icon in it. Most of the menu is devoted to editing various expressions to customize the Track, as described in the Expressions section. The gear icon next to an expression will be filled in if that expression has a value, and the gear in the button will be filled in if any expression associated with the Track has a value, or if there are any Cues in the Track.
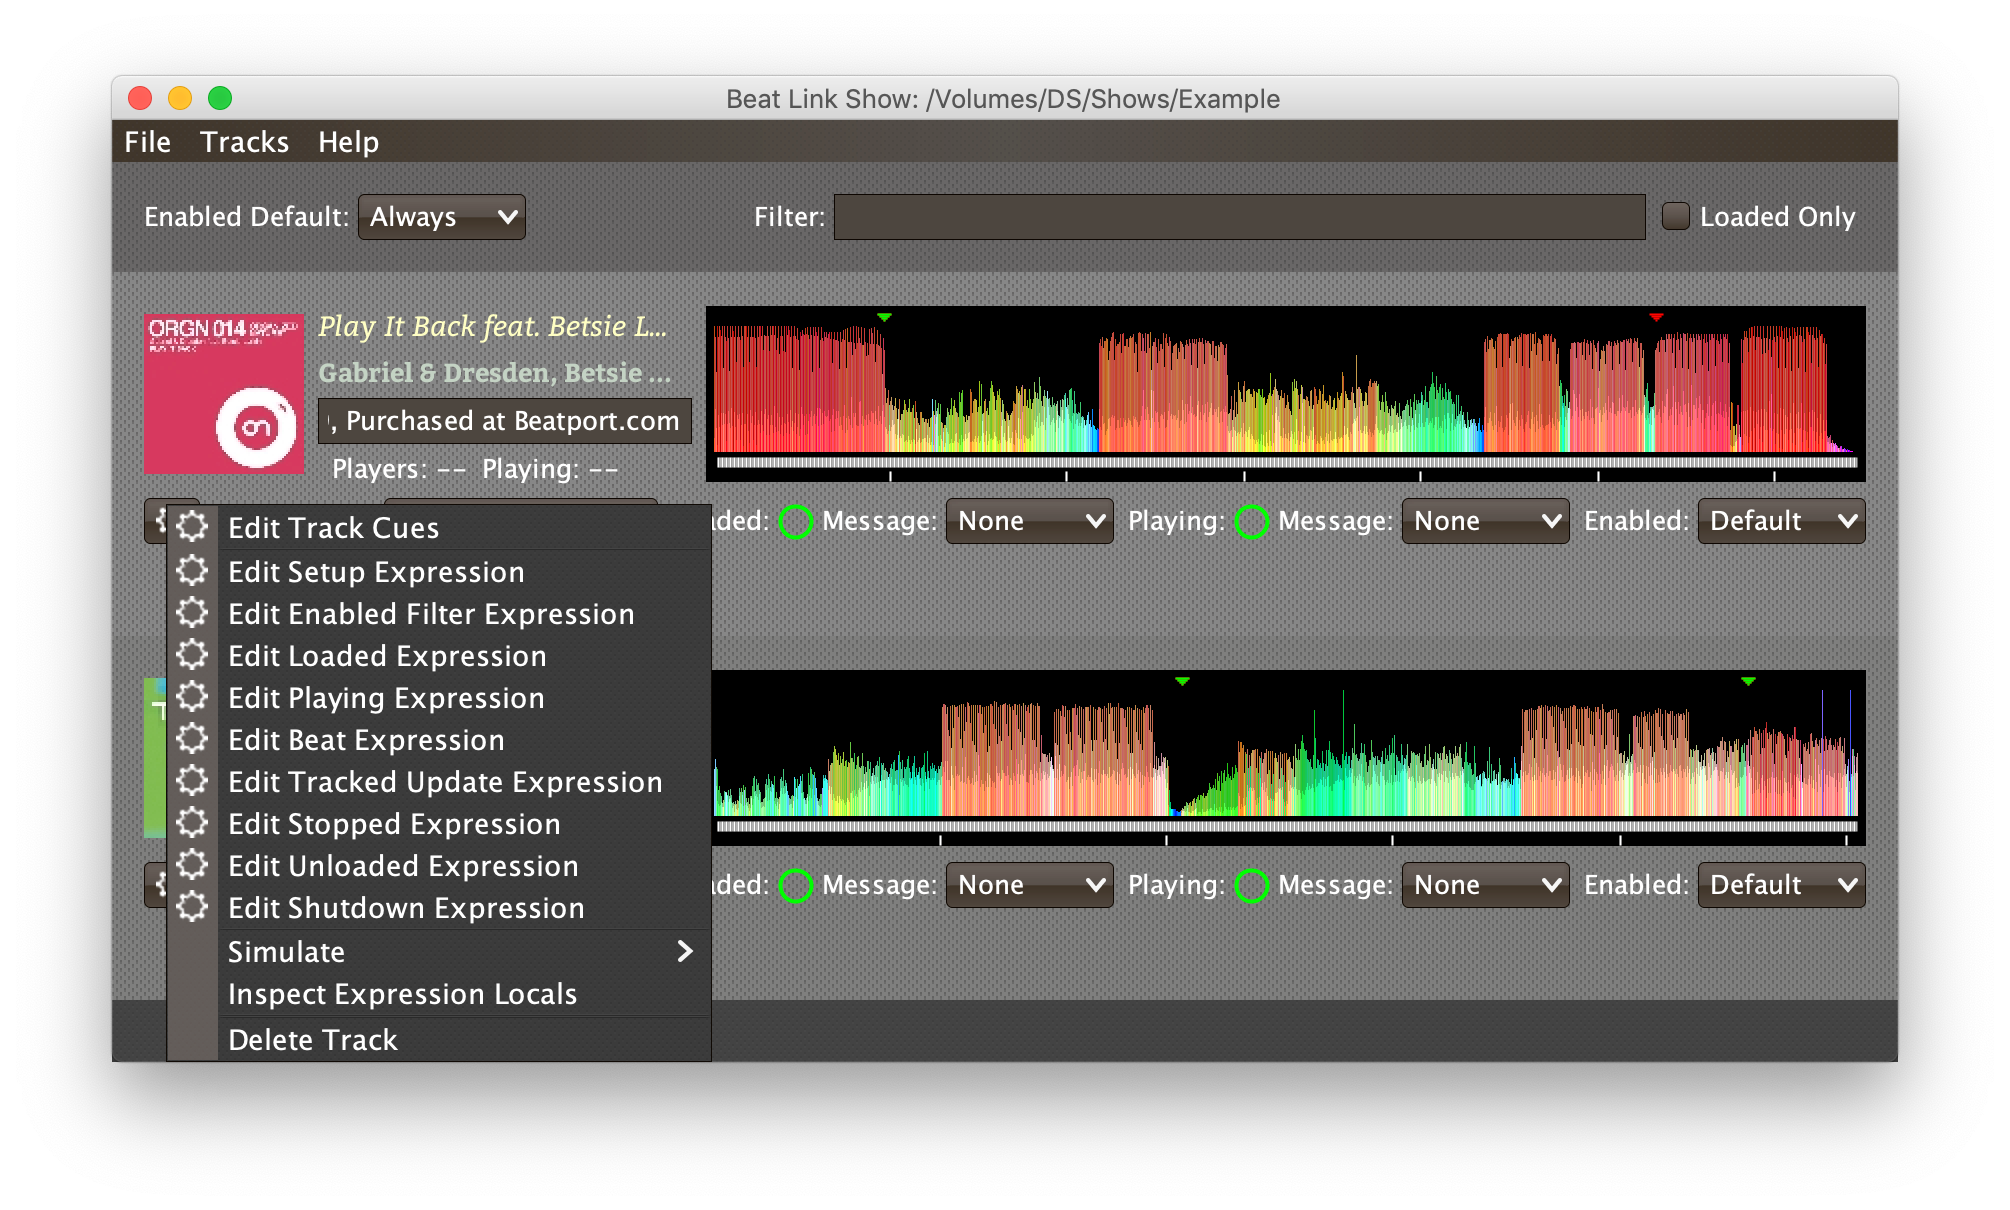
The first option in the menu, Edit Track Cues, opens the Cues window for the Track, which is how you can create Cues that respond to particular beat ranges in the Track, as discussed in the next section.
Below that come the expression-related options, allowing you to open editors to create or edit Clojure code that runs at well-defined moments to customize the behavior of the Track. These are followed by the Simulate submenu, which allows you to test your MIDI mappings and custom expressions as described in the next section.
The Inspect Expression Locals option allows you to explore any values that have been set up by expressions in the Track to re-use or share with each other. See Inspecting Locals and Globals for more details.
As mentioned at the end of the Adding Tracks section, if you have more than one Show window open, and you bring up the context menu for a Track that does not exist in one of the other Shows, you will see an option to copy it to that Show.
Finally, the Delete Track option does just what it sounds like, after confirming that you want to discard any expressions and Cues you have set up for that Track.
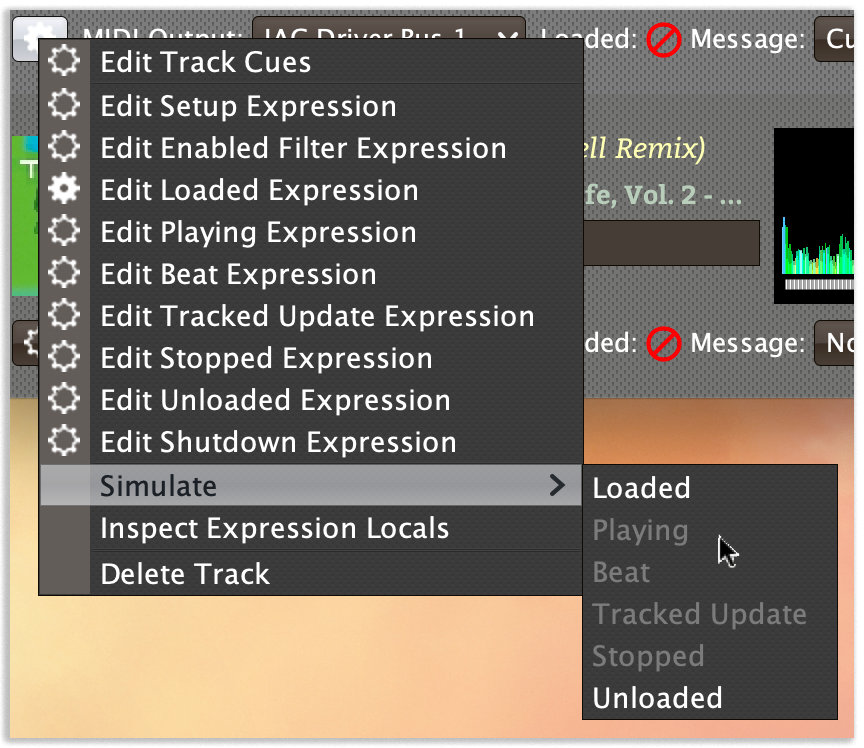
Simulating Track Events
The Simulate submenu allows you to pretend that a Loaded, Unloaded, Playing, Stopped, Beat or Tracked Update event has occurred, and send the corresponding MIDI messages and/or run the custom Expressions you have configured for those situations.
|
This can allow you to set up MIDI mappings in other software, like Ableton Live, that requires actual MIDI messages in order to learn them, even when you are working in offline mode because you don’t currently have access to your CDJs. |
The corresponding option will be disabled if there is no MIDI message or Expression configured for that event.
Editing Track Cues
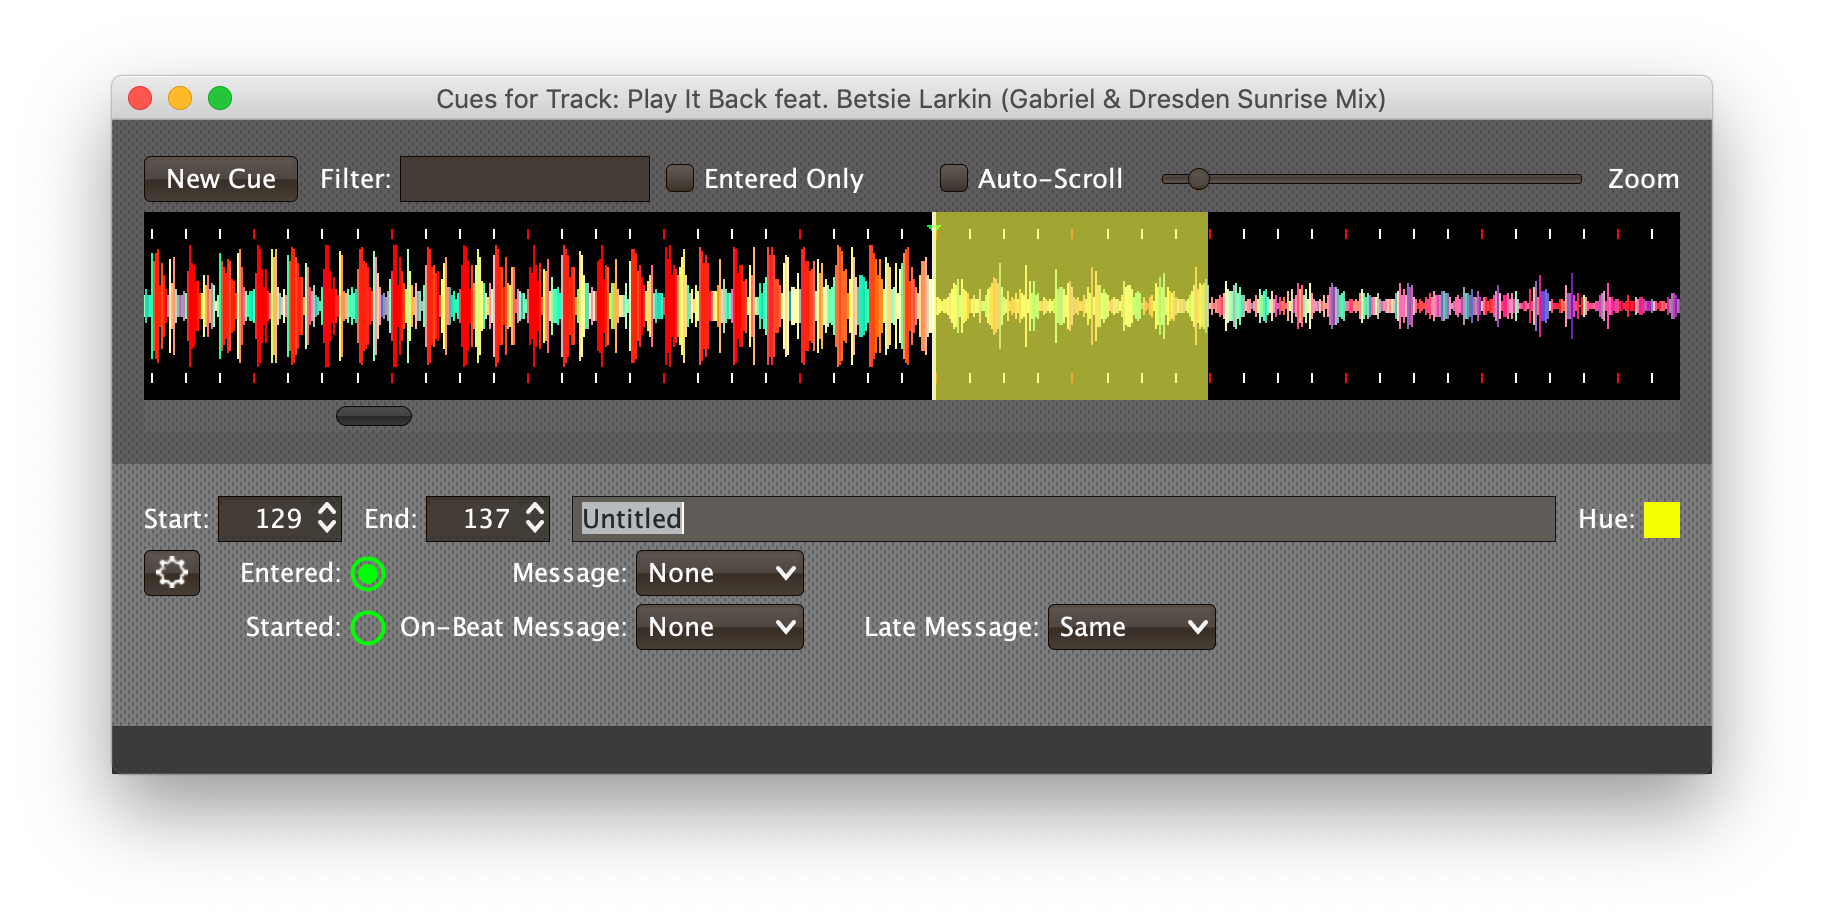
Tracks have settings and expressions that allow you to make things happen when they load or start and stop playing, but you will often be interested in more specific parts of the track being played. That’s where Cues come in. To add Cues to a Track, choose Edit Track Cues in the Track’s context menu, as described in the previous section. That will open a new window for viewing and editing details about that Track’s Cues:
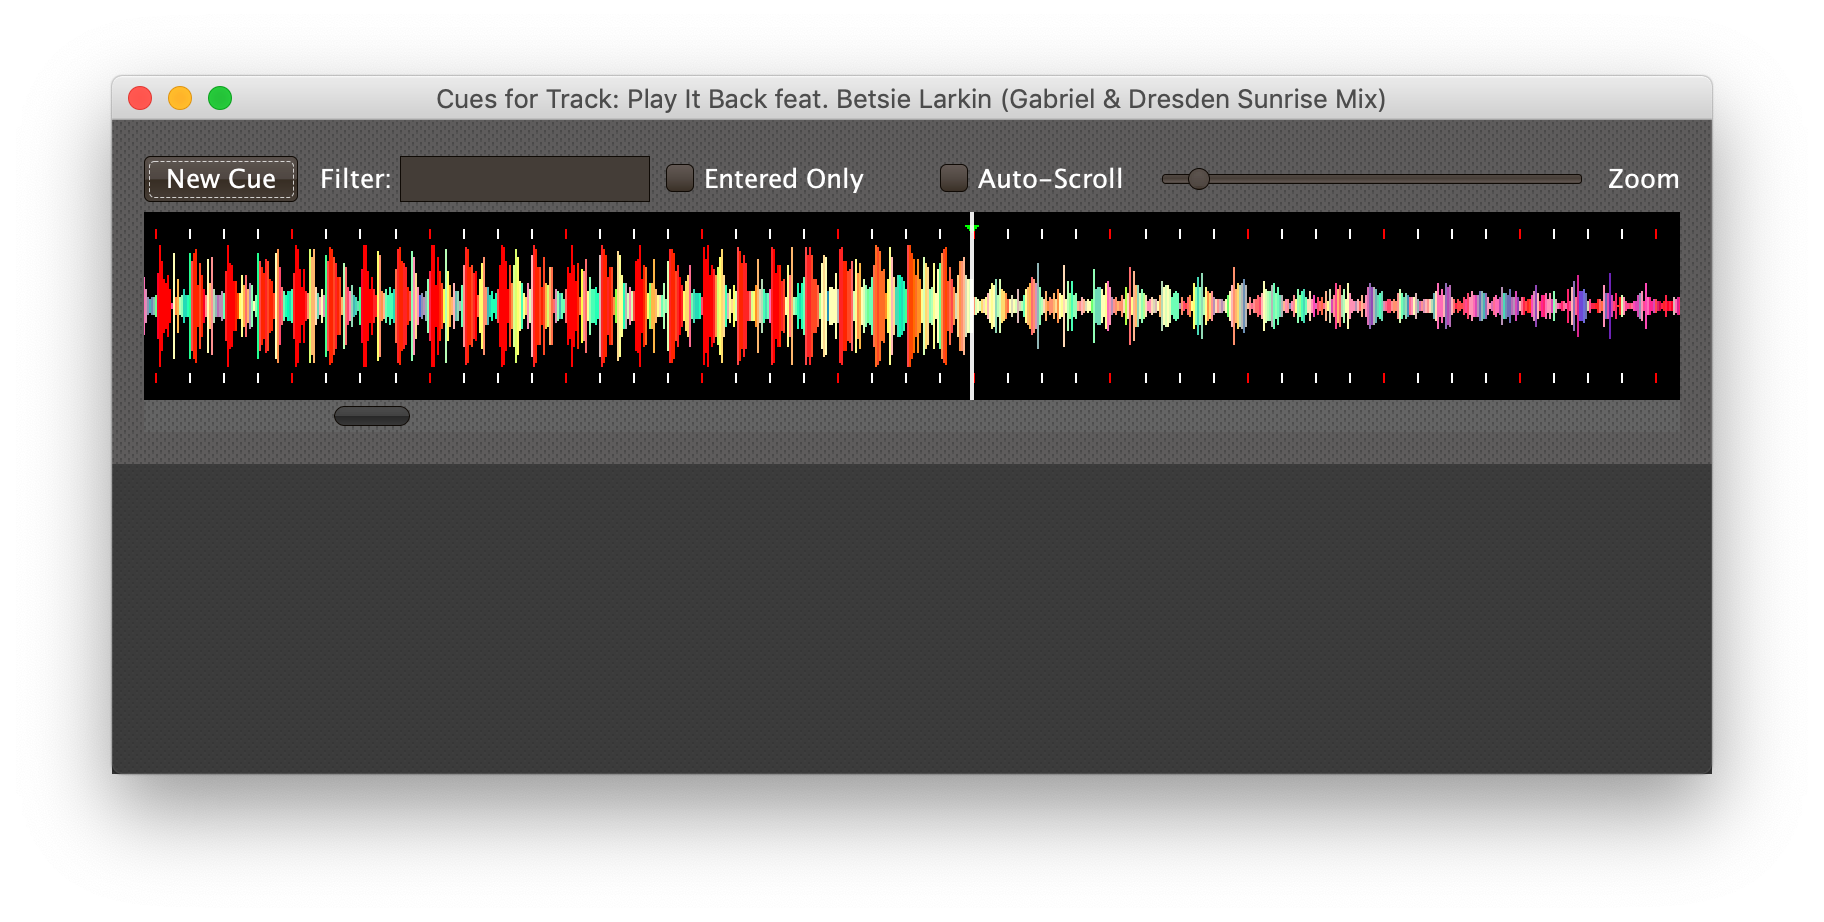
Before introducing the various ways to add Cues to the track, let’s explore the features available at the top of the window.
Cues Window Header Elements
At the top of the Cues window, above any Cues that you have added to
it, is a header that shows a scrollable and zoomable view of the track
waveform and beat grid, much like the one that appears in the
Player Status Window, except that you can
manually scroll this one to the section you want to see regardless of
whether any players are currently playing it. If any are, you will
see their playback position(s) marked on the waveform as illustrated
above, but they will not cause the waveform to scroll to follow them
unless you check the Auto-Scroll checkbox. Although you won’t want
to do that when you are editing cues, it can be nice when running a
show, as it makes it easy to follow along as Cues approach and run.
The New Cue button creates a new cue on the first beat of the Track, unless you have selected a beat range first as described below.
As with the Show window, if you type any text in the Filter box,
only Cues that match that text will be visible. Similarly, if you
check the Entered Only checkbox, only Cues that currently have a
player positioned inside them will be visible. This is a great way to
narrow down your focus to watch what is going on with cues the DJ is
currently playing.
The Entered Only and Auto-Scroll checkboxes are only visible
when Beat Link Trigger is Online, because they only make sense in the
context of being able to detect that a player has loaded the track.
|
Adding Cues to a Track
The Cues window doesn’t do much until you add at least one Cue. As mentioned above, you can use the New Cue button to do this, and then edit the cue to position it where you want it, but it is easier to specify where you want it on the beat grid first. To do that, you can click and drag in the waveform view to highlight the beats that you want the Cue to run for. Dragging over the eight beats past where the player was cued in the above example sets up a selection like this:
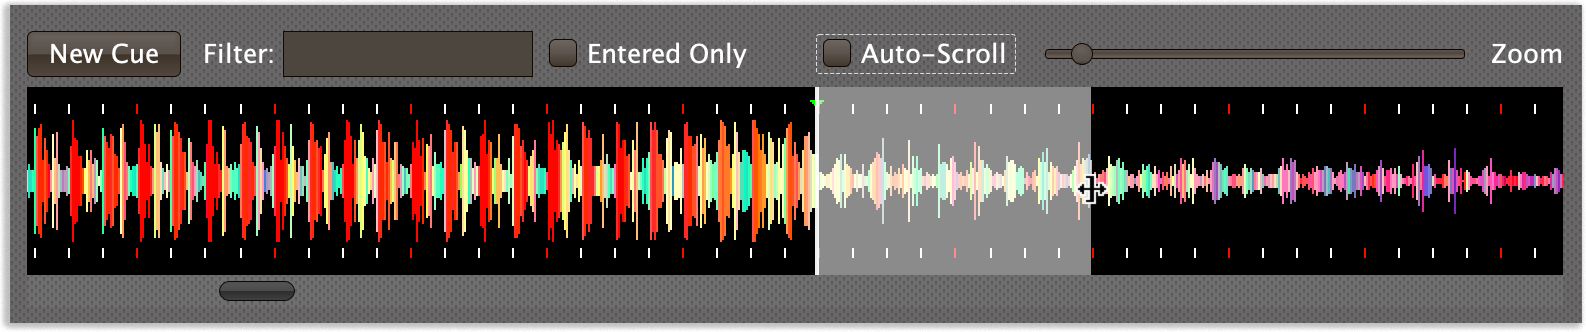
If your aim was slightly off, you can drag the edges of the selection to adjust them, as suggested by the cursor in the image above, or you can shift-click to grow or shrink the cue, perhaps after scrolling the wavform to a different section. Also remember that you can adjust the Zoom slider to make it easier to position your cue.
Alternately, you can click to select a single beat, then shift-click another to specify the entire range without dragging. If you created a beat selection by accident and want to get rid of it, you can either drag it back down to nothing, or click a single beat outside the selection and then shift-click it to deselect it.
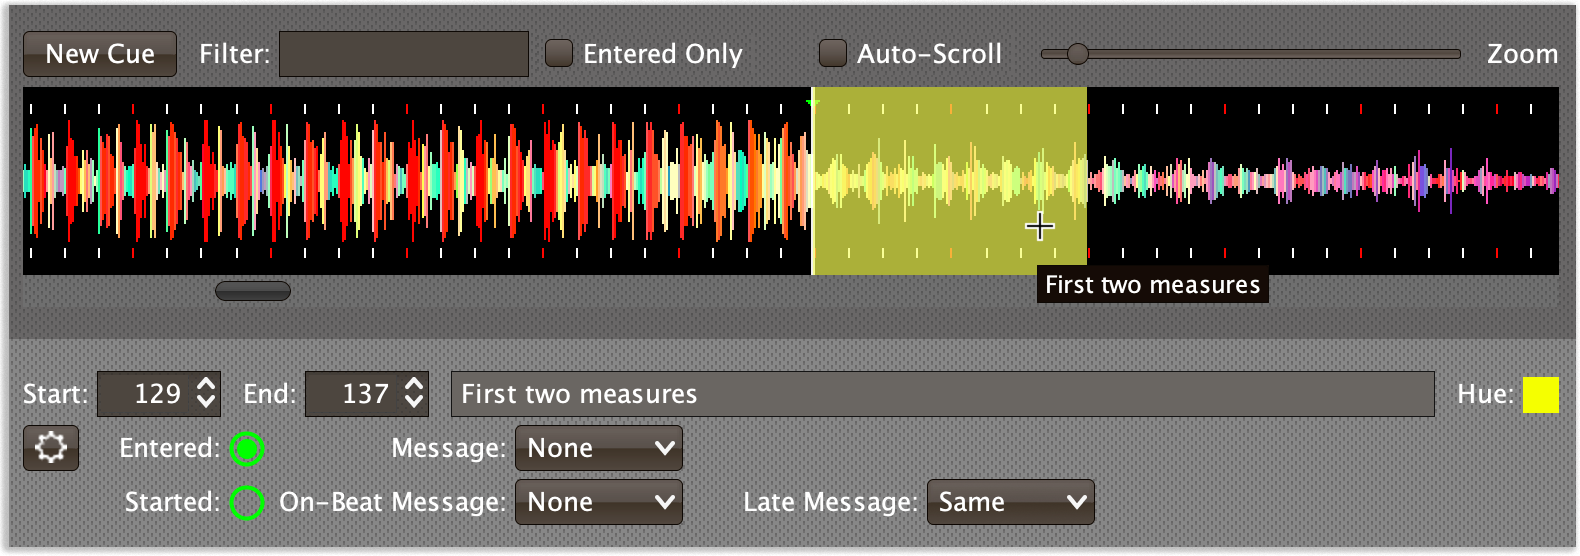
Regardless of how you do it, once you have the right beats selected, clicking the New Cue button will create a new cue covering the chosen beats:
Cue Row Elements
Start and End Spinners
You can see and adjust the beats on which the Cue starts and ends using these two fields, either by typing new values, or clicking the arrows. However, it is probably even more convenient to simply drag the edges of the cue in the waveform, which also works.
The End must always be at least one beat past the Start, and neither can extend outside the beat grid of the Track.
Cue Name
To help understand the purpose of the cue, you can give it a name. The
default is Untitled (with a numeric suffix if needed to keep it
distinct), but as soon as the cue is created, the Name field is
selected and ready for you to type something more meaningful. For this
example, we’ll type "First two measures", since we placed the cue at
the point where this track begins playback after being loaded.
The cue name also appears as a tool tip when you hover the mouse pointer over the cue in the waveform:
Cue Hue
Cues are assigned distinct hues when they are created to help you tell
them apart (and to tie the cue in the waveform to the corresponding
detail row below), but you can also assign each cue a specific hue if
that helps organize your show by clicking the Hue swatch in the Cue
row. That will bring up a color picker window wher you can choose the
exact hue you want.
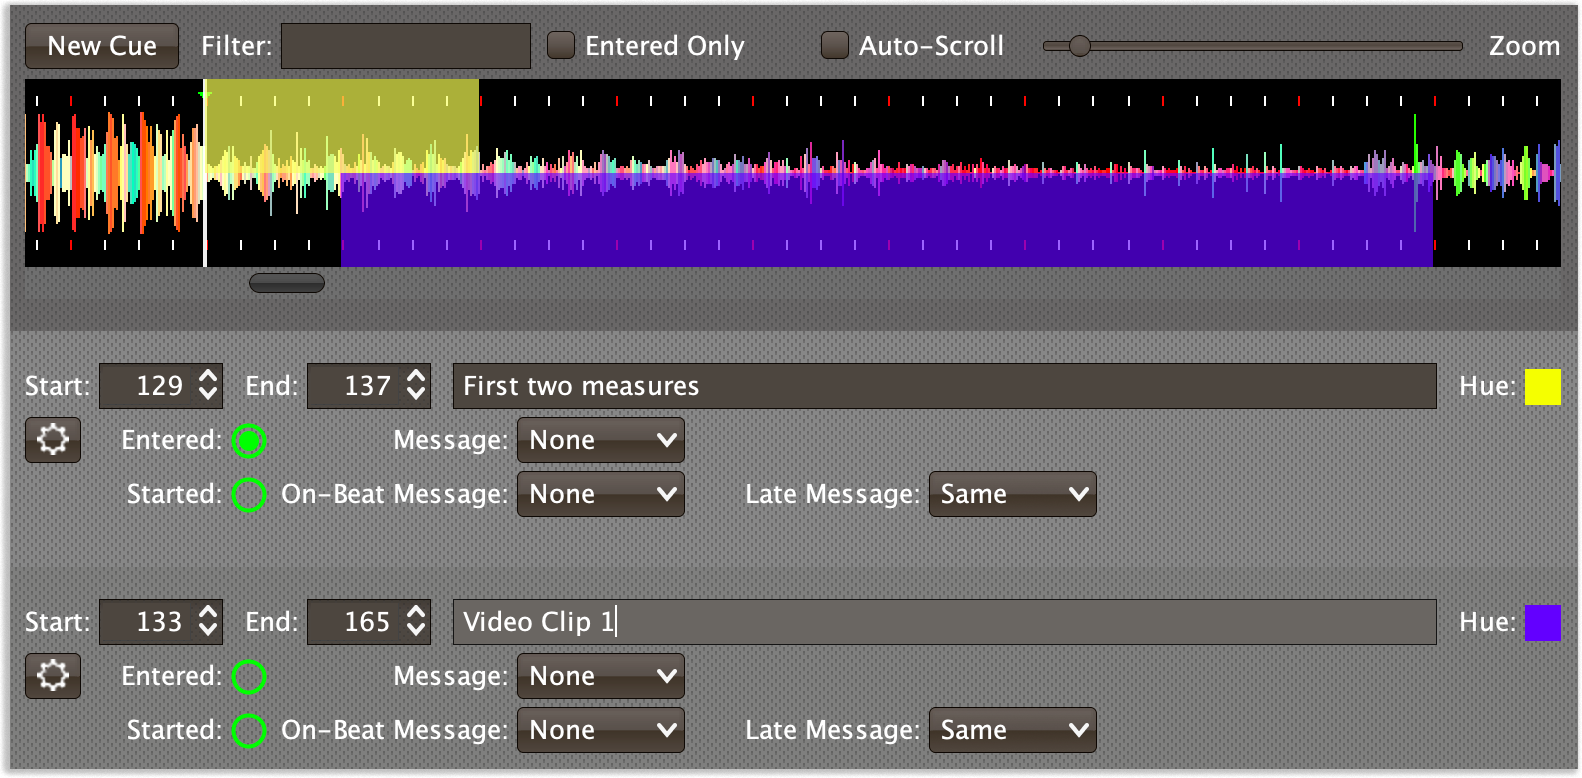
If cues overlap each other, Beat Link Trigger draws them in separate lanes to make it easier to tell where each begins and ends. It can handle even very complex sets of overlapping cues, adjusting them into a minimal set of lanes. Here’s an example of what it would look like if we added a second cue called “Video Clip 1” that overlaps part of our first cue:
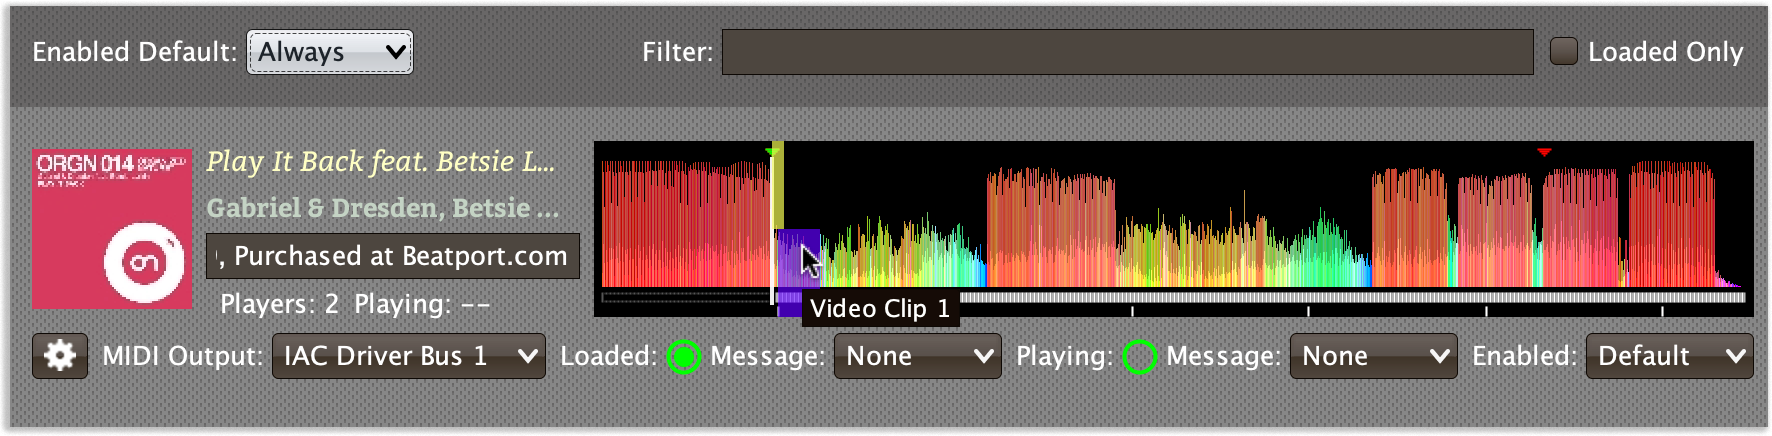
Cues are also visible, and show their names as tool tips, in the waveform preview drawn in Track rows in the Show window, so you don’t even need to open the Cues Editor for a quick reminder of what cues are coming up:
Context Menu Button
Below the first row of cue configuration elements there is a gear button that allows you to access the cue’s Context Menu with a regular mouse click. The gear will be filled in if any Expressions have been added to the Cue, and hollow otherwise. The contents of the menu itself are described below.
Entered Status
To the right of the context menu button there is an Entered Status indicator which has two parts. The outer ring indicates whether the Cue’s Track is currently enabled (a green circle) or disabled (a red circle with a slash). If any player is currently positioned anywhere inside the Cue, there is a filled circle inside the enabled indicator ring:
| State | Indicator |
|---|---|
Disabled, Not Entered |
|
Enabled, Not Entered |
|
Disabled, Entered |
|
Enabled, Entered |
|
Entered Message Menu
The Entered Message Menu determines what kind of MIDI message is sent when the first player moves into the cue (as long as the Cue’s Track is Enabled), or when the last player that had been positioned inside the cue moves out of it.
| The player does not need to actually be playing for Entered/Exited messages to be sent: if the track loads and the player auto-cues within the Cue, or the DJ uses cue/loop call, needle jump, the jog wheel, or search to move into or out of the cue, its state will update and the appropriate messages will be sent. |
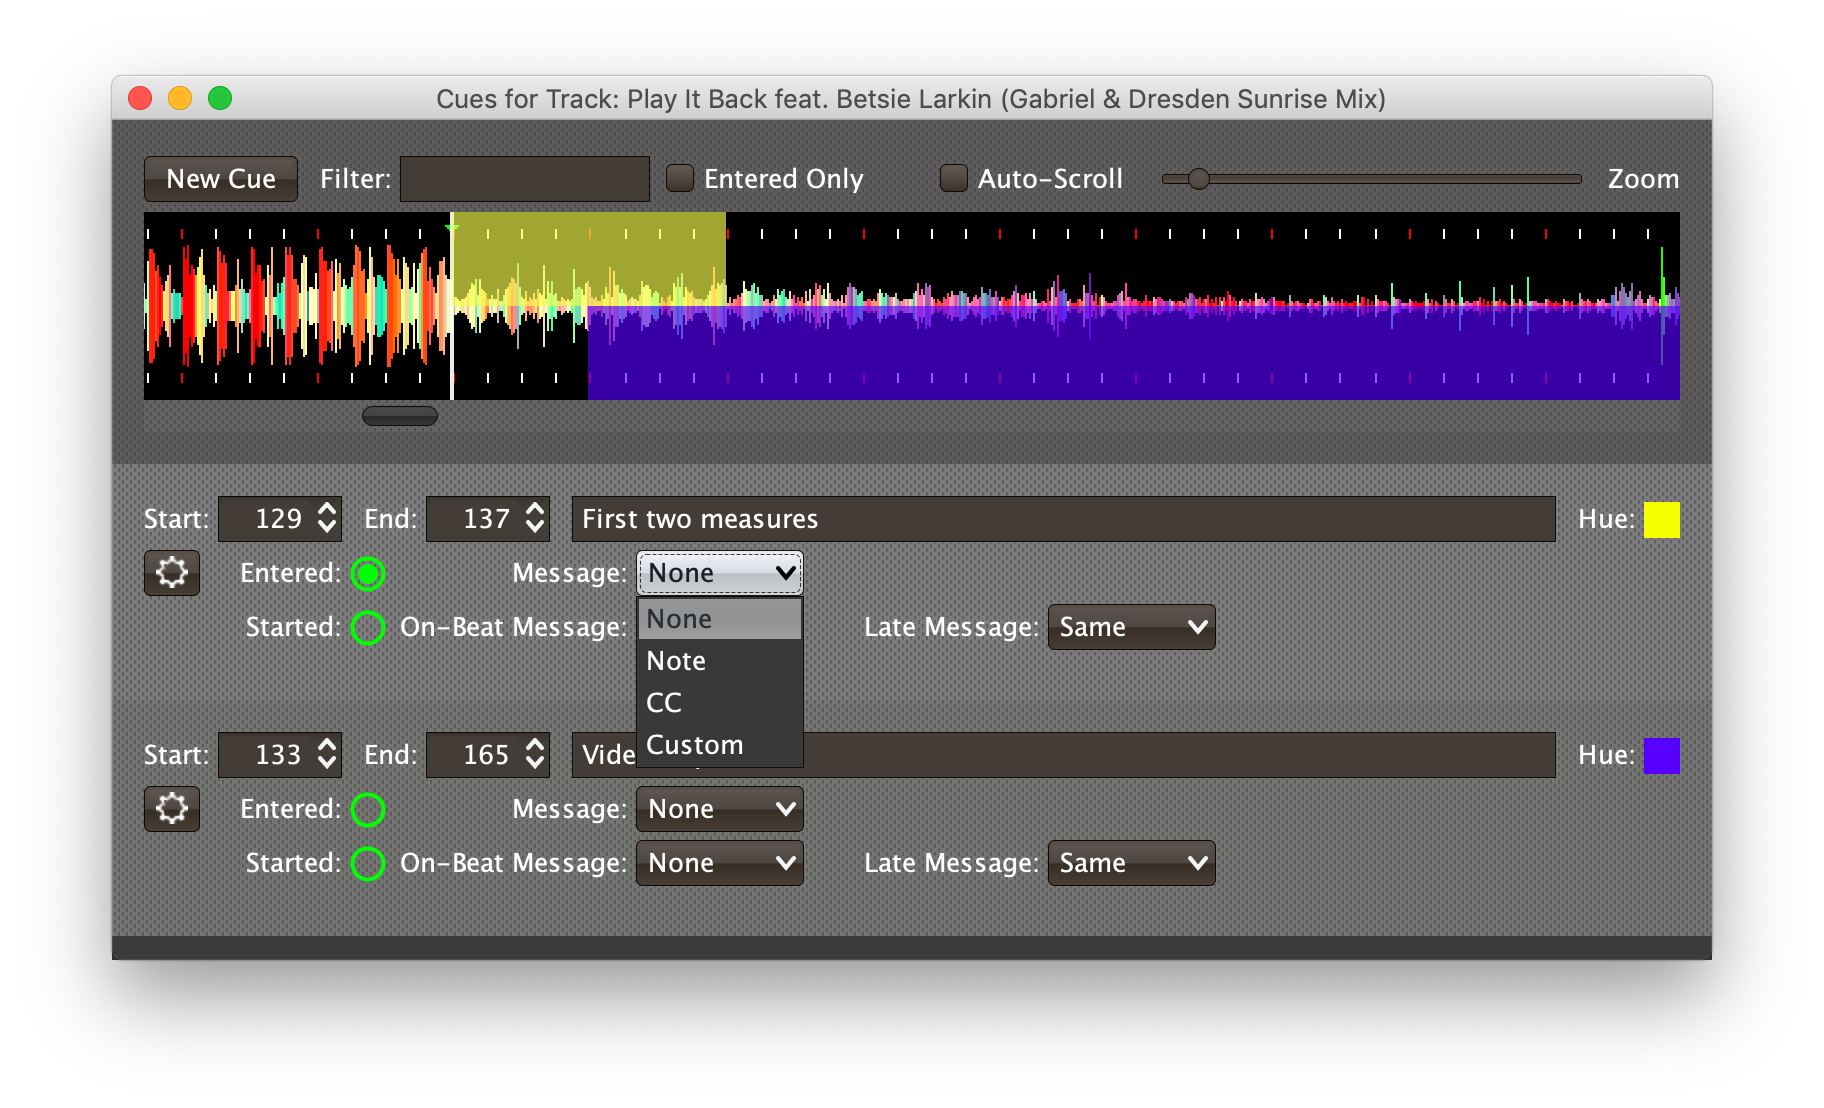
- None
-
With this setting, which is the default, nothing is sent when the Track loads or unloads.[1] When
Noneis chosen, there are no interface elements visible to configure the message. They will appear once you choose a message type to send. - Note
-
With this setting, the Show sends a Note On message, with velocity 127 and the note number shown to the right of the menu, when the first player moves inside the Cue (as long as the Cue’s Track is enabled), and a Note Off message when the last player that had been inside the Cue moves back out of it, or the Track is disabled.

The Channel on which the Entered/Exited messages are sent is configured just to the right of the note selector.
- CC
-
With this setting, the Show sends a Control Change message, with value 127 and the note number shown to the right of the menu, when the first player moves inside the Cue (as long as the Cue’s Track is enabled), and a CC with value 0 when the last player that had been inside the Cue moves back out of it, or the Track is disabled.
- Custom
-
When this option is chosen, you can send any kind of message you want when the Cue is entered and/or exited, by writing code as described in the Expressions section. This gives you the most flexibility because in addition to MIDI messages, you can send arbitrary UDP packets, HTTP requests, or whatever you might need. The expression editors for the Entered Expression and Exited Expression are accessed through the cue context menu.
If you choose
Customand have not yet written a Entered expression, the expression editor will be opened to let you do that. You can also open that editor using the cue context menu.
Entered Note/Controller Spinner
Found immediately to the right of the Entered Message Menu (unless
None is chosen as the Message type), this field lets you set the MIDI
note number used for Note-based entered and exited messages, or the
controller number used for Control Change-based entered and exited
messages. The value is also available to your Cue expressions if they
want to use it.
Started Status
Below the Entered Status indicator there is an Started Status indicator. Like the Entered Status indicator, it has two parts. The outer ring indicates whether the Cue’s Track is currently enabled (a green circle) or disabled (a red circle with a slash). If any player is currently playing inside the Cue, there is a filled circle inside the enabled indicator ring:
| State | Indicator |
|---|---|
Disabled, Not Started |
|
Enabled, Not Started |
|
Disabled, Started |
|
Enabled, Started |
|
Started On-Beat Message Menu
The Started On-Beat Message Menu determines what kind of MIDI message is sent when the first player begins playing the Cue, as long as it does so from the very first beat of the Cue (and as long as the Cue’s Track is enabled), or when the last player that had been playing inside the cue moves out of it or the Track becomes disabled, if it was started on its first beat.
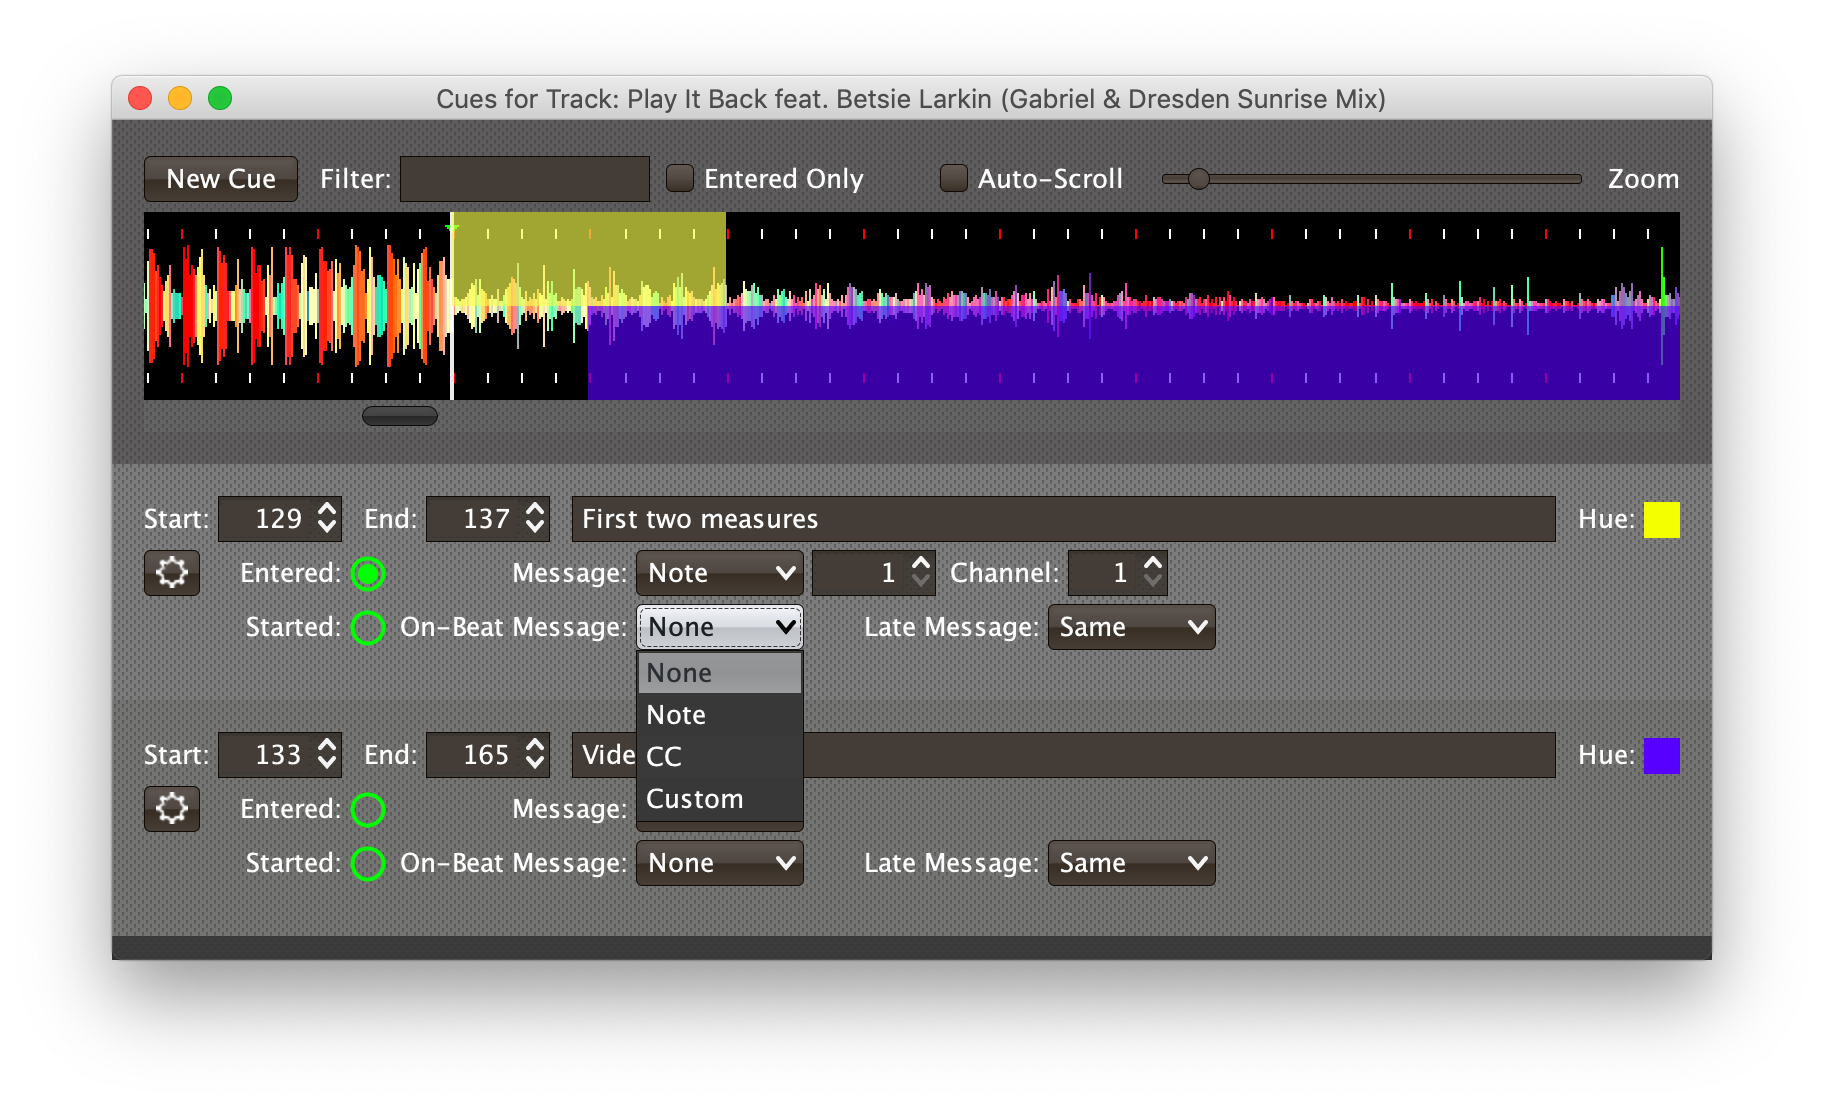
- None
-
With this setting, which is the default, nothing is sent when the Cue starts on its first beat or ends after having started that way.[1] When
Noneis chosen, there are no interface elements visible to configure the message. They will appear once you choose a message type to send. - Note
-
With this setting, the Show sends a Note On message, with velocity 127 and the note number shown to the right of the menu, when the first player starts playing the Cue from its first beat (as long as the Cue’s Track is enabled), and a Note Off message when the last player that had been playing the Cue stops doing so, or the Track is disabled (as long as the Cue started playing from its first beat).

The Channel on which the Started On-Beat/Ended messages are sent is configured just to the right of the note selector.
- CC
-
With this setting, the Show sends a Control Change message, with value 127 and the note number shown to the right of the menu, when the first player starts playing the Cue from its first beat (as long as the Cue’s Track is enabled), and a CC with value 0 when the last player that had been playing the Cue stops doing so, or the Track is disabled (as long as the Cue started playing from its first beat).
- Custom
-
When this option is chosen, you can send any kind of message you want when the Cue is started on-beat and/or ended from that state, by writing code as described in the Expressions section. This gives you the most flexibility because in addition to MIDI messages, you can send arbitrary UDP packets, HTTP requests, or whatever you might need. The expression editors for the Started Expression and Ended Expression are accessed through the cue context menu.
If you choose
Customand have not yet written a Started On-Beat expression, the expression editor will be opened to let you do that. You can also open that editor using the cue context menu.
Started On-Beat Note/Controller Spinner
Found immediately to the right of the Started On-Beat Message
Menu (unless None is chosen as the Message type), this field lets
you set the MIDI note number used for Note-based started on-beat and
ended messages, or the controller number used for Control Change-based
started on-beat and ended messages. The value is also available to
your Cue expressions if they want to use it.
Started Late Message Menu
The Started Late Message Menu determines what kind of MIDI message is sent when the first player begins playing the Cue, as long as it missed playing the very first beat of the Cue (and as long as the Cue’s Track is enabled), or when the last player that had been playing inside the cue moves out of it or the Track becomes disabled, if it was started somewhere after its first beat.
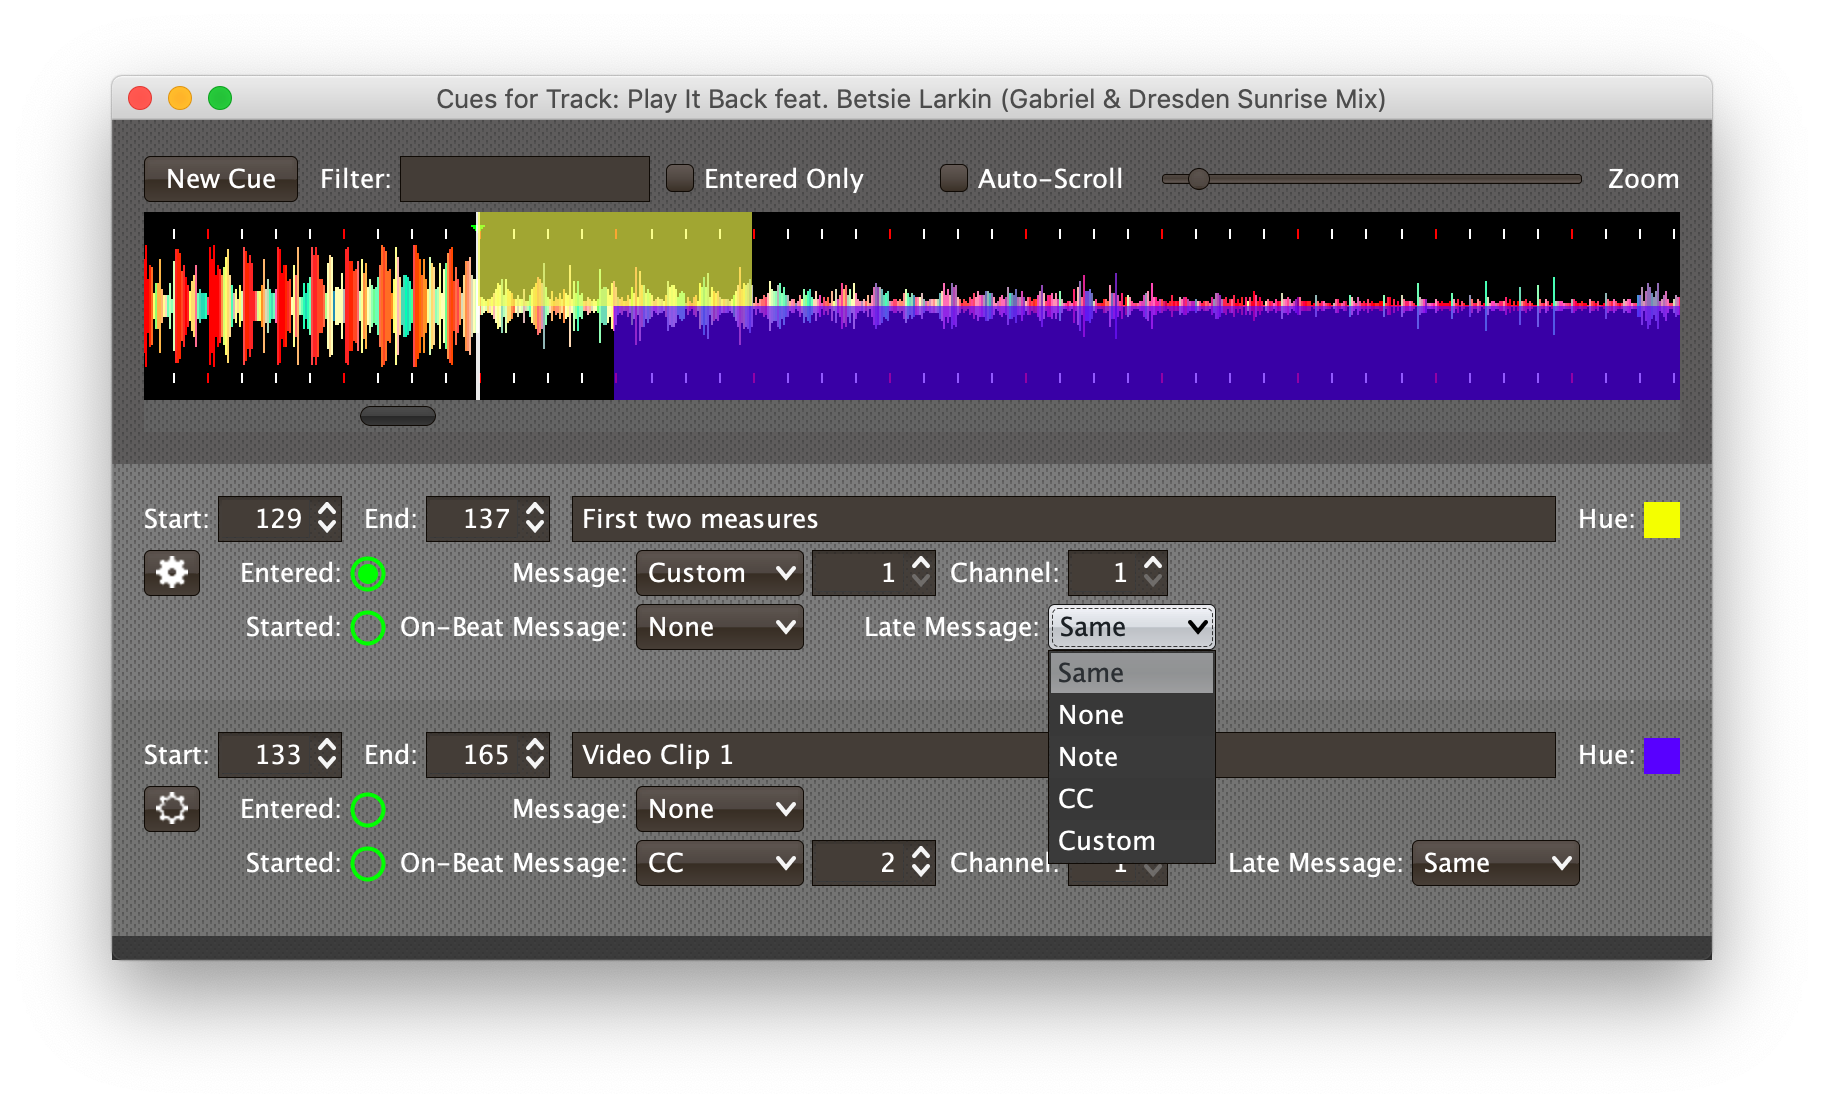
- Same
-
With this setting, which is the default, cues which start late will be treated as if they had started playing with the initial beat of the cue, so the settings of the Started On-Beat Message Menu will be used, and there are no separate interface elements visible to configure the Late Message.
Most of the time you will want to leave the Late Message set to
Same. Unless you have a memory point or hot cue positioned precisely at the beat, the only way you can be certain that the cue will be detected as starting on-beat is if you are playing into it. And unless it is a long cue, and you expect to have loops or memory points that jump to later beats inside it that you want to treat differently, the difference between starting on-beat and starting just after the beat is not generally visible in the results triggered in the system you are controlling via Beat Link Trigger. - None
-
With this setting nothing is sent when the Cue starts after its first beat or ends after having started that way.[1] When
Noneis chosen, there are no interface elements visible to configure the message. They will appear once you choose a specific message type to send. - Note
-
With this setting, the Show sends a Note On message, with velocity 127 and the note number shown to the right of the menu, when the first player starts playing the Cue from somewhere past its first beat (as long as the Cue’s Track is enabled), and a Note Off message when the last player that had been playing the Cue stops doing so, or the Track is disabled (as long as the Cue started playing after its first beat).

The Channel on which the Started Late/Ended messages are sent is configured just to the right of the note selector.
- CC
-
With this setting, the Show sends a Control Change message, with value 127 and the note number shown to the right of the menu, when the first player starts playing the Cue from somewhere past its first beat (as long as the Cue’s Track is enabled), and a CC with value 0 when the last player that had been playing the Cue stops doing so, or the Track is disabled (as long as the Cue started playing after its first beat).
- Custom
-
When this option is chosen, you can send any kind of message you want when the Cue is started late and/or ended from that state, by writing code as described in the Expressions section. This gives you the most flexibility because in addition to MIDI messages, you can send arbitrary UDP packets, HTTP requests, or whatever you might need. The expression editors for the Started Expression and Ended Expression are accessed through the cue context menu.
If you choose
Customand have not yet written a Started Late expression, the expression editor will be opened to let you do that. You can also open that editor using the cue context menu.
Started Late Note/Controller Spinner
Found immediately to the right of the Started Late Message Menu
(unless Same or None is chosen as the Message type), this field
lets you set the MIDI note number used for Note-based started late and
ended messages, or the controller number used for Control Change-based
started late and ended messages. The value is also available to your
Cue expressions if they want to use it.
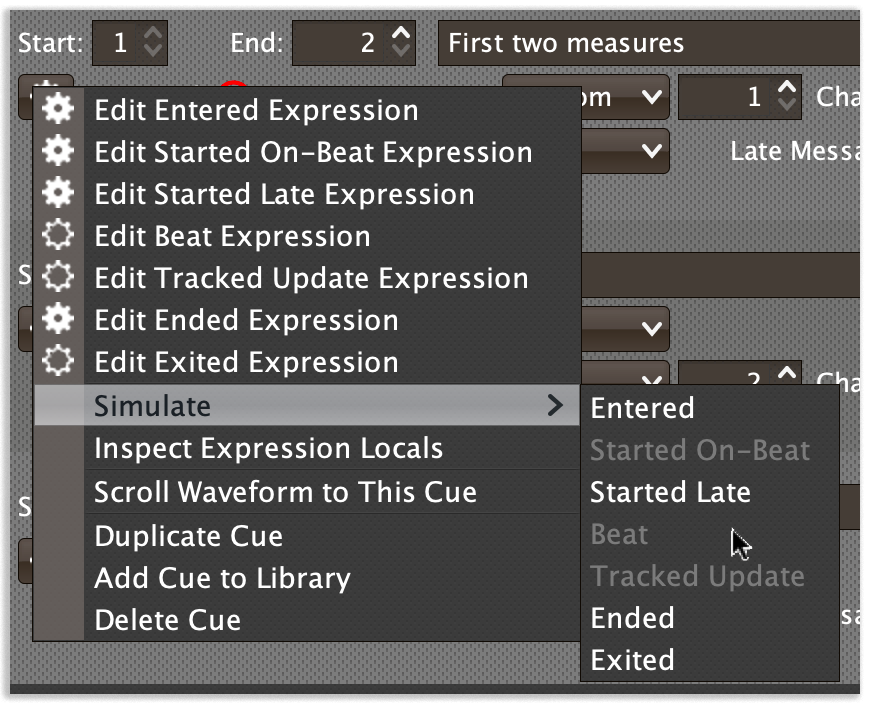
Cue Context Menu
Each Cue row has a context menu attached to it, which can be accessed by right-clicking (or control-clicking) anywhere on the row’s background, but you can also open the context menu with a regular mouse click on the button with a gear icon in it. Most of the menu is devoted to editing various expressions to customize the Cue, as described in the Expressions section. The gear icon next to an expression will be filled in if that expression has a value, and the gear in the button will be filled in if any expression associated with the Cue has a value.

The menu starts with the expression-related options, allowing you to open editors to create or edit Clojure code that runs at well-defined moments to customize the behavior of the Cue. These are followed by the Simulate submenu, which allows you to test your MIDI mappings and custom expressions as described in the next section.
The Inspect Expression Locals option allows you to explore any values that have been set up by expressions in any Cue or the Track itself to re-use or share with each other. See Inspecting Locals and Globals for more details.
Choosing Scroll Waveform to This Cue does just what it sounds like, ensuring that the cue is visible in the waveform display at the top of the window. You can zoom the waveform out if you want to be able to see more cues and context, or in if you want to see more detail. See Navigating Cues below for more ways to find what you are looking for.
The Duplicate Cue option makes a copy of the chosen Cue, appending the word “Copy” (and possibly a number) to its name to keep it unique. You can use this if you need to create several cues that have common elements.
The Add Cue to Library option adds the cue contents to the show cue library, making it easy to create other cues in any track which send the same messages. See The Cue Library for more details.
Finally, the Delete Cue option does just what it sounds like, after confirming that you want to discard any expressions and settings you have configured for that Cue.
| In addition to accessing the context menu from the cue row, you can bring it up by right-clicking or control-clicking on the cue in the waveform at the top of the window. |
Simulating Cue Events
The Simulate submenu allows you to pretend that an Entered, Exited, Started, Ended, Beat or Tracked Update event has occurred, and send the corresponding MIDI messages and/or run the custom Expressions you have configured for those situations.
|
This can allow you to set up MIDI mappings in other software, like Ableton Live, that requires actual MIDI messages in order to learn them, even when you are working in offline mode because you don’t currently have access to your CDJs. |
The corresponding option will be disabled if there is no MIDI message or Expression configured for that event.
Navigating Cues
Beat Link Trigger tries to make it easy for you to find the cue you want to work with. Here are some of the things that it does automatically, and others you will likely find helpful to try when working with a large number of cues.
-
The list of cues is kept sorted by their start and end beats (and then their names, if you have multiple cues starting and ending on the same beat).
-
You can type text in the
Filterbox at the top of the window to narrow the display to only cues whose name contain the text you typed. -
You can click the
Entered Onlycheck box to only show the cues that currently have players posititoned in them. This can be handy when you are running a show. -
When you create a new Cue, the list of cues is automatically scrolled to ensure the new cue is visible. (If your new cue is hidden by the
FilterorEntered Onlysettings, Beat Link Trigger will pop up a dialog to remind you why you are not seeing it.) If needed, the track waveform at the top of the window is also scrolled to show the new cue. -
You can also scroll a Cue’s configuration row into view by clicking on the cue in the waveform display at the top of the window.
-
Finally, as noted in the Context Menu section above, you can use a Cue’s context menu to scroll the waveform to reveal the cue within the track beat grid.
The Cue Library
When building a show with a group of tracks, there will often be a shared set of lighting looks or presets that will be useful in more than one track. Once you have set up a cue that sends the proper messages to achieve that look, you can make it available for reuse in any track by adding it to the Cue Library. To do that, choose Add Cue to Library from the Cue context menu.
As soon as you have a cue in the show’s library, a Library ▾ button appears next to the New Cue button in any Cue Editor windows you have open for tracks in the show. Clicking it gives you a menu of all the cues that you have added to the show’s library, and choosing one creates a new cue (in the same location that the New Cue button would), based on the template cue that you put in the library:
| The names that appear in the Cue Library are the names (comments) of the cues that have been added to it, so it makes sense to make sure your cue is well named before adding it to the library. |
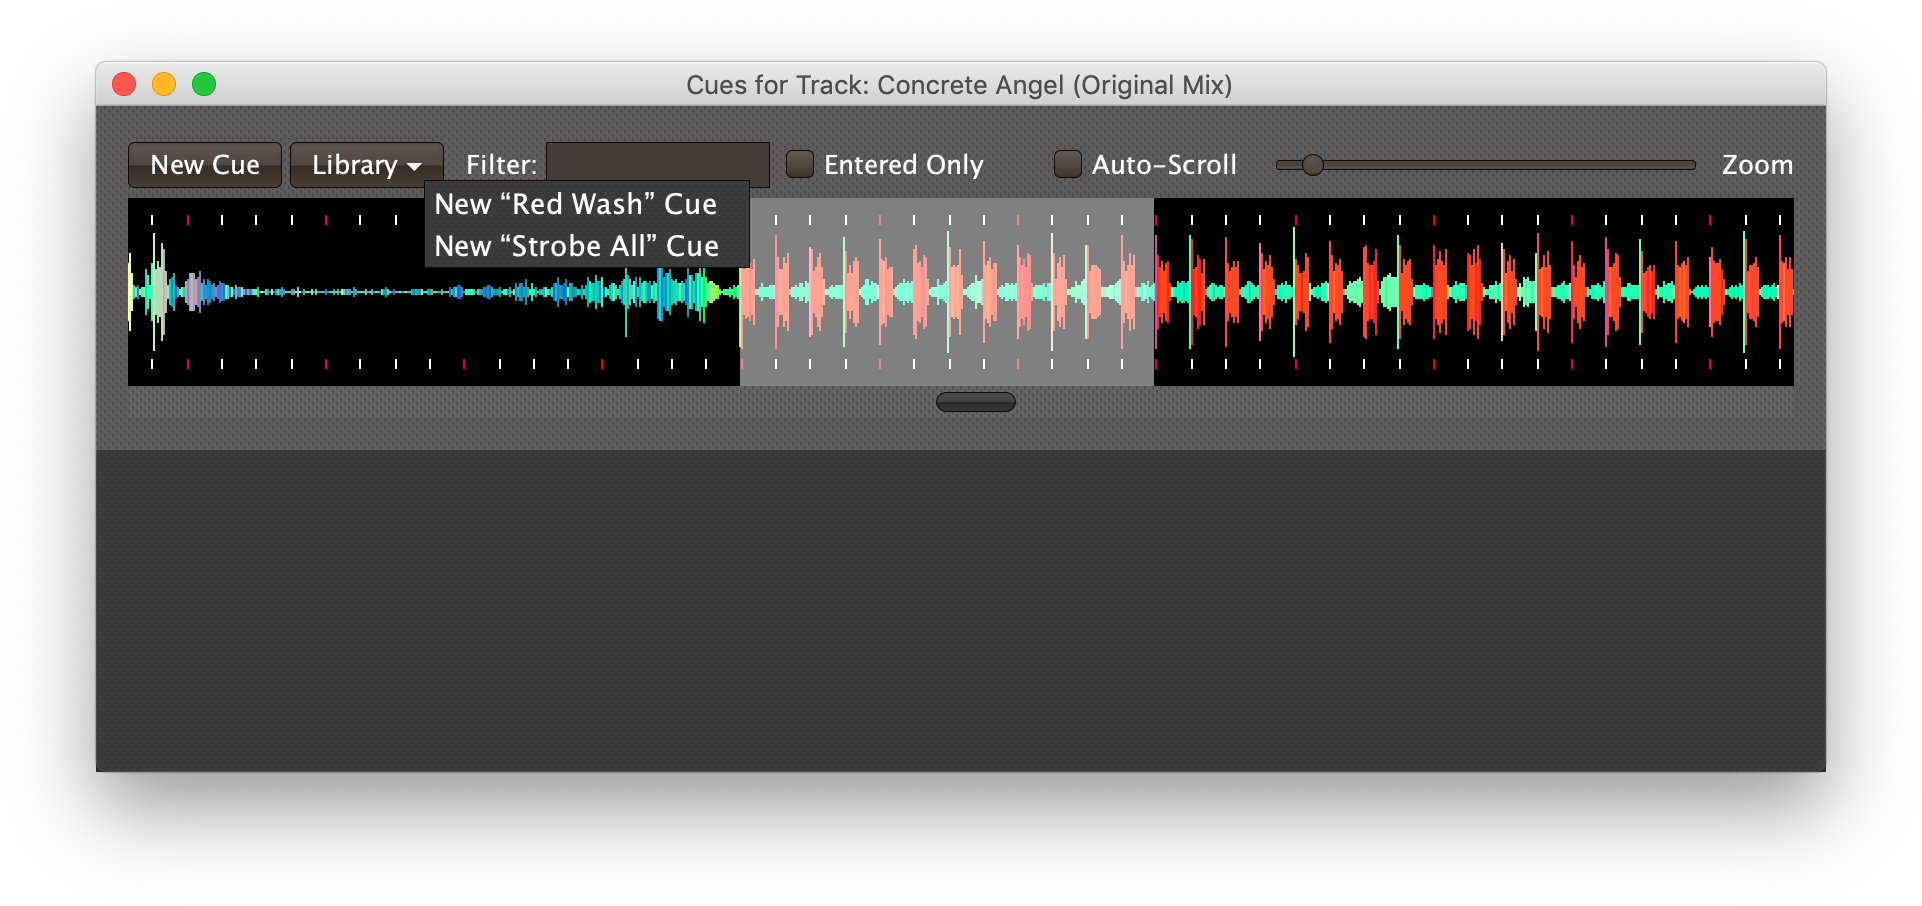
Another way to choose a cue template from the library is to right-click (or control-click) anywhere outside an existing cue in the waveform at the top of the Cue Editor window:
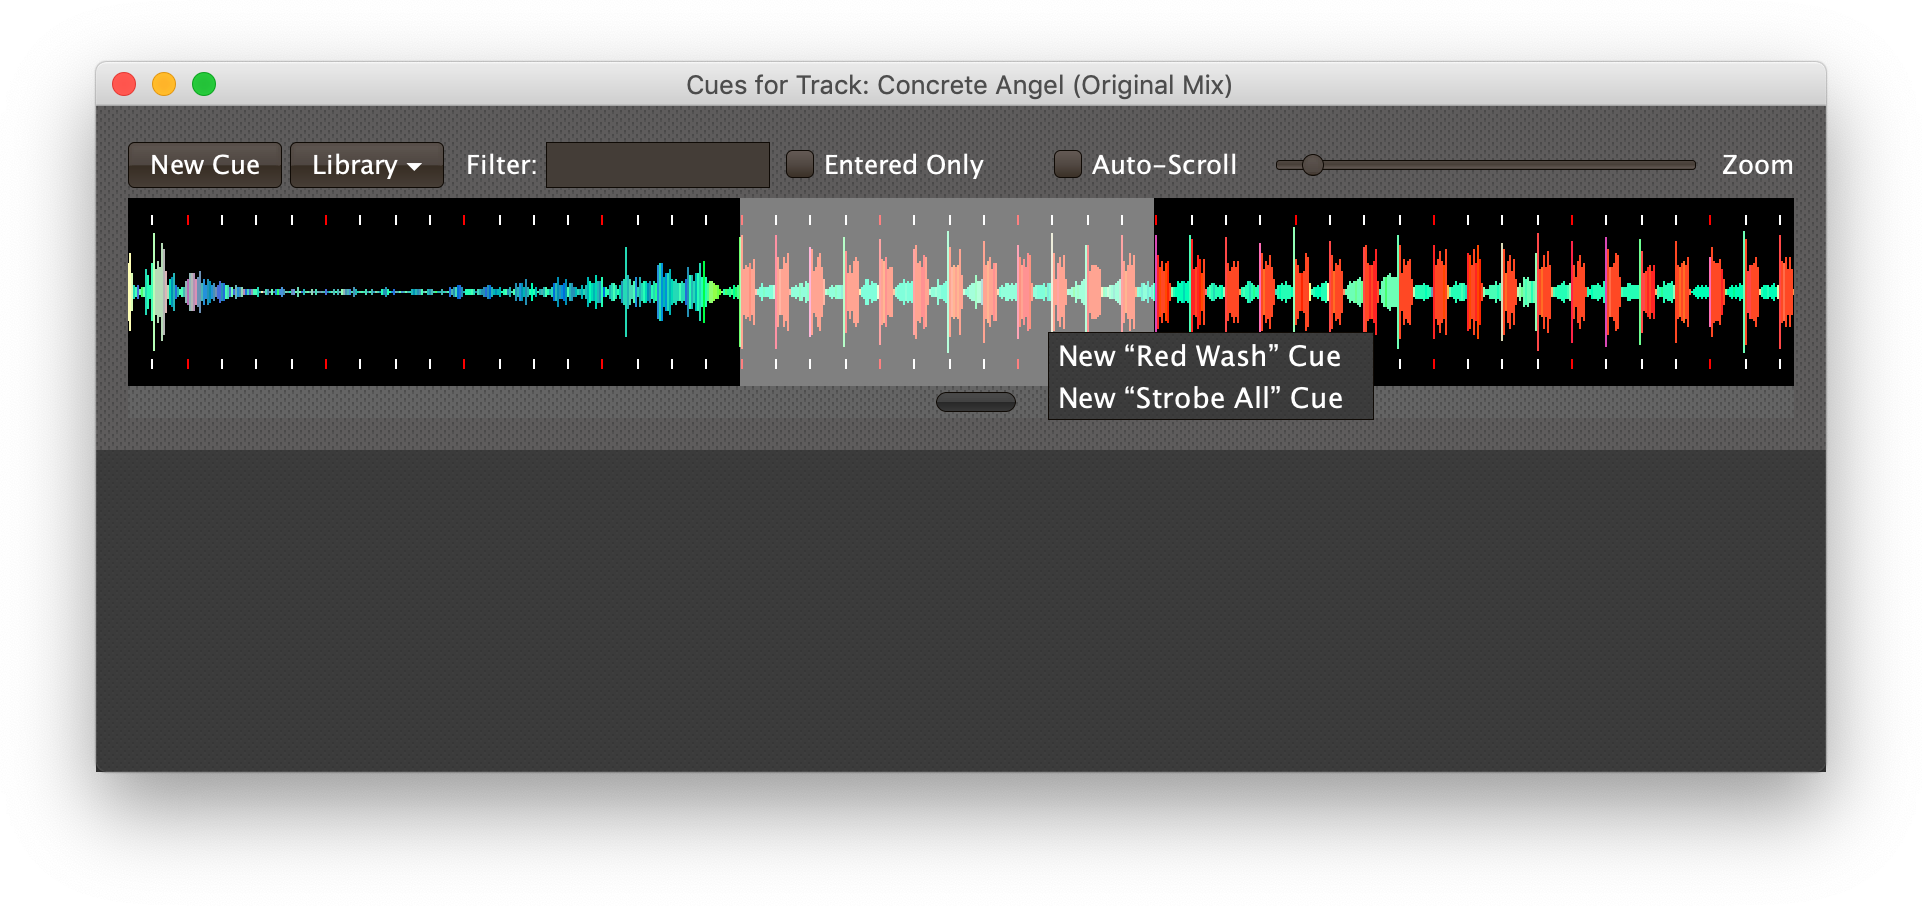
Using either of those approaches to choose New “Red Wash” Cue in the menu would result in the creation of a cue based on that template in the selected region of the track:
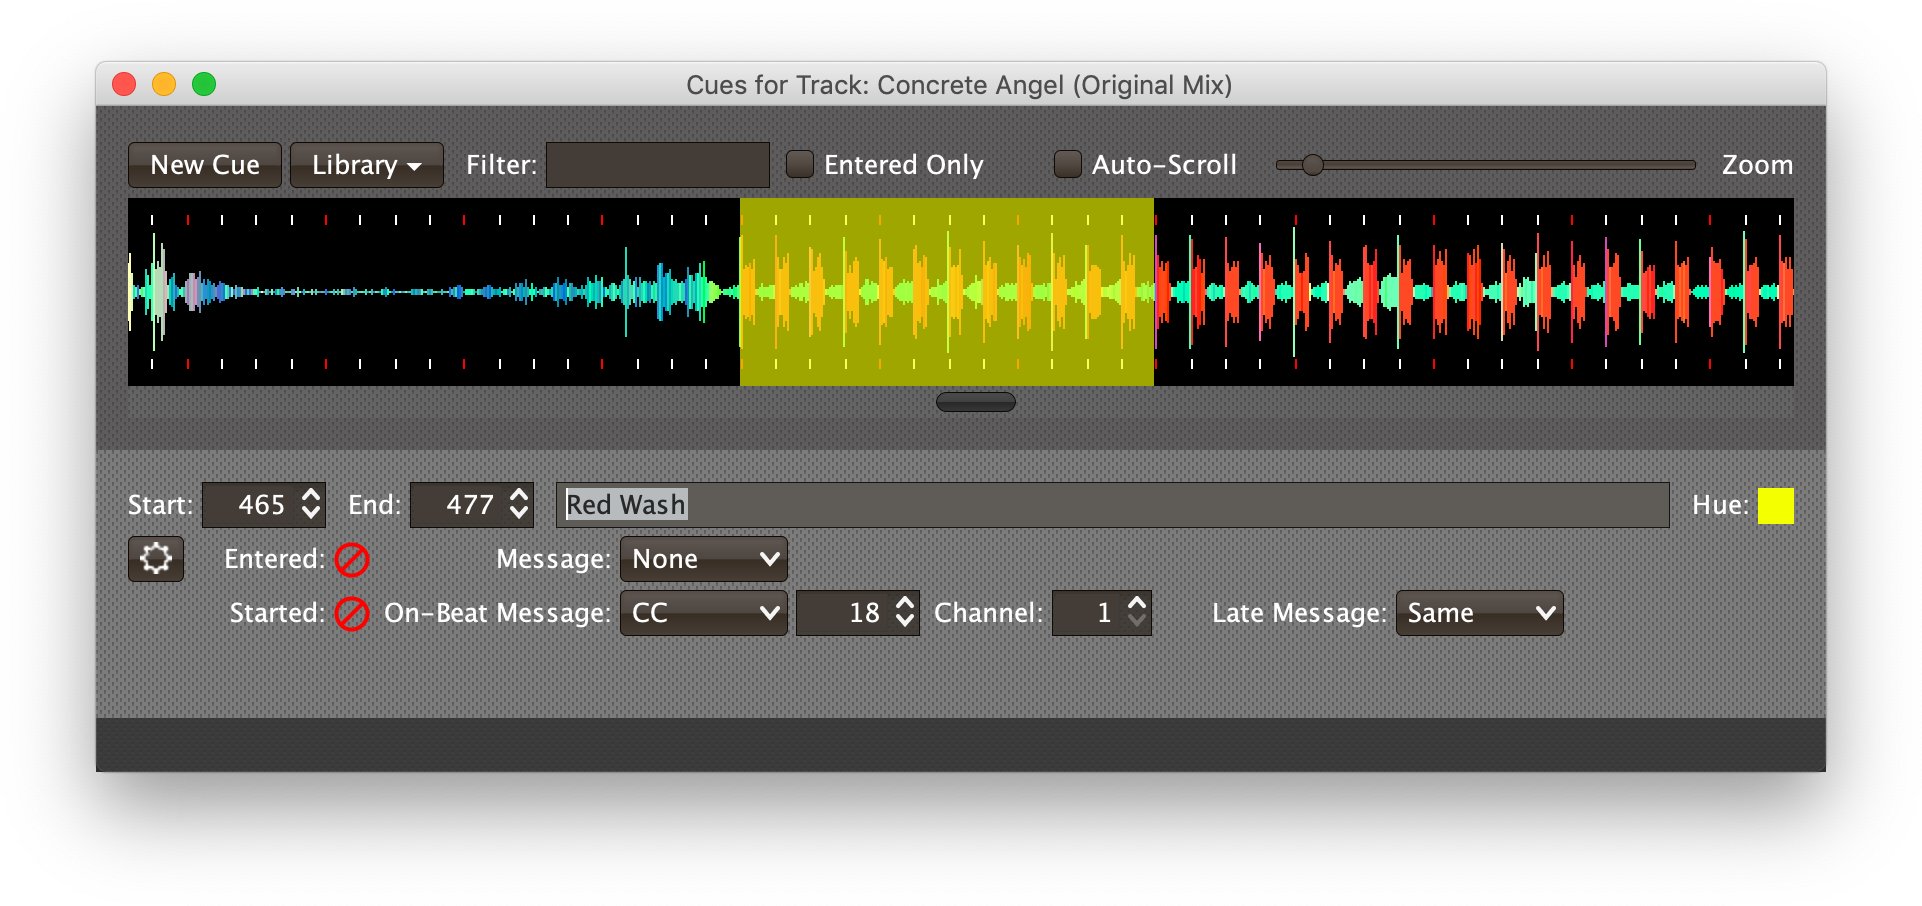
The new cue will share any of the MIDI message configurations and Expressions that were present in the cue that was added to the show library.
Updating the Library
If you already have a cue in the library, you can update its content by changing the cue that it was based on, and then using the cue context menu again. When there is already a cue with a particular name in the library, instead of seeing Add Cue to Library, the option will read Update Cue in Library. Choosing that will replace the cue template with the MIDI and Expression settings of the current cue. (This will not change any cues that you already created based on the template, but it will change any future cues you create from it.)
If the current cue has exactly the same content as the cue of the same name in the library (ignoring incidental details like its position in the track or displayed hue), the menu option will read Remove Cue from Library, and choosing it will do just that.
License
![]() Copyright © 2016–2019 Deep Symmetry, LLC
Copyright © 2016–2019 Deep Symmetry, LLC
Distributed under the Eclipse Public License 1.0, the same as Clojure. By using this software in any fashion, you are agreeing to be bound by the terms of this license. You must not remove this notice, or any other, from this software. A copy of the license can be found in LICENSE within this project.
Library Licenses
Remote Tea, used for communicating with the NFSv2 servers on players, is licensed under the GNU Library General Public License, version 2.
The Kaitai Struct Java runtime, used for parsing rekordbox exports and media analysis files, is licensed under the MIT License.