Editing Show Tracks
Tracks are kept sorted alpahabetically by title and artist in the Show
window (and remember that you can narrow the display to include only
those matching a string you type in the Filter field). If there is
album art available, it is shown at the top left. To the right of that
is a column that shows the track title, artist, a comment field, and
information about which players have the track loaded, and which are
currently playing it.
Track Row Elements

Comment Field
The comment field starts out holding whatever comment the DJ entered
about the track in rekordbox, but you are free to edit it however you
like, to help you remember things about the track or to make it easy
to find using the Filter field.
Waveform Preview
The waveform preview section shows the overall intensity and dominant frequencies of the track from beginning to end. As in the Player Status window, you can see the locations of hot cues and memory points in the waveform preview, and if any players have the track loaded, you can see their playback position markers. (Unlike in the Player Status window, you may see more than one player position on a single track, because the same track might be loaded in more than one player.) The tick marks along the bottom each represent one minute of playback time.
Along the bottom of the track row you find the controls that let you configure how you want the Show to respond to the track.
Context Menu Button
This allows you to access the track Context Menu with a regular mouse click. The gear inside the button will be filled in if there have been any Cues or Expressions added to the Track, and hollow otherwise. The contents of the menu itself are described below.
MIDI Output Menu
The MIDI Output Menu lets you choose the MIDI device to which the Track will send messages when you configure it to send MIDI messages for particular events. It will show all MIDI outputs currently available on your system.
The chosen MIDI output will be used for all messages that the Track is configured to send, including those belonging to any Cues created in the Track. But each Track can have its own MIDI output, in case you have a large show with many cues.
| As with the MIDI Output Menu in the Triggers window, if a MIDI Output is chosen which is no longer available on the system, it will remain in that Track’s menu, but the Enabled section of the Track will be replaced with the message “Not found.” Once the output reappears, or a different output is chosen, the Track will become operational again. |
Loaded Status
To the right of the MIDI Output menu there is a Loaded Status indicator which has two parts. The outer ring indicates whether the Track is currently enabled (a green circle) or disabled (a red circle with a slash). If any player currently has the Track loaded, there is a filled circle inside the enabled indicator ring:
| State | Indicator |
|---|---|
Disabled, Not Loaded |
|
Enabled, Not Loaded |
|
Disabled, Loaded |
|
Enabled, Loaded |
|


Tracks are recognized by their signature, a cryptographic hash
calculated from their title, artist, duration, waveform, and beat
grid. This is taken care of by the SignatureFinder class in Beat
Link, which allows them to be efficiently detected and indexed within
the Show, and means that even if you have a variety of remixes of the
same track, they should all be recognized correctly.
|
Loaded Message Menu
The Loaded Message Menu determines what kind of MIDI message is sent when the Track first becomes loaded by any player (as long as the Track is Enabled, as described below), or when the track is unloaded by the last player that had loaded it.
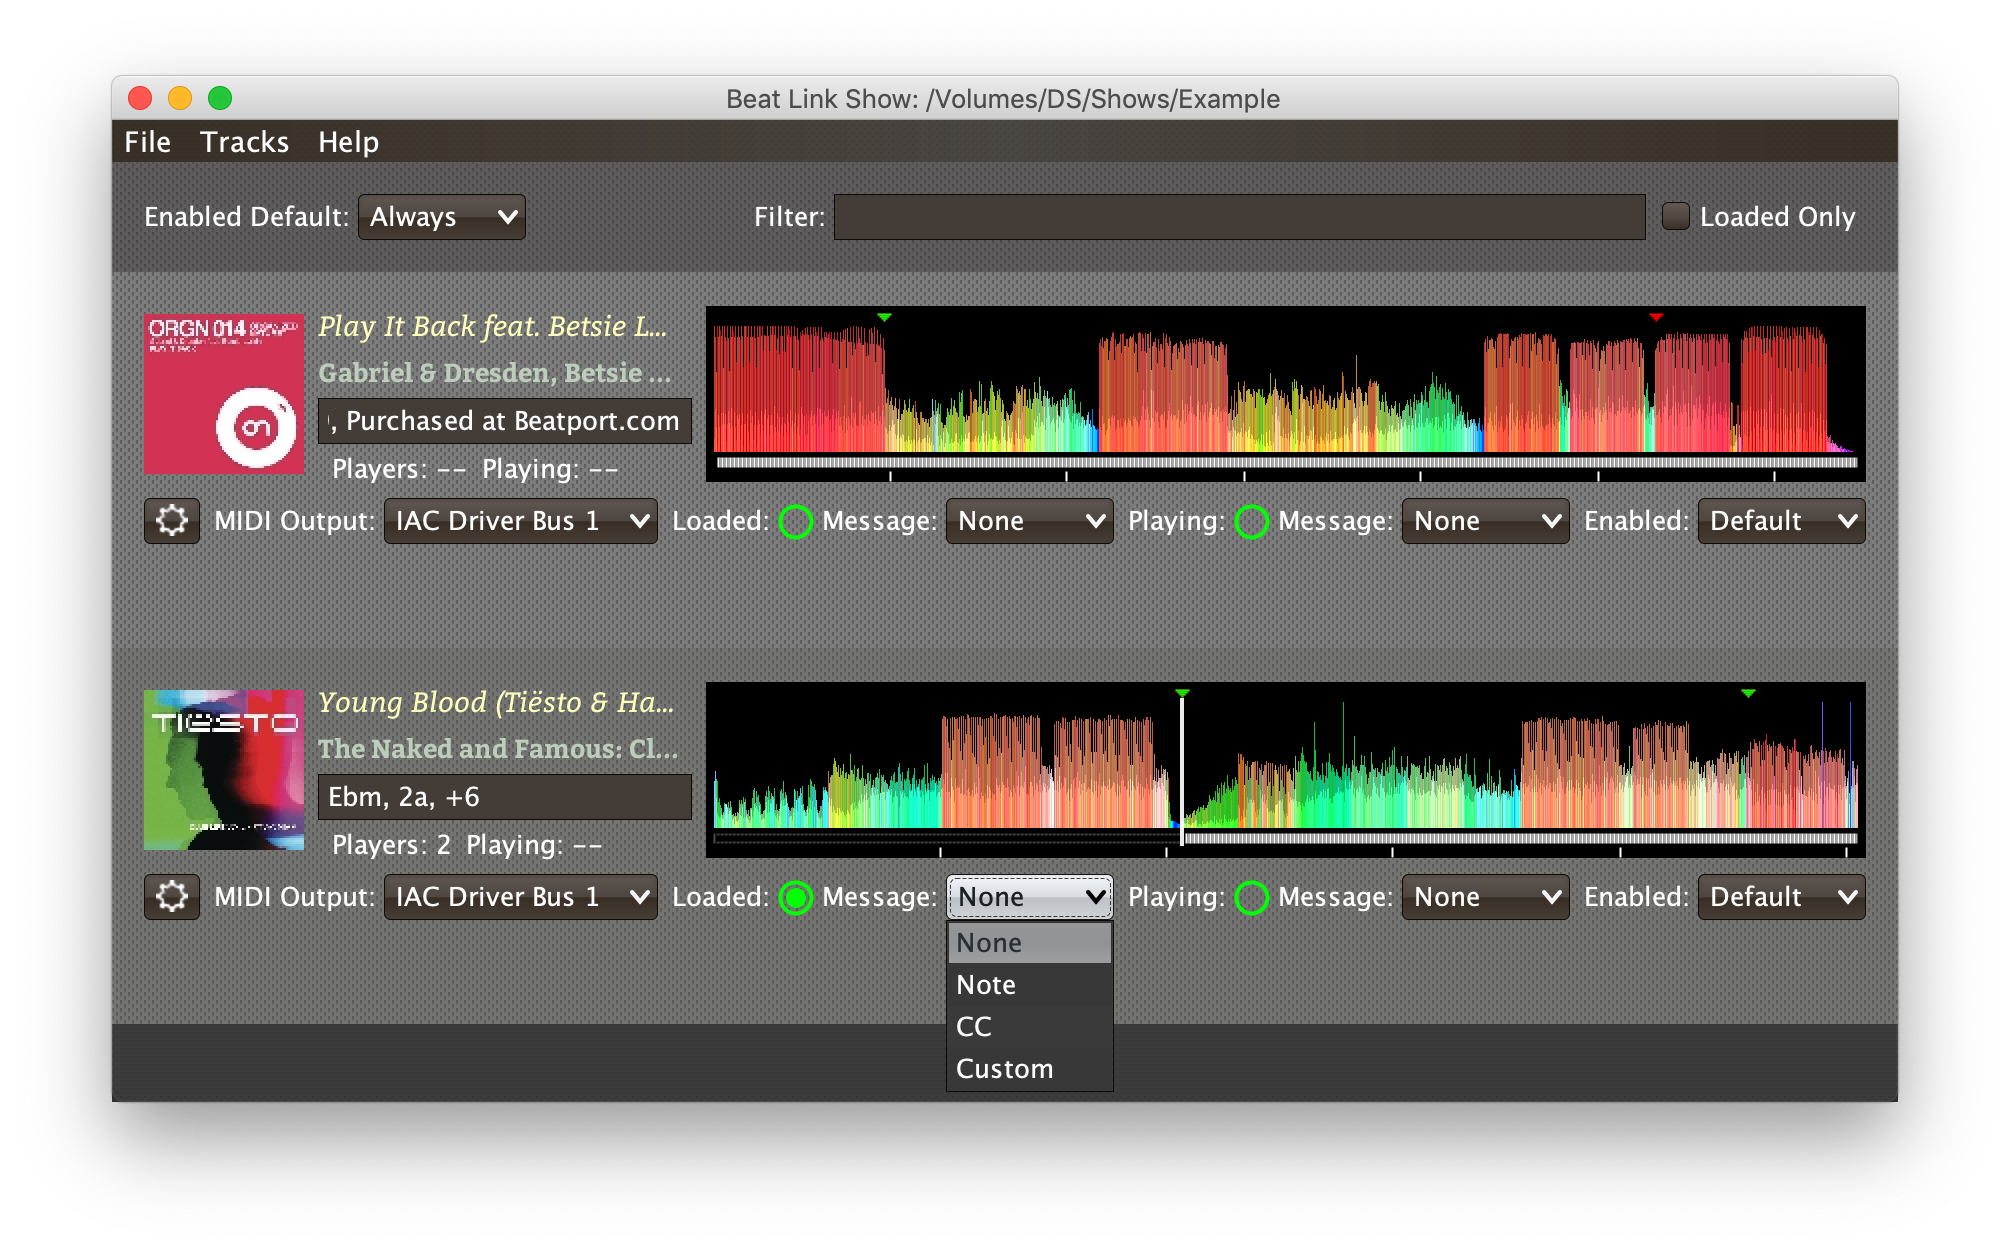
- None
-
With this setting, which is the default, nothing is sent when the Track loads or unloads.[1] When
Noneis chosen, there are no interface elements visible to configure the event. They will appear once you choose an event type to send. - Note
-
With this setting, the Show sends a Note On message, with velocity 127 and the note number shown to the right of the menu, when the Track gets loaded onto the first player (as long as the Track is enabled), and a Note Off message when the last player unloads the Track, or the Track is disabled.

The Channel on which the Loaded/Unloaded messages are sent is configured just to the right of the note selector.
- CC
-
With this setting, the Show sends a Control Change message, with value 127 and the controller number shown to the right of the menu, when the the Track is loaded (as long as it is enabled), and sends a CC with value 0 when the Track is unloaded or becomes disabled.
- Custom
-
When this option is chosen, you can send any kind of message you want when the Track loads and/or unloads, by writing code as described in the Expressions section. This gives you the most flexibility because in addition to MIDI messages, you can send arbitrary UDP packets, HTTP requests, or whatever you might need. The expression editors for the Loaded Expression and Unloaded Expression are accessed through the track context menu.
If you choose
Customand have not yet written a Loaded expression, the expression editor will be opened to let you do that. You can also open that editor using the track context menu.
Loaded Note/Controller Spinner
Found immediately to the right of the Loaded Message Menu (unless
None is chosen as the Message type), this field lets you set the MIDI
note number used for Note-based loaded and unloaded messages, or the
controller number used for Control Change-based loaded and unloaded
messages. The value is also available to your Track expressions if they
want to use it.
Playing Status
To the right of the Loaded Message section there is a Playing Status indicator. As with the Loaded Status indicator, it has an outer ring which shows whether the Track is currently enabled (a green circle) or disabled (a red circle with a slash). If any player is currently playing the Track, there is a filled circle inside the enabled indicator ring:
| State | Indicator |
|---|---|
Disabled, Not Playing |
|
Enabled, Not Playing |
|
Disabled, Playing |
|
Enabled, Playing |
|
| Because of a limitation of the DJ Link protocol, if a player is positioned right before a beat, and the DJ uses Cue Play (holds down the Cue button to preview the track), Beat Link Trigger might briefly think the track is playing if the player sends a beat packet before any status packets reporting the fact that it is in cue preview mode. As soon as a status packet is received, the track will be recognized as not actually playing, and further beat packets will be ignored. Unfortunately, the first beat packet can cause your Playing message (and Cues' Started messages) to be sent prematurely, followed within a fraction of a second by Stopped messages. |
Playing Message Menu
The Playing Message Menu determines what kind of MIDI message is sent when the first player starts playing the Track (as long as the Track is Enabled, as described below), or when the last player that was playing the track stops.

- None
-
With this setting, which is the default, nothing is sent when the Track starts or stops playing.[1] When
Noneis chosen, there are no interface elements visible to configure the event. They will appear once you choose an event type to send, as shown in the screen shot above. - Note
-
With this setting, the Show sends a Note On message, with velocity 127 and the note number shown to the right of the menu, when some player starts playing the Track (as long as the Track is enabled), and a Note Off message when the last player playing it stops, or the Track is disabled.
The Channel on which the Started/Stopped messages are sent is configured just to the right of the note selector.
- CC
-
With this setting, the Show sends a Control Change message, with value 127 and the controller number shown to the right of the menu, when the the Track starts playing (as long as it is enabled), and sends a CC with value 0 when the Track is stopped or becomes disabled.
- Custom
-
When this option is chosen, you can send any kind of message you want when the Track starts and/or stops, by writing code as described in the Expressions section. This gives you the most flexibility because in addition to MIDI messages, you can send arbitrary UDP packets, HTTP requests, or whatever you might need.
If you choose
Customand have not yet written a Playing expression, the expression editor will be opened to let you do that. You can also open that editor using the track context menu.
Playing Note/Controller Spinner
Found immediately to the right of the Playing Message Menu (unless
None is chosen as the Message type), this field lets you set the MIDI
note number used for Note-based started and stopped messages, or the
controller number used for Control Change-based started and stopped
messages. The value is also available to your Track expressions if they
want to use it.
Enabled Menu
The Enabled menu controls whether the Show will react to players doing things with the Track.
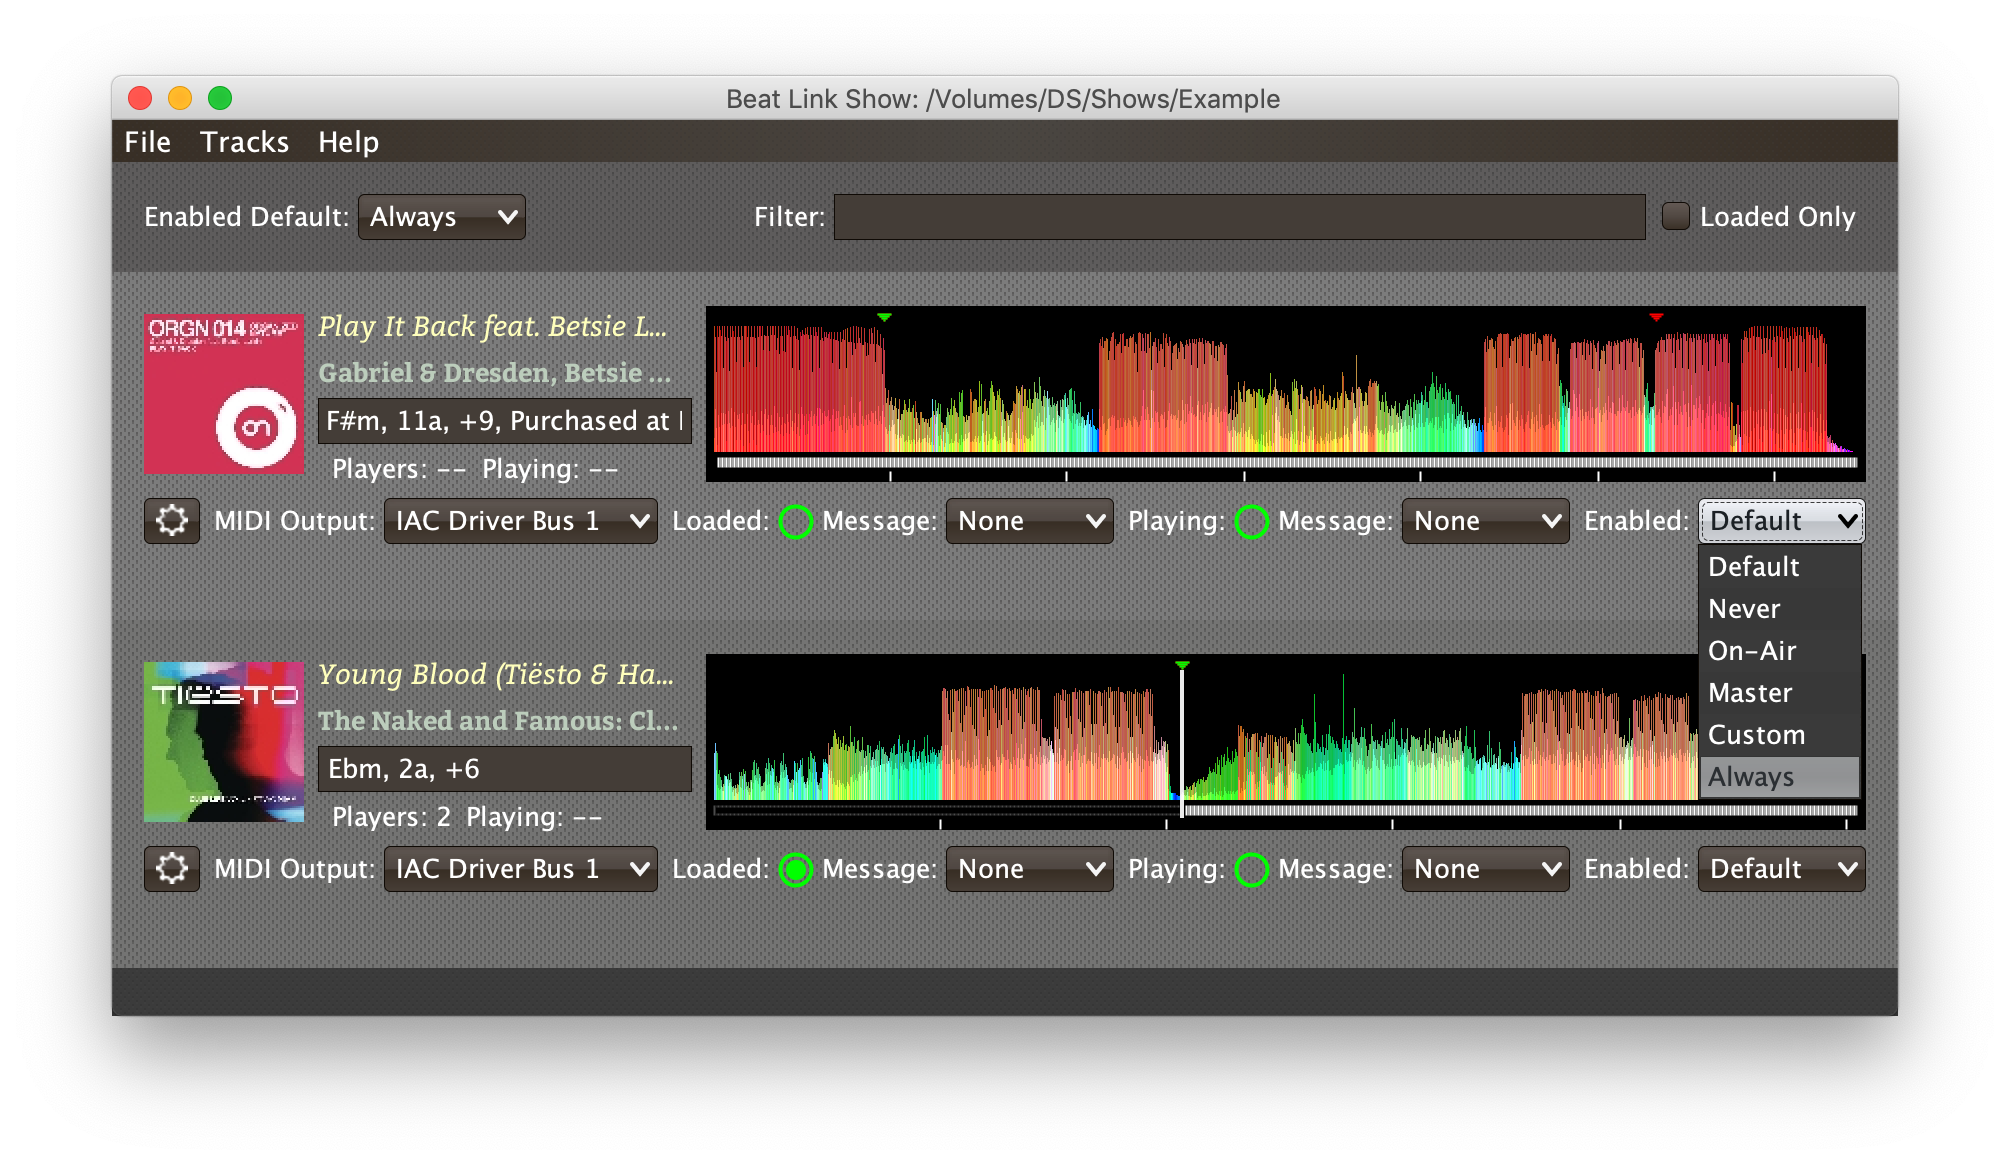
- Default
-
With this setting, which will be used by most Tracks, the Show’s shared Enabled Default menu (at the top of the window) is used. This allows you to enable and disable most or all tracks using a common set of rules, while special tracks that need to be different can still use their own settings. All of the options in this list (except for
Defaultitself) are available in the Enabled Default menu, and have the same meaning there, being used by any Tracks whose own Enabled menu is set toDefault. - Never
-
With this setting, the Track is disabled until you re-enable it.
- On-Air
-
With this setting, the Track is enabled whenever it is loaded by at least one player that reports that it is On the Air. (For that to work, the player must be connected to a Nexus mixer, and must have the feature turned on.)
If you work with a DJ who likes to fade out his tracks to coax the audience into singing along, you might be interested in using the example Custom Enabled Filter Expression rather than this setting. - Master
-
With this setting, the Track is enabled whenever it is loaded by the player that is the current Tempo Master.
- Custom
-
With this setting, the Track is controlled by an Enabled Filter, Clojure code that you write yourself. Whenever a status update is received from any player, your expressions are evaluated. If the last expression in your filter returns a
truevalue, the Track will be enabled. This lets you apply sophisticated logic, like enabling the Track when another track is loaded into a different player, or only during particular times of day. Expressions are further explained in the Expressions section. If you chooseCustomand have not yet written an Enabled Filter expression, the expression editor will be opened to let you do that. You can always open that editor using the Track Context Menu, described in the next section. - Always
-
With this setting, the Track is enabled until you disable it.
Track Context Menu
Each Track row has a context menu attached to it, which can be accessed by right-clicking (or control-clicking) anywhere on the row’s background, but you can also open the context menu with a regular mouse click on the button with a gear icon in it. Most of the menu is devoted to editing various expressions to customize the Track, as described in the Expressions section. The gear icon next to an expression will be filled in if that expression has a value, and the gear in the button will be filled in if any expression associated with the Track has a value, or if there are any Cues in the Track.

The first option in the menu, Edit Track Cues, opens the Cues window for the Track, which is how you can create Cues that respond to particular beat ranges in the Track, as discussed in that section.
Once you have attached any expressions to your track, a View Expressions in Report option will appear below Edit Track Cues. Selecting it tells your system browser to open the Expressions Report and scroll it to the section that holds this track’s expressions.
Below that come the expression-specific options, allowing you to open editors to create or edit Clojure code that runs at well-defined moments to customize the behavior of the Track. These are followed by the Simulate submenu, which allows you to test your MIDI mappings and custom expressions as described in the next section.
The Inspect Expression Locals option allows you to explore any values that have been set up by expressions in the Track to re-use or share with each other. See Inspecting Locals and Globals for more details.
As mentioned at the end of the Adding Tracks section, if you have more than one Show window open, and you bring up the context menu for a Track that does not exist in one of the other Shows, you will see an option to copy it to that Show.
Finally, the Delete Track option does just what it sounds like, after confirming that you want to discard any expressions and Cues you have set up for that Track.
Simulating Track Events
The Simulate submenu allows you to pretend that a Loaded, Unloaded, Playing, Stopped, Beat or Tracked Update event has occurred, and send the corresponding MIDI messages and/or run the custom Expressions you have configured for those situations.
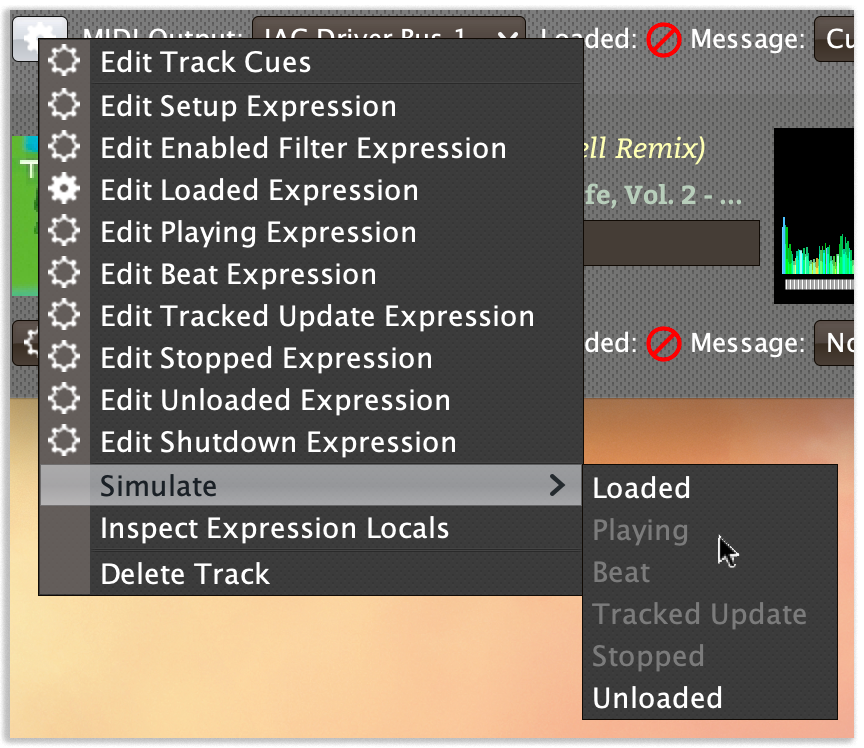
|
This can allow you to set up MIDI mappings in other software, like Ableton Live, that requires actual MIDI messages in order to learn them, even when you are working in offline mode because you don’t currently have access to your CDJs. |
The corresponding option will be disabled if there is no MIDI message or Expression configured for that event.